HOW TO
Set up related tables in ArcGIS Pro for use in ArcGIS Field Maps
Summary
Creating a related table in ArcGIS Pro requires unique values to represent the relationship between the primary key and foreign key. It is recommended to use the GlobalID field of the layer so the primary key of the relationship is unique when establishing a connection between a feature class and a table.
The most convenient way to achieve this is through Global IDs and globally unique identifiers (GUIDs). Both data types store registry-style strings comprising 36 characters enclosed in curly brackets, for example, {90A942E1-BC7C-4F1E-94D5-AACAAD24F08C}.
One of the differences between Global IDs and GUIDs is ArcGIS actively maintains Global ID fields (that is, when a new feature is created, a GUID value is assigned), whereas GUID fields are left blank and the user must maintain these fields, as noted in the article: Prepare to create a relationship class
To use related tables in a relationship class, the Global IDs in the origin table can be used as the primary key, and the GUIDs in the destination table can be used as the foreign key. Using this method, ArcGIS automatically copies the primary key (Global ID) into the foreign key (GUID) field.
The following workflow demonstrates how to set up standalone tables for use in ArcGIS Field Maps by adding Global IDs in ArcGIS Pro. In this example, a relationship is created between the feature class, Schools_all, and the standalone table, LightRailStopsTable.
Procedure
- Set up the feature class with the desired fields. Refer to ArcGIS Pro: Open the map and add your data.
- Set up the standalone table with the desired fields. Refer to ArcGIS Pro: Add and open a stand-alone or attribute table from a map or scene.
- Add the Global ID field to the attribute table of the feature class using the Add Global IDs tool.
- In the Contents pane, right-click the feature class and click Attribute Table. This opens the attribute table view.
- On the top ribbon, click the Analysis tab > Tools.
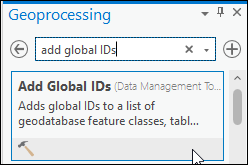
- In the Geoprocessing pane, search for and select Add Global IDs (Data Management Tools).
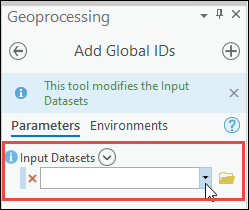
- In the Add Global IDs pane, for Input Datasets, click the drop-down arrow or Browse, select the feature class, and click Run. The Global ID field is added to the feature class’s attribute table.
- Add a GUID field to the standalone table.
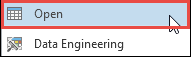
- In the Contents pane, right-click the table and click Open.
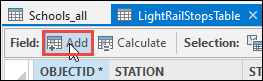
- In the attribute table view, click the Add icon to add a field.
- In the Fields view, in the Field Name column, type the name for the new field.
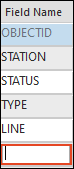
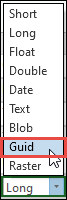
- Under the Data Type column, double-click the cell to open the drop-down menu and click Guid.
- On the Fields tab, in the Changes group, click Save.

- Exit the fields view. The new field is displayed in the table.
- Relate the feature class to the table. Refer to How To: Relate attributes from one layer to another layer or table in ArcGIS Pro for more information.
- Create a relationship class between the feature class and the table using the Create Relationship Class tool.
- On the top ribbon, click the Analysis tab > Tools.
- In the Geoprocessing pane, search for and select Create Relationship Class (Data Management Tools).
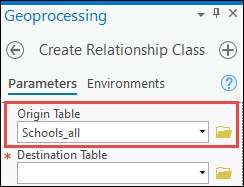
- In the Create Relationship Class pane, for Origin Table, click the drop-down arrow or Browse and select the feature class.
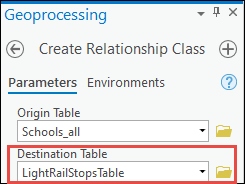
- For Destination Table, click the drop-down arrow or Browse and select the table.
- Click the drop-down arrow for Cardinality and select the relevant option. Refer to ArcGIS Pro: Cardinality for more information.
- Click the drop-down arrow for the Origin Primary Key and select the GlobalID option.
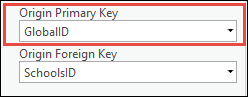
- Click the drop-down arrow for Origin Foreign Key and select the GUID option. In this example, the origin foreign key is SchoolsID.

- Leave the other parameters as default and click Run.
- Exit the Geoprocessing pane. The relationship class geodatabase appears in the Catalog pane.
Article ID: 000028010
- ArcGIS Pro 2 8 x
- ArcGIS Pro 2 x
Get support with AI
Resolve your issue quickly with the Esri Support AI Chatbot.


Related Information
Discover more on this topic
Search for related information
Find training related to this topic
Explore ideas and give feedback
Get help from ArcGIS experts
Start chatting now