Frequently asked question
What is a root tile and how are they used to make a vector tile package with a local coordinate system?
Note:
Before beginning , consider that the default ArcGIS Online default tiling scheme is the simplest workflow.
To use a custom scheme, Let’s start by clarifying the requirements of a tiling scheme for use in vector tile creation.
- Tile size must be 512 by 512 pixels
- Have consecutive scales in a ratio of two
See the ArcGIS Pro Help topics: Create Vector Tile Package and Create Vector Tile Index - The root tile must overlap the data sufficiently for features to draw
See the ArcGIS Pro Help topics: 00257: The root tile must overlap the data sufficiently for features to draw and 002112: The root tile must overlap the data sufficiently for features to draw
What is the Root Tile?
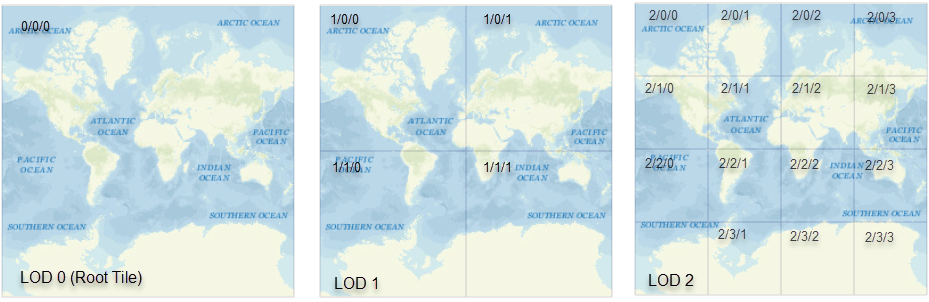
If a tile cache were a pyramid, the root tile would be its peak. It is the tile that represents the largest area of the map and the lowest level of detail. For example, an ArcGIS Online Basemap that uses the WGS_1984_Web_Mercator_Auxiliary_Sphere coordinate system and the default tiling scheme, the root tile is represented with the “Start Tile” For Level of Detail 0 (LOD 0), as shown on the World Topo Map (MapServer):
- Level ID: 0 [ Start Tile, End Tile ]
- Resolution: 156543.03392800014
- Scale: 5.91657527591555E8
Why are the Scales Doubled?
It is important to note that the Default ArcGIS online tiling scheme has scales that double. Note the second Level of Detail; “Level ID: 1” that the scale value is exactly half of the scale of LOD 0:
- Level ID: 1 [ Start Tile, End Tile ]
- Resolution: 78271.51696399994
- Scale: 2.95828763795777E8
It is equally important to note how the root tile separates in subsequent Levels of Detail, 1 into 4, into 16 tiles, and so forth. This supports a seamless transition in the vector tile layer when zooming, and supports the tile indexing that allows vector tiles to be so efficient.
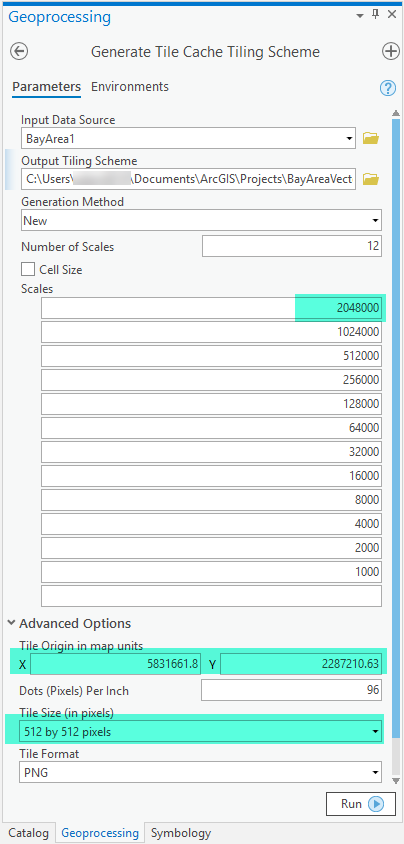
How to use the Generate Tile Cache Tiling Scheme tool to make a valid tile scheme for use with vector tiles
See the ArcGIS Pro Help topic: Generate Tile Cache Tiling Scheme
- Open the Generate Tile Cache Tiling Scheme tool.
- Set Tile_size to 512 x 512 pixels
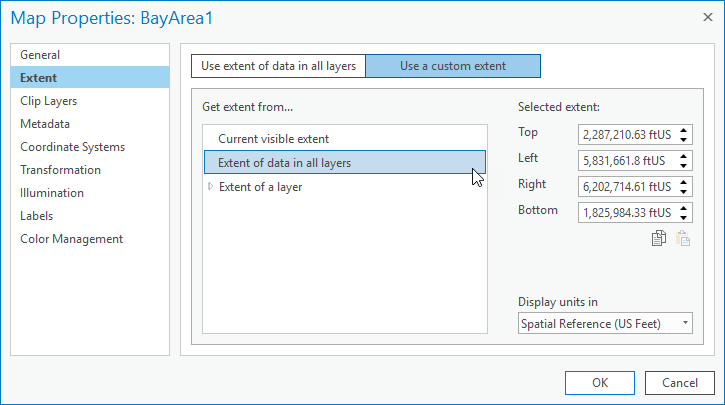
- Set Tile_origin: This identifies the upper left corner of the root tile. This corner should be placed so that the root tile bounding box covers all the data in the map.
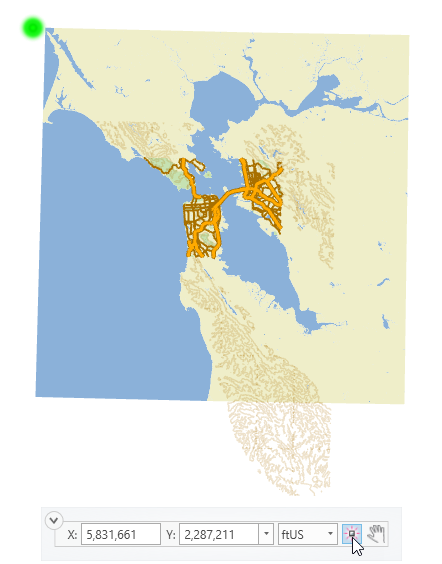
In the following image, the map is using the coordinate system “NAD 1983 StatePlane California III FIPS 0403 (US Feet)”, Where the Map Properties show the top left corner as x=5,831,662, y=2,287,211. You can see the placement using the Go to XY tool. This position is used as the Tile_Origin value.
- Set scales: Pick any minimum scale value that suits your data. Each scale must double until a scale is added that surpasses the MaxScale, for example, 1000 > 2000 > 4000 > ...MaxScale > Next Value.
		|Right – Left| = MaxScale*(Tile_size/DPI*Inch2MapUnit)
		|Top - Bottom| = MaxScale*(Tile_size/DPI*Inch2MapUnit)

* The bounding box is a square, so go with the MaxScale you find that is larger.
Left = 5831661.8
Right = 6202714.6
Bottom = 1825984.3
And:
Tile_Size = 512 pixels per tile
DPI = 96 dots (pixels) per inch
Inch2MapUnit = 12 in. to 1 US foot (This may differ depending on the measuring unit of the map's coordinate system)
We subtract the Top and Bottom extents to find the minimum distance the root tile needs to cover is 461,226 feet. So, we use this value to find MaxScale.
Therefore:
461226.3 = MaxScale*(512/(96*12))
1037758.5 = MaxScale
The following image shows what the final parameters of this example for Generate Tile Cache Tiling Scheme:
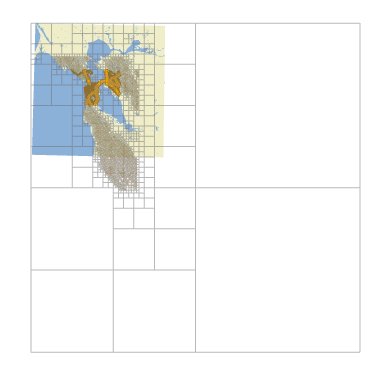
The following image is a view of a Vector Tile Index for the example map using this custom tiling scheme:
Article ID: 000022396
- ArcGIS Pro
Get support with AI
Resolve your issue quickly with the Esri Support AI Chatbot.


Related Information
Discover more on this topic
Search for related information
Find training related to this topic
Explore ideas and give feedback
Get help from ArcGIS experts
Start chatting now