HOW TO
Apply a raster function template to symbolize classified data in a mosaic dataset or image service published from ArcGIS Pro
Summary
Symbolizing classified data is useful for data analysis. A raster function template can be saved from the layer's symbology and applied on a mosaic dataset or image service published from ArcGIS Pro. However, this results in the image displayed with the RGB Composite renderer by default. This is a known limitation. Refer to BUG-000110154.
To symbolize classified data on a mosaic dataset or image service published from ArcGIS Pro, the raster function template created must include a function chain of a mosaic dataset layer, Colormap function and Remap function.
Procedure
The workflow below describes how to create a raster function template with a function chain that includes a mosaic dataset layer, Colormap function and Remap function to symbolize classified data in a mosaic dataset or image service published from ArcGIS Pro.
Note:
For the publishing of the mosaic dataset in this workflow, ArcGIS Image Server is required.
Add the mosaic dataset layer, Colormap function and Remap function to the raster function template
- Add the mosaic dataset to the map.
- Create a raster function template. Click the Analysis tab, and select Function Editor.
- Add the mosaic dataset layer to the raster function template. Drag the mosaic dataset layer from the Contents pane to the Raster Function Template window.
- Add the Remap function to the raster function template.
- Click the Raster Functions
 button in the upper right corner of the Raster Function Template window.
 - In the Raster Functions window, click System > Conversion. Drag the Remap tool into the Raster Function Template window.
- Click the Raster Functions
- Add the Colormap function to the raster function template. In the Raster Functions window, click System > Conversion, and drag the Colormap tool into the Raster Function Template window.
- Connect all the items in the Raster Function Template window using the cursor.

Generate and save a colormap file
- In the Contents pane, right-click the dataset, and click Symbology.
- Under Primary symbology, click the drop-down button, and select Unique Values.
- In the Values tab, click a value under the Value or Label column in the table to select it. Hold the Shift key while selecting multiple values (according to the classified symbology values) using the down arrow key.
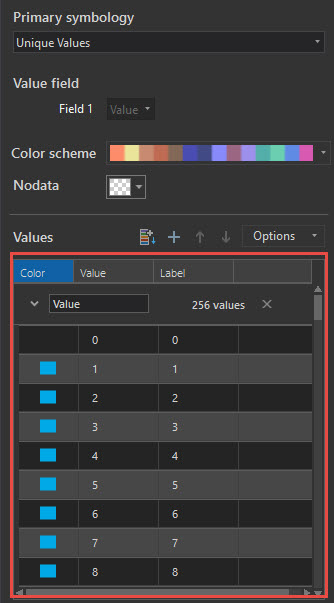
- Right-click the selected values, and select Format symbol(s). Select the desired color.
- Click the Options
 icon, and select Export colormap.
 - In the Export colormap window, specify a name for the colormap file in the Name section.
- Save the file as Colormap Files (.clr).
Configure the Remap function and Colormap function, and export the raster function template file
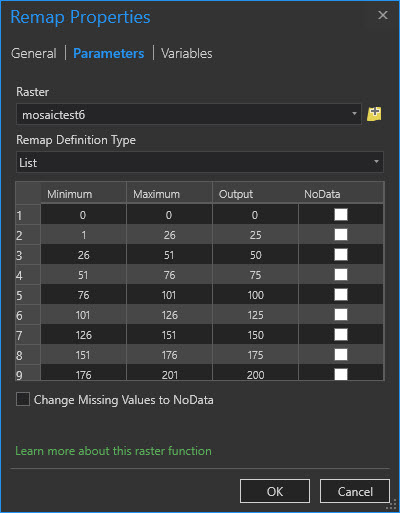
- Configure the Remap function.
- Right-click the Remap box, and select Properties.
- Edit the table in the Remap Properties window according to the values of the classified symbology. Click OK.
- Configure the Colormap function by adding the colormap file in it.
- Right-click the Colormap box in the Raster Function Template window, and click Properties.
- Click Parameters. Under Colormap, click the Folder icon and insert the colormap file (.clr) created previously.
- In the Colormap Properties window, click OK.
- Save the raster function template to make it available in the list of Custom Raster Functions.
- In the Raster Function Template window, click Save As.
- In the Save As window, specify a name for the template under the Name box.
- Provide some details in the Description box, and click OK.
- Export the raster function template file.
- Click the Raster Functions
 icon on the upper right corner of the Raster Function Template window.
 - In the Raster Functions pane, click Custom. Right-click the created raster function template, and click Export.
- In the Export window, specify a name for the template under Name and ensure the format is Raster Functions. Click Save.
- Click the Raster Functions
Apply the raster function template to the mosaic dataset in the map or when publishing it as an image service
- Apply the raster function template to the mosaic dataset in the map.
- Click Catalog Pane. In the Catalog window, right-click the mosaic dataset, and select Manage Processing Templates.
- In the Manage Processing Templates window, click the Import
 icon on the left of the Find Processing Templates box.
 - In the Select Processing Templates window, select the created raster function template, and click OK.
- Alternatively, apply the template to the mosaic dataset when publishing it as an image service.
- Click Catalog Pane. In the Catalog window, right-click the mosaic dataset, and select Share As Web Layer.
- Click Configuration, and under Layer(s), click the Configure Web Layer Properties icon next to Imagery.
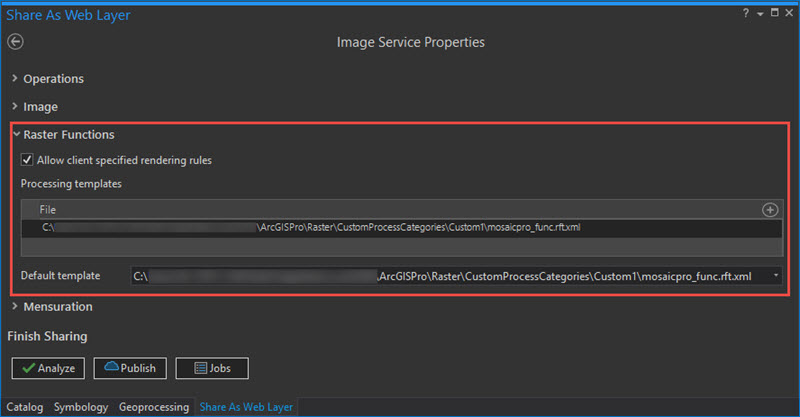
- In the Image Service Properties window, click Raster Functions. Under Processing templates, in the File table, click the Add processing templates icon.
- In the Select raster function template(s) window, select the created raster function template, and click OK.
- Optionally, set the selected raster function as default by clicking the Default template drop-down button and selecting the raster function template.
- Analyze the raster data before publishing.
Article ID: 000021676
- ArcGIS Pro
- ArcGIS Server
Get support with AI
Resolve your issue quickly with the Esri Support AI Chatbot.


Related Information
Discover more on this topic
Search for related information
Find training related to this topic
Explore ideas and give feedback
Get help from ArcGIS experts
Start chatting now