HOW TO
Define the projection for CAD data for use in ArcMap
Summary
Computer Aided Design (CAD) files can be added to ArcGIS and made to overlay other data in ArcMap by defining the projection (coordinate system).
The instructions provided in this article describe how to define a projection for CAD data in ArcMap and apply it to DWG or DXF files created in AutoCAD and to DGN files created in Microstation.
Procedure
CAD data can be created in a real-world coordinate system, such as State Plane or UTM. This is the spatial reference of the CAD data, and information about the spatial reference should be obtained from the data source. If the CAD data was created in a real-world coordinate system and the data source provides the necessary parameters, refer to Step 1.
Note:
To identify the coordinate system used to create the CAD file, if the data source does not have the projection information available, refer to How To: Identify an unknown projected coordinate system using ArcMap 10.1 and later versions to identify the projection for the CAD file.
Note:
To determine whether the coordinate system is geographic, projected, or local, refer to How To: Identify the spatial reference, projection, or coordinate system of data.
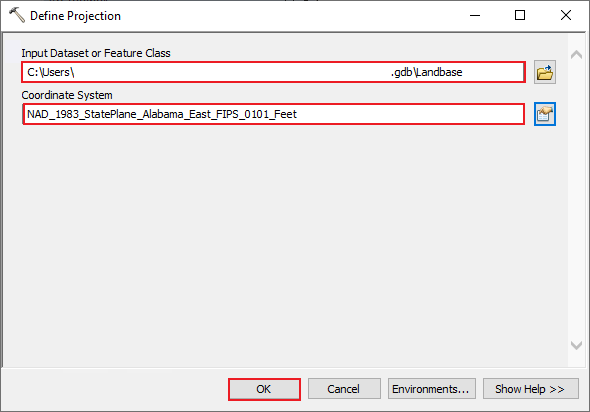
- After obtaining the spatial reference (projection) parameters for the CAD data, define the projection for the CAD dataset using the Define Projection tool:
- In ArcMap, click the ArcToolbox icon
 on the top ribbon. The ArcToolbox pane opens.
 - In the ArcToolbox pane, click Data Management Tools > Projections and Transformations > Define Projection. The Define Projection window opens.
- In the Define Projection window, for Input Dataset or Feature Class section, select the CAD dataset.
- For the Coordinate System section, click the browse icon. In the Spatial Reference window, select coordinate system for the CAD dataset, and click OK.
- In the Define Projection window, click OK.
- In ArcMap, click the ArcToolbox icon
- Navigate to the directory where the CAD file is stored on the computer.
- Rename the projection file with an identical name as the CAD dataset, substituting the extension with .prj. For example, if the CAD file is named 'Parcels020305.dwg', the projection file is renamed to 'Parcels020305.prj'.
Warning:
•    The projection file must be saved in the same directory as the CAD file.
•    With the exception of the file extension, the projection file name must be identical to the CAD file.
•    The file name is case-sensitive.
- If the CAD data was created in a local coordinate system, a custom projection file can be created for the CAD data to align the CAD file with other data in ArcMap. Refer to How To: Create a custom projection file to align CAD Data in ArcMap 10.1 and above for more information.
- In ArcGIS Desktop version 9.3 onwards, if many CAD files in the same coordinate system are received from the data source, the projection for all the CAD files can be defined with a single projection file using the steps below.
- In Windows Explorer, navigate to the installation folder for ArcGIS Desktop, open CoordinateSystems\Projected Coordinate Systems\, and copy the projection file with the correct parameters for the CAD files.
- Navigate to the directory where the CAD files are stored on the computer, and paste the projection file into that directory.
- Rename the projection file as esri_CAD.prj.
Note:
The projection is defined for all the CAD files in that directory. This method also defines the projection for any CAD files saved with spaces in the name.
Note:
In version 10.x, open ArcMap, and click View > Data Frame Properties > Coordinate System tab. On the Coordinate System tab, browse to the projection definition that applies to the CAD file and right-click it, click Add To Favorites, and click OK. A physical copy of the projection file is written to the location of the user profile.
Article ID: 000007831
- ArcMap
Get support with AI
Resolve your issue quickly with the Esri Support AI Chatbot.


Related Information
Discover more on this topic
Search for related information
Find training related to this topic
Explore ideas and give feedback
Get help from ArcGIS experts
Start chatting now