PROBLEM
The Kernel Density tool generates a blank output raster in ArcGIS Pro
Description
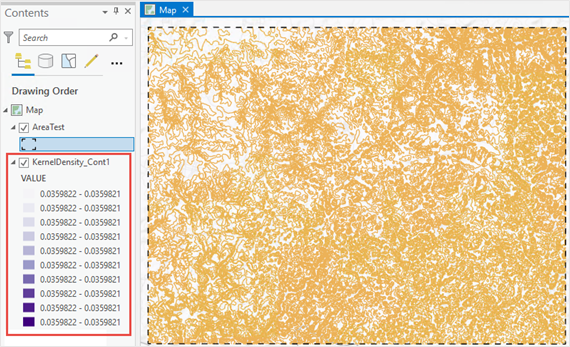
When calculating the density of features for a feature layer using the Kernel Density tool in ArcGIS Pro, a blank output raster is generated, as demonstrated in the image below.
Cause
This issue occurs when the feature layer coordinate system is a geographic coordinate system. The search radius in the Kernel Density tool calculates the density based on the linear unit of the projection of the output spatial reference. Thus, the coordinate system of the feature layer must be a projected coordinate system.
Note:
To check the coordinate system of the feature layer, refer to the Tip section in ArcGIS Pro: Specify a coordinate system.
Solution or Workaround
To resolve the issue, project the feature layer to a projected coordinate system using the Project tool, and calculate the density of the features using the Kernel Density tool in ArcGIS Pro.
- Open the ArcGIS Pro project.
- In the Geoprocessing pane, search for and click the Project tool. Refer to ArcGIS Pro: Run a tool in the Geoprocessing pane for steps to do this.

- In the Project pane, under the Parameters tab, select the feature layer from the Input Dataset or Feature Class drop-down list. In this example, Contour is selected.
- Provide a name for Output Dataset or Feature Class, and click Browse….
 to specify the location for the output feature class.
 - In Output Coordinate System, click Select coordinate system
 to open the Coordinate System window.
 - In the Coordinate System window, expand the Projected Coordinate System node, and select the coordinate system. In this example, WGS 1984 Web Mercator (auxiliary sphere) is selected. Click OK.

- In the Project pane, click Run. The new feature class created by the Project tool is automatically added to the map.

- In the Geoprocessing pane, search for and click the Kernel Density tool.
- In the Kernel Density pane, under the Parameters tab, select the new feature layer from the Input point or polyline features drop-down list to calculate the density of its features. Refer to ArcGIS Pro: Parameters for more information.

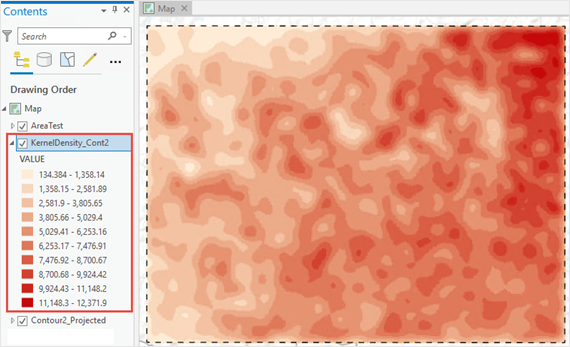
The image below shows the output raster generated by the Kernel Density tool in ArcGIS Pro.
Article ID: 000026358
- ArcGIS Pro 2 8 x
- ArcGIS Pro 2 7 x
- ArcGIS Pro 2 x
Get support with AI
Resolve your issue quickly with the Esri Support AI Chatbot.


Related Information
Discover more on this topic
Search for related information
Find training related to this topic
Explore ideas and give feedback
Get help from ArcGIS experts
Start chatting now