HOW TO
Create buffers for selected features using the Analysis widget in ArcGIS Experience Builder
Summary
In ArcGIS Experience Builder, buffers can be created using spatial analysis tools in the Analysis widget. However, there is no direct method to exclusively create buffers for selected features. The 'Set filter' data action in the Table widget can be used to create a buffer for the selected features, enabling a specific spatial analysis for that area only. This limits the visibility of features to only those that meet the criteria set by SQL expressions. After configuring the 'Set filter' data action, the selected features can be used to create buffers using spatial analysis tools in the Analysis widget. This article provides the workflow to create buffers for selected features using the Analysis widget in ArcGIS Experience Builder.
Procedure
- In ArcGIS Experience Builder, navigate to the Insert widget panel.
- On the New tab, under the Map centric group, drag and drop the Map widget onto the canvas. Configure the following parameters for the Map widget.
- In the Map panel, on the Content tab, under Source, click Select map.
- In the Select data pane, click + Add new data.
- In the Add data window, select the desired map, and click Done.
- Under the Data centric group, drag and drop the Table widget to a desired position on the canvas. Configure the following parameters for the Table widget.
- In the Table panel, on the Content tab, click New sheet.
- In the Sheet configuration, click Select data.
- Expand the selected map from the previously configured Map widget and click the desired feature layer. In this example, the feature layer is PowerPlantsWA.

- Click Live view on the builder toolbar to use the Table widget.
- On the canvas, in the Table widget, click Actions and click Set filter.

- Toggle the feature layer on to set the filter.
- In the Set filter window, click + Add and click Clause.
- Configure the following parameters to create an expression to select the preferred features.
- For the Field input box, select a field. In this example, 'CITY' is selected.
- For the Operator input box, select a functional operator. In this example, the is any of operator is selected.
- Click Select source type
 and select Multiple.
 - For the Value input box, select the desired values. In this example, 1 field is selected.

- Turn off Live view on the builder toolbar and navigate to the Insert widget panel.
- Under the Map centric group, drag and drop the Analysis widget to a desired position on the canvas. Configure the following parameters for the Analysis widget.
- In the Analysis panel, on the Content tab, under Select a Map widget, click Map.
- Under Add tools, click Spatial Analysis tool.
- Expand Use proximity > Create Buffers.

- Click Live view on the builder toolbar to use the Analysis widget.
- On the canvas, in the Analysis widget, on the Tools tab, configure the following parameters.
- Under Input features, select the desired Input layer. In this example, the input layer is PowerPlantsWA.

- Under Buffer settings, select the desired Distance type. In this example, the distance type is Value.
- Specify the desired Distance values and click + Add. In this example, the distance value is 50.
- Under Units, expand the drop-down menu and select the desired units. In this example, the unit is Miles.

- Under Result layer, specify the desired Output name. In this example, the output name is Buffer_50mi_ PowerPlantsWA.
- Under the Save in folder, expand the drop-down menu, and select the desired folder. In this example, the folder is testing.

- Click Run.
Note:
Click Estimate credits to estimate the credit consumption. The Create Buffers analysis tool uses 1 credit per 1000 features for each analysis. For more information on credit usage, refer to ArcGIS Online: Understand credits for spatial analysis.
- In the Analysis widget, on the History tab, click More
 > View details.
 - Under Result, click Actions, click Add to table and Add to map.

- Click Save
 to save the experience.
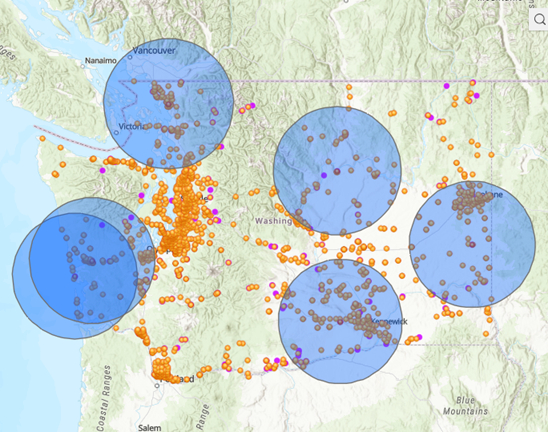
The image below shows the buffers created for selected features using the Analysis widget in ArcGIS Experience Builder.
Article ID: 000032615
- ArcGIS Experience Builder
Get support with AI
Resolve your issue quickly with the Esri Support AI Chatbot.


Related Information
Discover more on this topic
Search for related information
Find training related to this topic
Explore ideas and give feedback
Get help from ArcGIS experts
Start chatting now