Frequently asked question
What are the customizable settings in ArcGIS Flight?
Pilots can adjust a number of settings in ArcGIS Flight that will affect the drone behavior and camera function. The following article provides the purpose of such settings and examples of their impact on the mission.
Camera Settings
ISO
ISO is the level of sensitivity of the camera to available light. The brighter the lighting conditions, the lower the ISO can be set.
Ideally, use the lowest ISO possible for the given conditions, as this reduces grain size in the photos. However, selecting an ISO too low for the conditions leads to blurry images and poor results.
- 100 ISO = Very bright day, no clouds, mid-day
- 200 ISO = Bright day, morning, later in the afternoon
- 400 ISO (Default) = good all-around setting. Overcast mid-day, or clear skies but early morning/late afternoon
- 800 ISO = low light conditions, early morning, evening
Gimbal Angle
Gimbal angle controls the angle at which the camera is pointed during flight. A gimbal angle of 0 degrees (nadir) points the camera straight down at the surface, while a gimbal angle of 90 degrees points the camera straight ahead from the drone.
The gimbal angle is typically changed only during a Crosshatch Survey. It can also be adjusted for Area Survey in specific cases.
For Crosshatch Surveys, a setting between 35 degrees and 40 degrees typically delivers the best results. The horizon must not be visible in the photos, or processing results may be poor. Avoid setting an angle greater than 45 degrees.
Lighting Mode
This parameter controls the exposure level the drone uses when shooting images. Use Day Light when flying under normal conditions, Low Light when flying under low light conditions (early mornings or late evenings), and Manual to manually adjust additional exposure levels.
Lens Settings
This parameter allows you to adjust the focal length value of your gimbal. Adjust this when using custom payloads.
Flight Settings
Flight Height
Flight height indicates the drone's height above ground, and directly affects output image resolution, ground sampling distance (GSD), and the flight time needed to map a given area. Increasing flight height is a simple way to reduce flight time and the number of photos of the mission.
The table below shows how mission parameters will change for an area survey over a 20 acre region while only changing flight height. Users should not expect to receive the same exact values as they are demonstrative.
| Flight Height (feet) | Time Taken (minutes) | Ground Sampling Distance (inch/pixel) | Images Taken | Batteries Required |
| 100 | 32 | 0.3 | 598 | 2 |
| 200 | 11 | 0.7 | 162 | 1 |
| 300 | 6 | 1.0 | 75 | 1 |
| 400 | 7 | 1.3 | 47 | 1 |
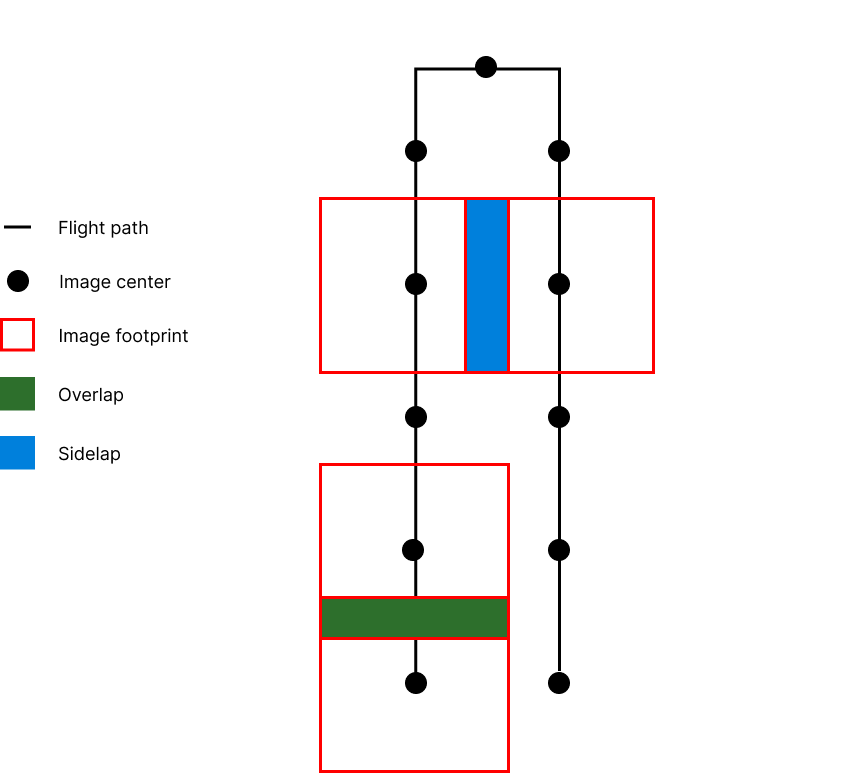
Overlap
Overlap is expressed as a percentage, and indicates the commonality of consecutive images within a single flight leg - 50% overlap would be images that share features in half the frame. It directly affects the number of images taken per flight leg in your flight polygon. To ensure high quality outputs, it is advised not to set this parameter below the default 70 percent. You can increase it in scenarios where you want to capture additional images to have a richer dataset.
The table below shows how mission parameters will change for an area survey over a 20 acre region while only changing overlap level. Users should not expect to receive the same exact values as they are demonstrative.
| Overlap (percent) | Time Taken (minutes) | Images Taken | Batteries Required |
| 70 | 11 | 163 | 1 |
| 80 | 13 | 225 | 1 |
| 90 | 23 | 441 | 1 |
| 95 | 46 | 874 | 2 |
Sidelap
Sidelap is expressed as a percentage, and indicates the commonality of parallel images from neighboring flight legs - 50% sidelap would be images that share features in half the frame. It directly affects the number of flight legs within your flight polygon. The higher the sidelap, the closer the flight legs are against each other. To ensure high quality outputs, it is advised not to set this parameter below the default 65 percent. You can increase it in scenarios where you want to capture additional images to have a richer dataset.
The table below shows how mission parameters will change for an area survey over a 20 acre region while only changing sidelap levels. Users should not expect to receive the same exact values as they are demonstrative.
| Sidelap (percent) | Time Taken (minutes) | Images Taken | Batteries Required |
| 65 | 11 | 162 | 1 |
| 75 | 13 | 226 | 1 |
| 85 | 18 | 375 | 1 |
| 95 | 46 | 1128 | 2 |
The diagram below provides additional distinction between overlap and sidelap. Again, overlap indicates the commonality of consecutive images in a single flight leg, while sidelap indicates commonality of parallel images in neighboring flight legs.
Note:
The quality of drone imagery and derived products (orthomosaics, point clouds, meshes) are most influenced by the flight height, overlap, and sidelap of the mission.
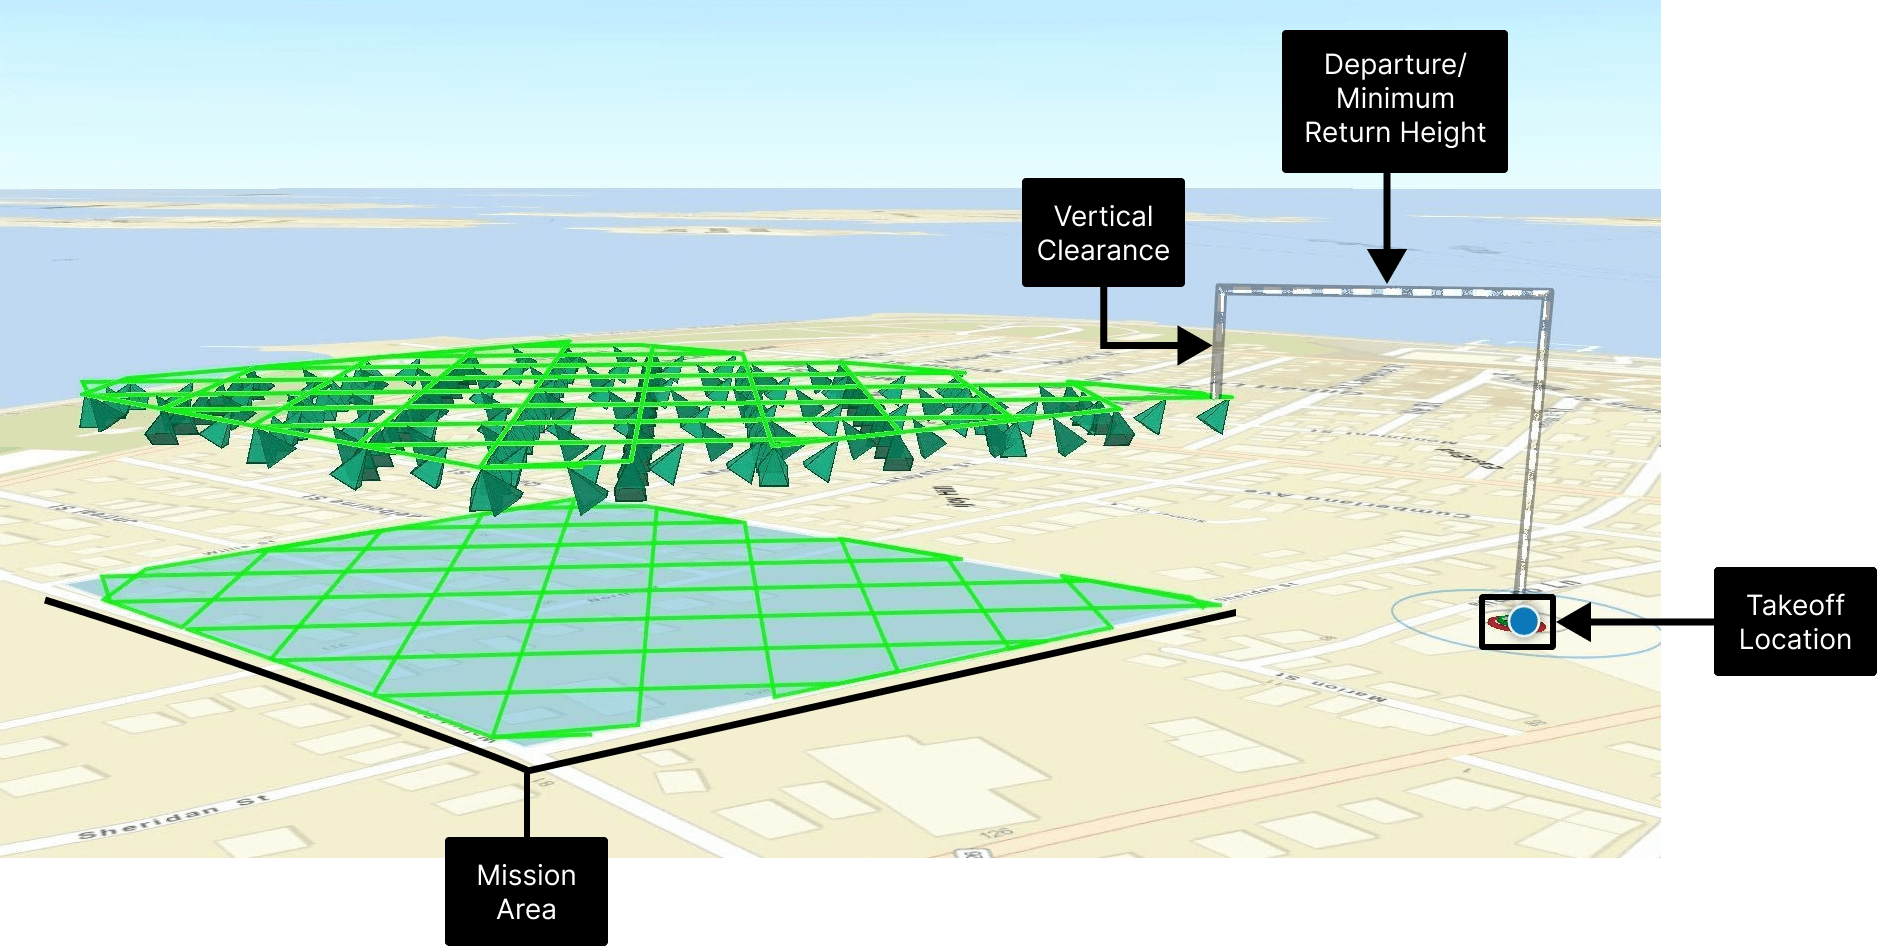
Departure/Minimum Return Height
The Departure/Minimum Return Height will determine the height at which the drone will travel between the takeoff location and the mission area. This value should always be higher than any obstacle in the mission area, and any obstacle between the takeoff location and mission area. The image below provides context to the departure/minimum return height setting, which adds additional vertical clearance from obstacles.
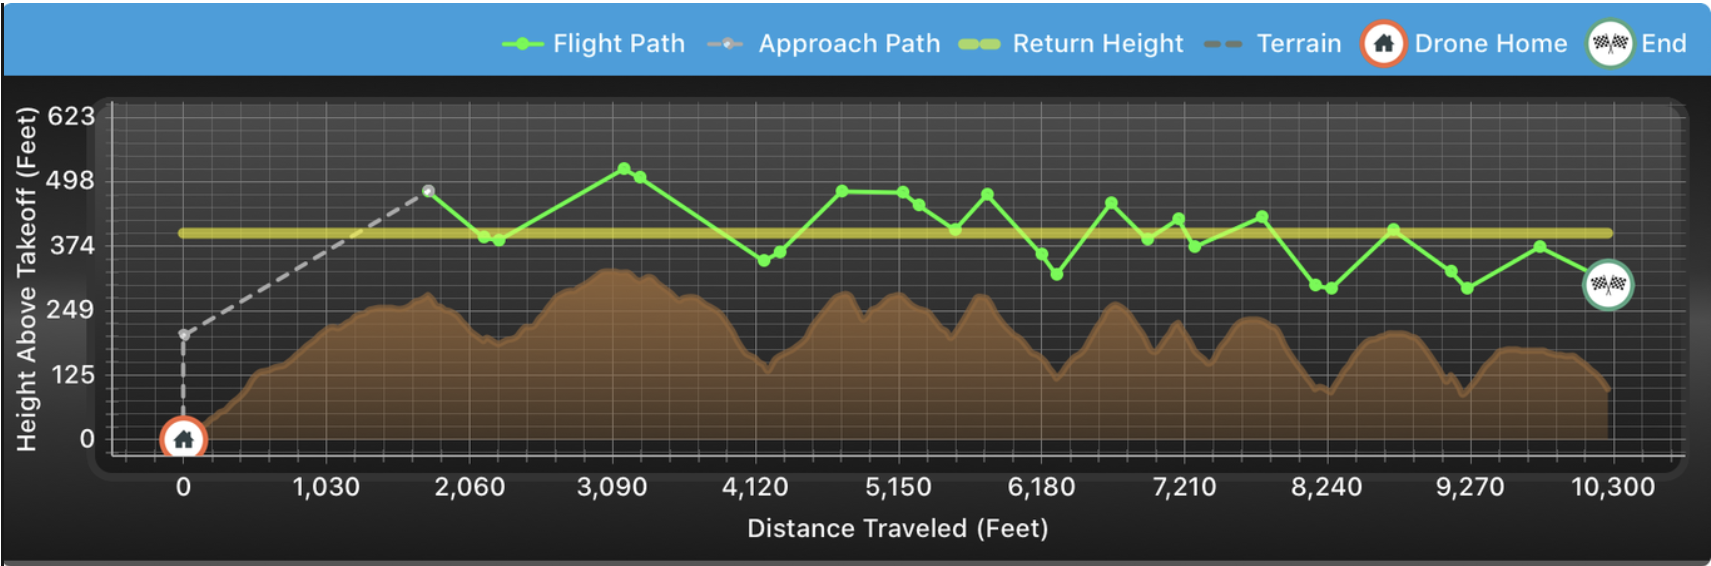
Terrain Follow
The terrain follow feature allows autonomous flights at dynamic altitudes to follow variations in site topography. For missions near hills and other variable terrain, terrain-following enhances the quality of imagery products by capturing images with constant resolution and proper overlap. The graph below shows the profile view of a mission with terrain follow enabled, where the drone flight height adjusts to maintain a constant altitude relative to the variable terrain.
Video Mode
When enabled, the drone will only record a continuous video to cover the mission area and will not take pictures.
Geofence
This feature will restrict your drone’s flight area to within the boundary of the flight polygon you planned. It will color the boundary of your polygon in red, and it has two different behaviors depending on the drone’s take off point
- Taking off outside the flight area: The drone will fly to the closest point possible of your flight polygon, enter the polygon, and begin capturing the site. The drone will enter and exit the polygon on the same point it initiated the flight whenever it needs a battery swap or finishes the mission.
- Taking off inside the flight area: The drone will fly to the waypoint you’ve designated (closes or furthest) and begin capturing the site. Since the drone took off inside the flight area’s polygon, it will use its original take-off point for battery swaps or land there after it finishes the mission.
Quick Map
Quick Map allows users to quickly capture photos and process them into an up-to-date basemap directly through the tablet. This is especially useful on sites with outdated basemap imagery. When enabled, flight plan settings will automatically be adjusted to obtain the optimal imagery for Quick Map processing.
Note:
When using Quick Map, after flight is complete do not disconnect the drone from the tablet until the Quick Map has finished processing.
Speed Adjustment
This parameter can be used to adjust the speed of drone flight, which is primarily determined by flight height, overlap and sidelap. Depending upon the drone & SD card used, adjustment to a higher speed may result in 1-2 photos being skipped.
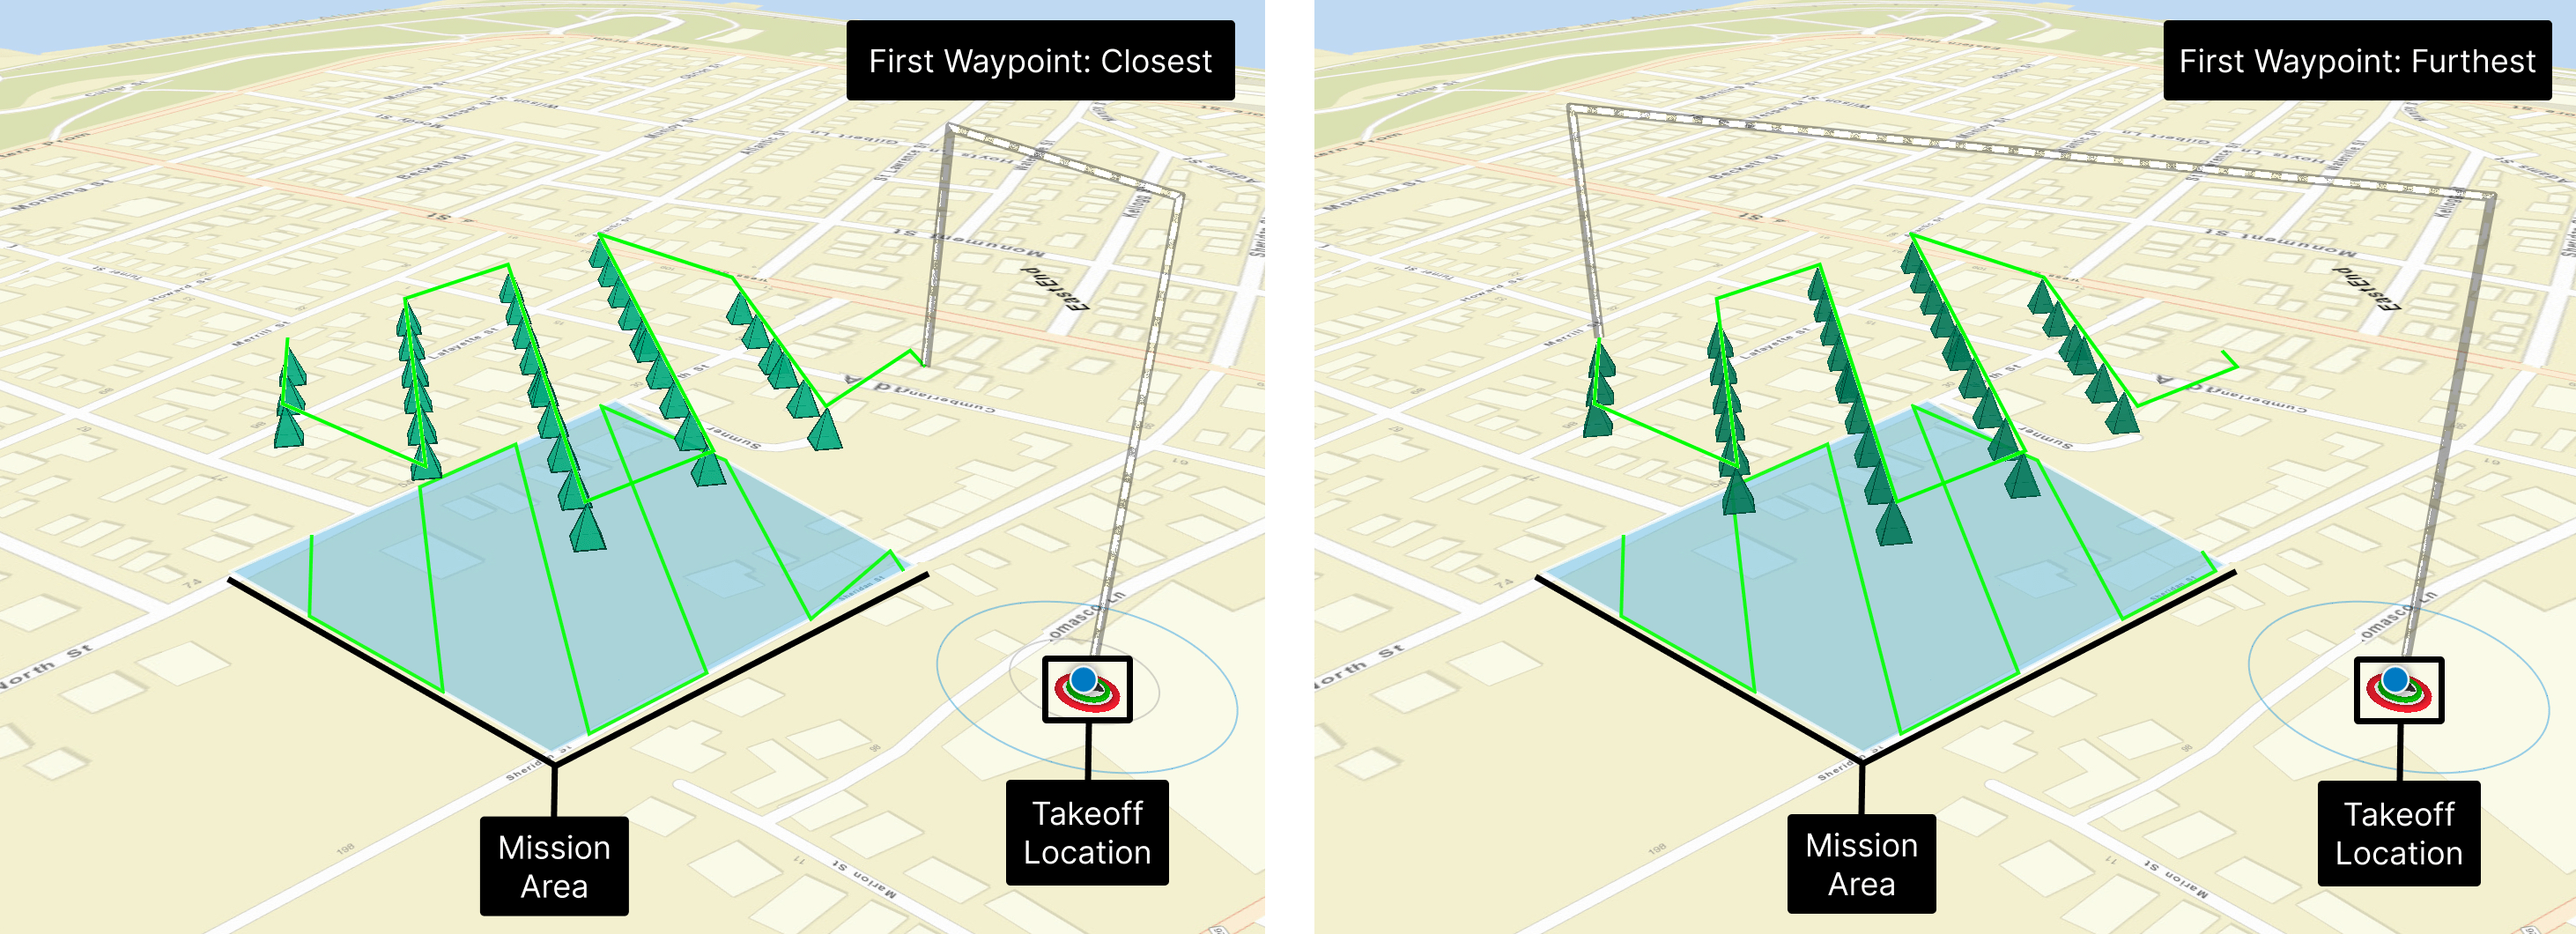
First Waypoint
This parameter changes where the drone will begin data collection of the mission area relative to the takeoff location. Closest will begin data collection starting at the nearest point/vertex of the mission area polygon, while Furthest will begin data collection starting at the farthest point/vertex on the mission area polygon.
The image below provides additional context for how first waypoint affects drone flight.
Continue Without Link
This parameter will enable your drone to continue flying the mission even if goes out of signal range from your remote controller. Use this parameter with caution, as the pilot will not be able to take manual control in the event of unexpected drone behavior.
Adjusting Global Settings
Changes made in the Global Settings will be applied by default to any new flight created. To adjust global settings tap the gear icon ![]() in the upper right corner of the project home screen. After selecting Advanced, users can navigate the following submenus to adjust default global settings:
in the upper right corner of the project home screen. After selecting Advanced, users can navigate the following submenus to adjust default global settings:
- RTK
- Base Station
- Connect: Activate connection between drone and saved base station.
- Disconnect: Terminate connection between drone and saved base station.
- Users can add a new base station by selecting the Base Station entry, and tapping Add New in the upper right corner. Users must specify the Provider Name, Mount Point, URL, Port, and login credentials for the new base station.
- Base Station
- Controller Defaults
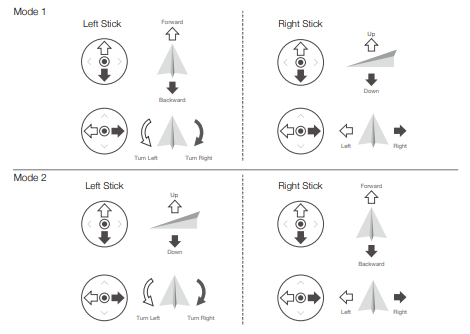
- RC Stick Control Mode: Modifies the way the controller sticks operate. The image below illustrates the difference in controller commands between modes 1 & 2.
- Camera Defaults
- ISO Settings: Adjusts default ISO level, only applicable to DJI cameras and Daylight Mode missions.
- Gimbal Angle: Adjusts default gimbal angle, only applicable to Area Survey missions.
- Flight Defaults
- Overlap: Adjusts default overlap level.
- Sidelap: Adjusts default sidelap level.
Adjusting Mission Specific Settings
Changes made within the Mission Settings menu will only apply to that specific mission, and not overwrite global settings. These changes are saved in the mission for future reflight. After selecting a flight mode and providing a name for a mission, the Mission Settings menu allows users to set basic settings (terrain follow, flight height, etc.). Users can select Advanced to modify advanced settings (overlap, sidelap, etc.).
Article ID: 000023176
- Mobile Applications
Get support with AI
Resolve your issue quickly with the Esri Support AI Chatbot.


Discover more on this topic
Search for related information
Find training related to this topic
Explore ideas and give feedback
Get help from ArcGIS experts
Start chatting now