HOW TO
An alternative to ArcMap’s representation geometry overrides for ArcGIS Pro
Summary
Representation geometry overrides were a feature in ArcMap that allowed users to create and store secondary versions of feature geometry within a single feature class. This was often used to store generalized versions of features for display in maps at smaller scales. Updates to the data such as feature additions or deletions were performed in one feature class.
The ability to create representations and geometry overrides is not a feature of ArcGIS Pro, but the functionality of creating secondary geometries and propagating updates to the necessary layers can be replaced by an alternative workflow using multiple feature classes and joins. Additionally, while Representation required a geodatabase, this approach is usable with a wider variety of data sources, such as shapefiles.
This workflow requires two key components:
- A primary database containing the most detailed, accurate, and up-to-date feature data and a unique value field to use as a key.
- One or more secondary databases derived from the primary database and used to store alternate geometries.
When data is added or deleted in the primary database, the changes must be propagated to the secondary databases. This is possible using selection queries and joins, which join multiple tables via a common field known as a key. A field of unique values must be present in the primary data to act as the key, and the key is used to create joins between the primary and secondary databases. While any unique identifier will work as a key, the Global ID and GUID data types may be useful options. See additional information about these datatypes to review their applications and limitations before deciding to use them.
Procedure
The following steps illustrate how to create a primary database, generate a secondary database modified by the Disperse Markers geoprocessing tool, and propagate additions/deletions in the primary database to the secondary database using joins and a GUID field. The Disperse Markers tool is used only as an example of a geoprocessing tool that modifies the input data; any other such tool is compatible with this workflow.
- POIs_primary – The primary “Points of interest” point data at the largest available scale with a GUID field containing unique values. This field will be the key field for joins.
- Copy the POIs_primary data and rename it as POIs_5K. This will contain secondary versions of the geometry for display at 1:5000 scale.
- Run Disperse Markers on the POIs_5K data to disperse overlapping features. Point feature shape is altered and is different from the features in the POIs_primary.
- When new features are added or removed in the primary data, the changes need to be propagated to the secondary data.
Scenario 1 - data is deleted from POIs_primary
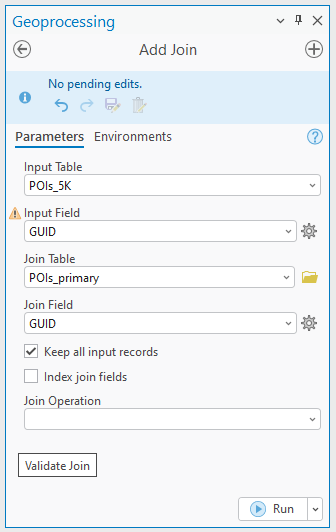
- Run the Add Join geoprocessing tool with POIs_5K as the Input Table, POIs_primary as the Join Table, the GUID field as the Input Field and Join Field, and Keep all input records checked.
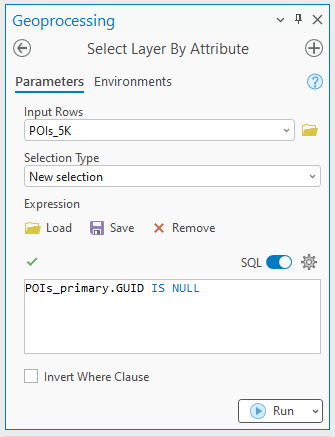
- Run the Select Layer by Attribute tool with POIs_5K as the Input Rows and the following as a SQL Expression to select features that have been deleted from POIs_primary:
POIs_primary.GUID IS NULL
- Run the Delete Rows tool to delete the selected features from POIs_5K that are no longer present in POIs_primary.
Note:
Schema differences will not impact the data to be deleted from the POIs_5K data.
Scenario 2 – new point features are added to POIs_primary
- Ensure the new features in POIs_primary have a unique GUID value.
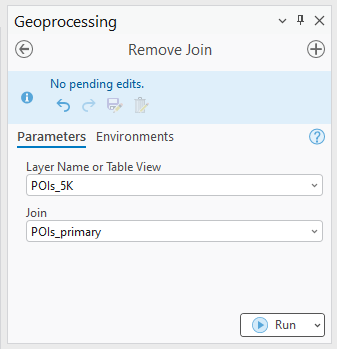
- Run the Remove Join tool with the Input Table as POIs_5K and remove the join with POIs_primary.
- Use the Append tool with POIs_primary data as the Input Dataset and POIs_5K as Target Dataset, “Input fields must match target fields” as Field Matching Type, GUID as Target and Input fields, and the Update Geometry option unchecked.
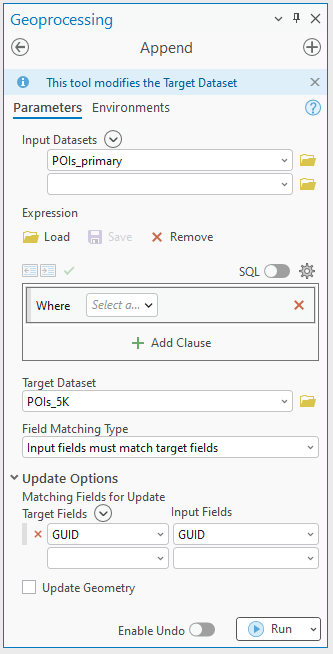
Note:
Use the field map to reconcile field differences in case the schema of both datasets does not match.
Article ID: 000032948
- ArcGIS Pro
Get support with AI
Resolve your issue quickly with the Esri Support AI Chatbot.


Related Information
Discover more on this topic
Search for related information
Find training related to this topic
Explore ideas and give feedback
Get help from ArcGIS experts
Start chatting now