PROBLEM
Unable to set titles as headings in ArcGIS StoryMaps map tours
Description
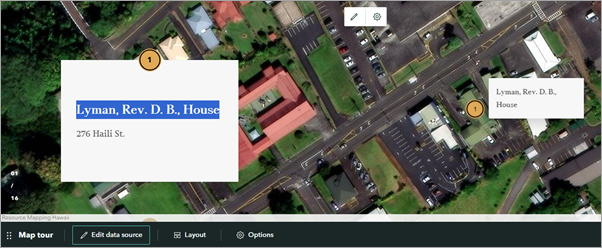
In ArcGIS StoryMaps, when highlighting the title of individual stops in the narrative panel of a map tour block populated from a feature layer, the text editing toolbar does not appear, preventing the text from being converted to a heading, as shown in the image below.
Cause
This is a known limitation, as a map tour does not include heading styles due to the default fixed text styling, which maintains a clean layout and ensures consistency across tour points. Therefore, the titles of individual stops cannot be converted to headings. Refer to ArcGIS Blog: Add another dimension to your stories with heading links for more information.
Solution or Workaround
To convert the titles of the individual map tour stops as headings, replicate the map tour using the sidecar block, which offers more customization capabilities compared to the map tour block. The sidecar block requires the stops to be manually created and the intended feature layer to be saved as a web map.
- Save the feature layer used on the existing map tour as a web map.
- Open ArcGIS Online Map Viewer and add the feature layer to the map. Refer to Steps 1 through 4 in ArcGIS Online: Browse layers for instructions.
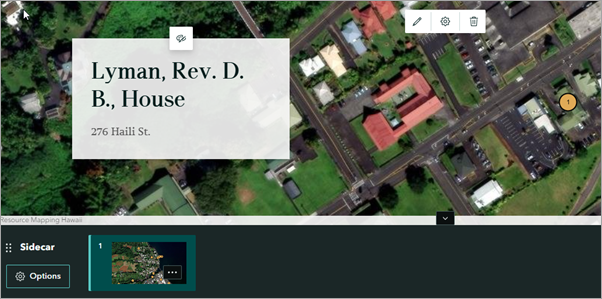
Note:
Optionally, configure the styles and labelling properties to match the existing map tour block. In this example, the point features are configured with a single symbol of the same color, and the Object ID field is set as the label field to replicate the numbering on the symbols, as shown in the image below.
- Save the map. Refer to ArcGIS Online: Save maps (Map Viewer) for instructions.
- Open the story on the story map's edit page.
- Add and configure a sidecar block in the story.
- Add a sidecar block to the story. Refer to Steps 1 through 4 in ArcGIS StoryMaps: Add a sidecar to a story for instructions. In Step 4, click Map and select the web map created in Step 1.
- In the Adjust map appearance window, pan and zoom the map to set the extent to match the first map tour stop, and click Save.
- On the narrative panel, click the default text block and manually enter the intended text or numeric attribute values. In this example, the narrative panel is added with two text blocks, and the desired attributes are entered accordingly to the added text blocks.
The web map is added to the sidecar media panel, and text blocks are added to the narrative panel.
- Duplicate the slide as desired to replicate the existing map tour. Refer to Steps 4 through 6 in FAQ: Can data-driven map tours be populated from multipoint feature layers in ArcGIS StoryMaps? for instructions. In Step 5(c), update the text blocks accordingly.
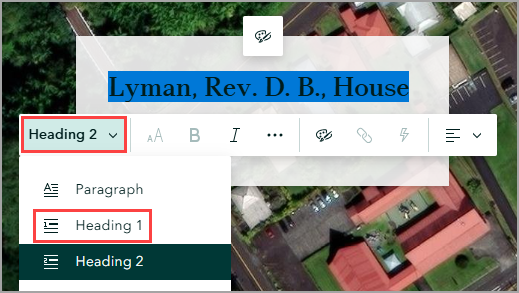
- Convert the title into a heading.
- On the slide panel, click the slide with the title to be converted into a heading.
- On the narrative panel, highlight the intended title to display the text editing toolbar.
- On the text editing toolbar, click the first drop-down arrow and select Heading 1 from the drop-down list.
Note:
If the navigation bar is not displayed after converting the text into a heading, enable story navigation. Refer to Step 1 in ArcGIS StoryMaps: Add story navigation for instructions.
- On the story map's edit page, in the story builder header, click Publish to save the changes.
Article ID: 000038715
- ArcGIS Online
- ArcGIS StoryMaps
Get support with AI
Resolve your issue quickly with the Esri Support AI Chatbot.


Related Information
Discover more on this topic
Search for related information
Find training related to this topic
Explore ideas and give feedback
Get help from ArcGIS experts
Start chatting now