PROBLEM
Point feature labels do not honor drawing order in high-density areas in ArcGIS Pro
Description
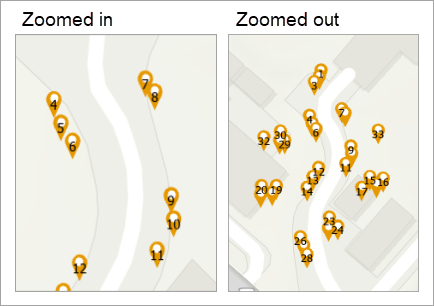
At certain zoom levels in ArcGIS Pro, labels for closely spaced point features do not honor the drawing order of the features. This results in visual clutter and hinders effective map interpretation.
The image below compares two different zoom levels to highlight labeling differences. When zoomed out, labels from point features positioned behind others appear on top, ignoring the drawing order.
Cause
ArcGIS Pro automatically applies label suppression in areas with limited space to prevent labeling conflicts.
Solution or Workaround
Use attribute-driven symbology for the labels
- Open the ArcGIS Pro project.
- Disable the point feature labeling.
- In the Contents pane, select the point feature layer.
- On the ribbon, click the Labeling tab.
- On the Labeling tab, in the Layer group, click Label.
- Enable attribute-driven symbology. Refer to ArcGIS Pro: Enable attribute-driven symbology for instructions.
- Add a marker layer to the existing points’ symbology.
- In the Symbology pane, click Primary symbology
 .
. - Under Primary symbology, click the symbol.
- Add a marker layer as a new symbol layer. Refer to ArcGIS Pro: Add a symbol layer for instructions. In Step 3, select Marker layer.
- In the Symbology pane, click Primary symbology
The marker layer is added to the symbol.
- Configure the attribute-driven marker layer properties.
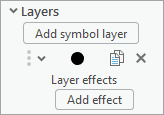
- In the Symbology pane, click Layers
 and select the newly added marker layer.
 - Under Appearance, click the Form drop-down arrow and select the numbered symbol
 .
. - Insert the following expression for Text string in the Expression Builder window. Refer to Steps 5 through 8 in ArcGIS Pro: Connect symbol properties to attributes for instructions. Replace <field> with the field name to be used as the labels.
- In the Symbology pane, click Layers
$feature.<field>
The attribute marker is added to the existing points’ symbology.
- Adjust the marker layer placement properties. In this example, the Offset Y value under Appearance is specified with a positive value to display the markers at the center of the symbol.
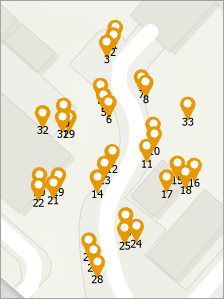
The map below shows the attribute-driven symbology honoring the point feature drawing order in ArcGIS Pro.

Use point symbol callouts for the labels
- Open the ArcGIS Pro project.
- Configure the point symbol callout. Refer to ArcGIS Pro: Common text symbols for more information.
- In the Contents pane, right-click the point feature layer and click Labeling Properties….
- In the Label Class pane, on the Symbol tab, under General
 , expand Callout.
 - Click the drop-down arrow and select Point symbol.
The point symbol callout is added to the point features.
- Adjust the labeling conflict properties. Refer to ArcGIS Pro: Resolve conflict between labels for more information.
- In the Label Class pane, click the Position tab.
- On the Position tab, click Conflict resolution
 .
. - Expand Unplaced labels and check Never remove (place overlapping).
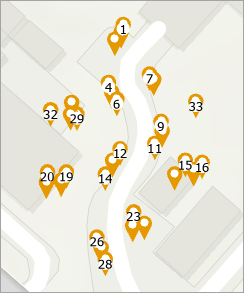
The map below shows the added point symbol callout, displaying the labels according to the feature drawing order in ArcGIS Pro.

Article ID: 000035705
- ArcGIS Pro
Get support with AI
Resolve your issue quickly with the Esri Support AI Chatbot.


Related Information
Discover more on this topic
Search for related information
Find training related to this topic
Explore ideas and give feedback
Get help from ArcGIS experts
Start chatting now