HOW TO
Symbolize features with graphical elements and attribute values in ArcGIS Pro
Summary
In ArcGIS Pro, feature boundaries are commonly symbolized using a single stroke layer defined by different colors, widths, and styles. However, in certain scenarios, combining graphical elements and attribute values with the stroke layer enhances boundary representation and can be achieved by adding multiple marker symbol layers into the existing symbology. For example, in town planning, triangular symbols and lot number markers can be incorporated to represent the parcel boundaries according to project needs or cartographic conventions.
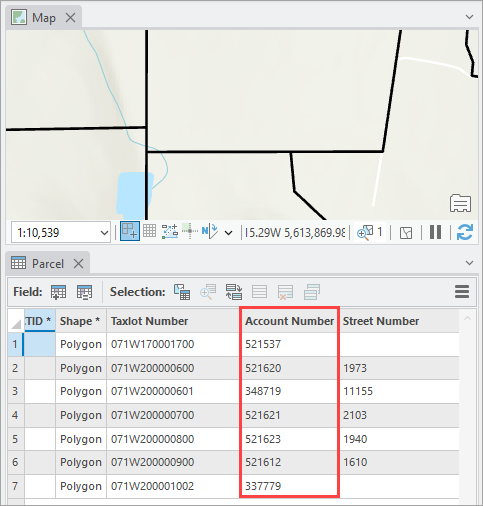
Complete the workflow provided to symbolize polygon boundaries by adding graphical elements and attribute markers to the existing symbology. The image below shows the Account Numbers field to be used as the attribute markers.
Procedure
- Open the ArcGIS Pro project.
- Add a marker layer to the existing boundaries' symbology.
- In the Contents pane, right-click the polygon feature layer and click Symbology.
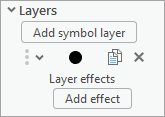
- In the Symbology pane, click the symbol.
- Add a marker layer as a new symbol layer. Refer to ArcGIS Pro: Add a symbol layer for instructions. In Step 3, select Marker layer.
The marker layer is added to the symbol.
- Configure the newly added marker layer properties.
- In the Symbology pane, click the Layers tab
 and select the newly added marker layer.
 - Under Appearance, click the Form drop-down and select the preferred symbol. In this example, a triangular symbol is selected.
- Configure the remaining properties to accurately position the marker. Refer to ArcGIS Pro: Modify symbols and ArcGIS Pro: Position and place marker symbol layers for more information.
- Click Apply or toggle Auto Apply on.
- In the Symbology pane, click the Layers tab
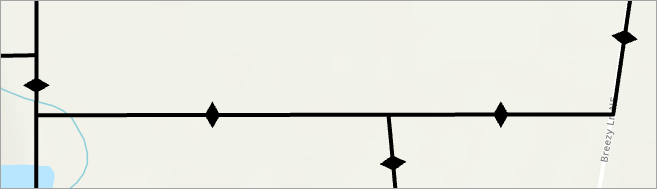
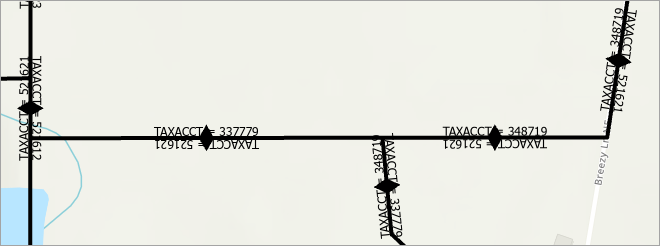
The map below shows the triangular markers added to the existing boundaries' symbology.
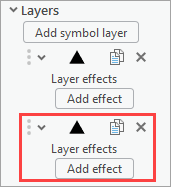
- Duplicate the marker layer.
- In the Symbology pane, click the Structure tab
 .
. - Under Layers, next to the preferred marker layer, click Duplicate layer
 .
.
- In the Symbology pane, click the Structure tab
The duplicated marker layer is added to the symbol.
- Enable the attribute-driven symbology. Refer to ArcGIS Pro: Enable attribute-driven symbology for instructions.
- Configure the attribute-driven marker layer properties.
- In the Symbology pane, click Primary Symbology
 and click the symbol.
 - Under Properties, click the Layers tab
 and select the duplicated marker layer.
 - Under Appearance, click the Form drop-down and select
 .
. - Insert the following expression for Text string in the Expression Builder window. Refer to Steps 5 through 8 in ArcGIS Pro: Connect symbol properties to attributes for instructions. Replace <name> with the desired name and <field> with the field name.
- In the Symbology pane, click Primary Symbology
"<name>" + " = " + $feature.<field>
Note:
Alternatively, in the Set Attribute Mapping dialog box, select the desired field from the drop-down list to be symbolized at the boundaries.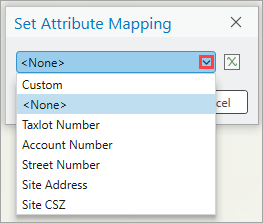
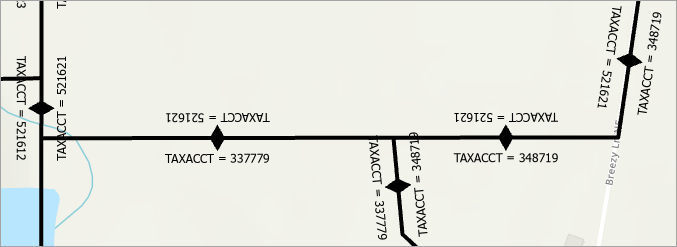
The map below shows the attribute markers added to the existing boundaries' symbology.
Note:
When duplicating a marker symbol layer, the new layer inherits the configurations and placement properties of the original layer. If necessary, modify the placement settings to prevent overlapping. Refer to ArcGIS Pro: Modify symbols for more information.
The map below shows the triangular symbols and attribute markers with their placement configured in ArcGIS Pro.
Article ID: 000035244
- ArcGIS Pro
Get support with AI
Resolve your issue quickly with the Esri Support AI Chatbot.


Related Information
Discover more on this topic
Search for related information
Find training related to this topic
Explore ideas and give feedback
Get help from ArcGIS experts
Start chatting now