操作方法
操作方法:将公开共享的数据作为 shapefile 从 ArcGIS Online 下载到本地计算机
摘要
In ArcGIS Online, it is possible to download publicly shared data as shapefiles to the local machine. The owner of the data must configure the hosted feature layer to allow others to export the data. Refer to ArcGIS Online: Export data from hosted feature layers for more information. This article outlines the workflows to export publicly shared data as shapefiles from ArcGIS Online to the local machine.
过程
Export the data from ArcGIS Online
- Log in to ArcGIS Online.
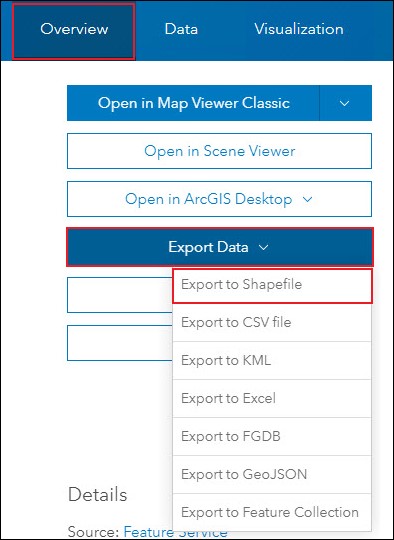
- In ArcGIS Online, navigate to the hosted feature layer's item details page.
- On the layer's item details page, on the Overview tab, click Export Data > Export to Shapefile.
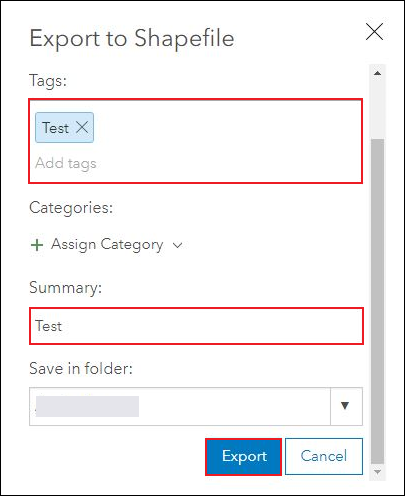
- In the Export to Shapefile window, specify the Tags and Summary sections, and click Export. The layer's item details page opens.
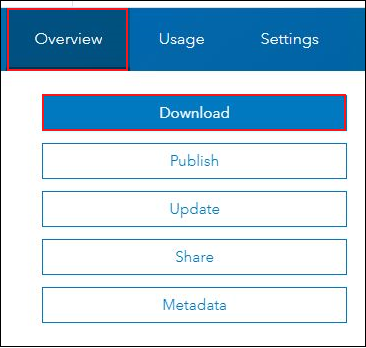
- On the shapefile layer's item details page, on the Overview tab, click Download. The shapefile is downloaded in a zipped folder.
Export the data using ArcGIS Pro
- Open the ArcGIS Pro project, and sign in to ArcGIS Online.
- Add the layer from ArcGIS Online to ArcGIS Pro. Refer to Steps 1 through 8 in ArcGIS Pro: Add data from ArcGIS Living Atlas of the World for instructions.
- In ArcGIS Pro, export the layer as a shapefile using the Feature Class To Shapefile tool.
- On the top ribbon, click the Analysis tab, and click Tools.
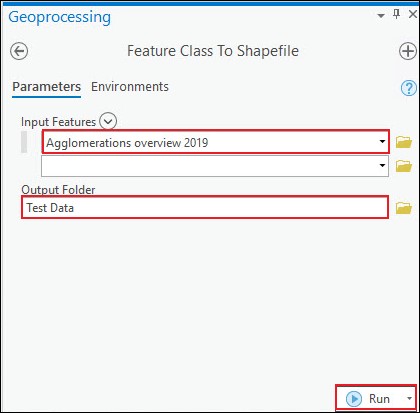
- In the Geoprocessing pane, search for and click Feature Class To Shapefile (Conversion). The Feature Class To Shapefile window opens.
- In the Feature Class To Shapefile window, click Parameters.
- For Input Features, select the desired layer or layers.
- For Output Folder, specify the folder location of the exported shapefile.
- Click Run.
Export the data using ArcMap
- Open the .mxd project in ArcMap.
- Add the layer from ArcGIS Online to ArcGIS Pro. Refer to ArcMap: Adding data from ArcGIS Online for instructions.
- In ArcMap, export the layer as a shapefile using the Feature Class To Shapefile tool.
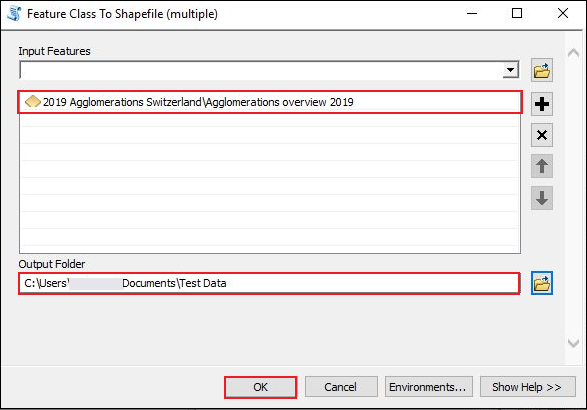
- In ArcMap, navigate to ArcToolbox > Conversion Tools > To Shapefile > Feature Class To Shapefile (multiple). The Feature Class To Shapefile (multiple) window opens.
- For Input Features, select the desired layer or layers.
- For Output Folder, specify the folder location of the exported shapefile.
- Click OK.
文章 ID: 000015899
获得人工智能支持
使用 Esri Support AI Chatbot 快速解决您的问题。


相关信息
发现关于本主题的更多内容
Search for related information
Find training related to this topic
Explore ideas and give feedback
获取来自 ArcGIS 专家的帮助
立即开始聊天