HOW TO
Export lidar data to a CSV file and retain the x, y, and z values in ArcGIS Pro
Summary
ArcGIS Pro supports lidar data provided as LAS or Optimized LAS (.ZLAS) files and can be used in three different formats: LAS dataset, terrain dataset, and mosaic dataset. This article provides steps to export lidar data to a CSV file in ArcGIS Pro while retaining the x, y, and z values.
Procedure
- If necessary, convert the lidar data to a LAS dataset using the Create LAS Dataset tool. Refer to Create a LAS dataset using the Create LAS Dataset geoprocessing tool for instructions.
- Convert the LAS dataset to a raster dataset using the LAS Point Statistics As Raster tool.
- Select the LAS dataset to convert for Input LAS Dataset.
- Set a name and location for Output Raster.
- In the Method drop-down list, select the desired type of statistics collected for the LAS points in each cell of the output raster. Click Run.
- Convert the raster dataset to point features using the Raster to Point tool.
- Select the output raster dataset from Step 2 for Input raster.
- Select VALUE from the Field drop-down list.
- Set a name and location for Output point features, and click Run.
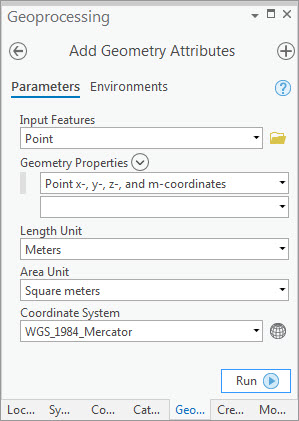
- Add the x-, y-, and z-coordinate values to the attribute table of the point shapefile or feature class using the Add Geometry Attributes tool.
- Select the point shapefile or feature class as Input Features.
- In the Geometry Properties drop-down list, select Point x-, y-, z-, and m-coordinates.
- Select the proper Length Unit, Area Unit, and Coordinate System for the input features, and click Run.
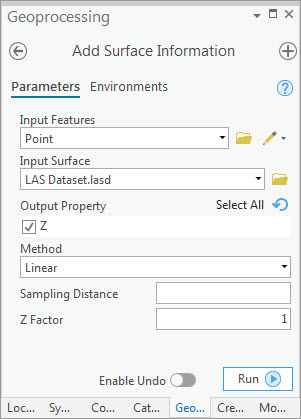
- Use the Add Surface Information tool to add z values to the attribute table.
Note:
The Add Surface Information tool is only available with a 3D Analyst extension.
- Select the point shapefile or feature class as Input Features.
- Select the lidar dataset as Input Surface.
- Check the Z check box under Output Property, and click Run.
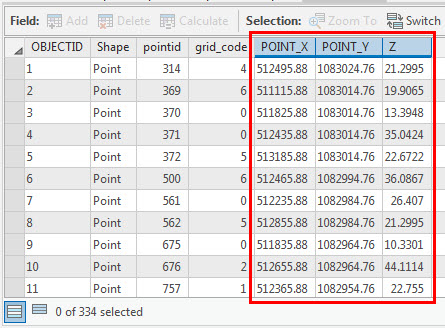
The attribute table is populated with the x, y, and z values.
- Export the attribute table to a CSV file using the Table To Table tool.
- Select the point shapefile or feature class containing the x, y, and z values for Input Rows.
- Select a folder for Output Location.
- Set a name and include the .csv extension for Output Name, and click Run.
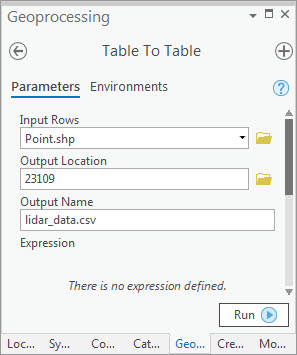
The exported CSV file containing the x, y, and z values of the lidar data is added to the project and in the specified folder.
Article ID: 000023109
Software:
- ArcGIS Pro 2 x
Get support with AI
Resolve your issue quickly with the Esri Support AI Chatbot.


Related Information
Discover more on this topic
Search for related information
Find training related to this topic
Explore ideas and give feedback
Get help from ArcGIS experts
Start chatting now