HOW TO
Convert a 2D shapefile to a 3D shapefile in ArcMap
Summary
The instructions provided describe how to convert a 2D shapefile to a 3D shapefile using the 3D Analyst extension in ArcMap.
Depending on the version of ArcMap, the workflow is different. Thus, follow the steps below that coincide with the version of ArcMap installed on the computer.
Procedure
Before converting the shapefile, ensure that the attribute table data from the shapefile contains a field that can be used as the 'elevation' measurement, often called the Z-value. 2D data cannot be converted into 3D data unless it has been sufficiently prepared for the conversion. To learn more, read Creating 3D feature data.ArcGIS (for) Desktop 10.x
- Verify that the 3D Analyst extension is activated by navigating to Customize > Extensions. Check 3D Analyst if it is not already checked.
- Open ArcToolbox, and navigate to 3D Analyst Tools > 3D Features.
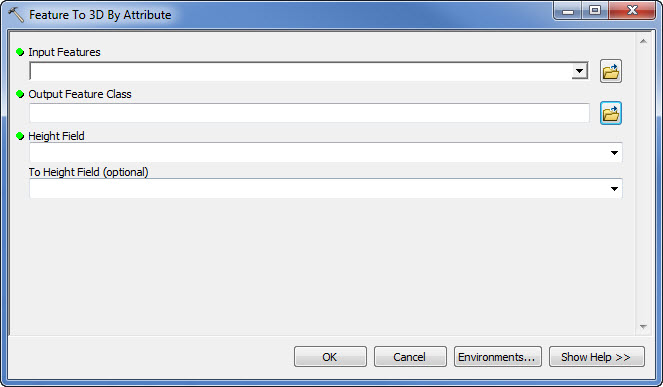
- Open the Feature To 3D By Attribute tool.
Note:
If the elevation values do not come from a field in the shapefile's attribute table, but rather from a 3D surface, disregard steps 3 through 7 and read the following ArcGIS Web Help documentation for more information: Deriving the existing features' heights from a surface
- In the Feature To 3D By Attribute window, select the 2D shapefile as the Input Feature.
- Specify a location for the 3D shapefile in the Output Feature Class box.
- Under Height Field, select the field to be used for the 'elevation' of the features.
- Click OK. After the new shapefile is created, open ArcScene from the 3D Analyst toolbar, and add the new shapefile (Add Data) to the scene. Right-click this shapefile in the Table of Contents, and click Properties.
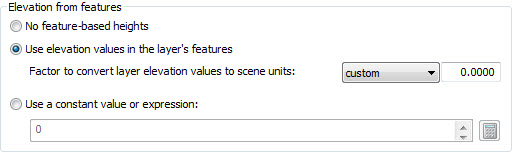
- Click the Base Heights tab, and under the Elevation from features section, specify the factor to convert the shapefile elevation values in the scene. This can either be custom, feet to meters, or meters to feet. Change this value as needed to provide the best view of the data.
ArcGIS Desktop 9.x
- Verify that the 3D Analyst extension is activated by navigating to Tools > Extensions. Check 3D Analyst if it is not already checked.
- On the 3D Analyst toolbar, click the 3D Analyst drop-down and navigate to Convert > Features to 3D.
- If the 3D Analyst toolbar is not visible, navigate to View > Toolbars and select 3D Analyst .
- In the Convert Features to 3D window, select the 2D shapefile as the Input feature.
- Under 'Source of heights,' select one of the three options for the 3D shapefile:
- Raster or TIN surface requires a raster or TIN dataset that contains elevation values.
- Input feature attribute requires a field in the input feature class that contains elevation values for the features.
Note:
To see the field in the tool, the field data type must be a number.
- Numeric constant is a constant z-value that is applied to all the features.
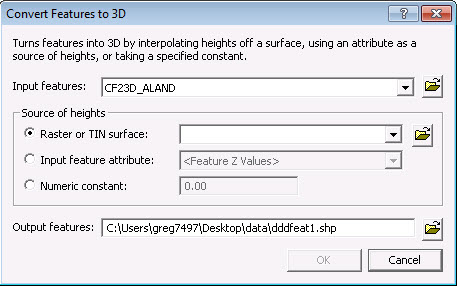
- Specify a location for the 3D shapefile in the Output features box.
- Click OK.
- After the new shapefile is created, open ArcScene from the 3D Analyst toolbar, and add the new shapefile (Add Data) to the scene. Right-click this shapefile from the scene layer menu, and click Properties.
- Click the Base Heights tab, and under the Z Unit Conversion section, specify the conversion factor for the shapefile elevation values in the scene. This can either be custom, feet to meters, or meters to feet. Change this value, as needed, to provide the best view of the data.
Article ID: 000008870
Software:
- ArcMap
Get support with AI
Resolve your issue quickly with the Esri Support AI Chatbot.


Related Information
Discover more on this topic
Search for related information
Find training related to this topic
Explore ideas and give feedback
Get help from ArcGIS experts
Start chatting now