HOW TO
Add old Esri north arrows in ArcGIS Pro
Summary
ArcMap and ArcGIS Pro provide various designs of north arrows to suit different preferences and map styles. These designs range from simple and traditional north arrows to more elaborate and stylized options. In ArcGIS Pro, old Esri north arrows available in ArcMap are unavailable in the north arrow gallery. It can be useful to have old Esri north arrows in ArcGIS Pro to maintain the visual appearance of project layouts.
This article describes the workflows to add old Esri north arrows in ArcGIS Pro by replacing the existing north arrow with the Esri North font or importing the ArcMap Esri North style to ArcGIS Pro.
Procedure
Replace the existing north arrow with the ESRI North font
In this workflow, the existing north arrow in ArcGIS Pro is replaced with the ESRI North font in the north arrow element properties. After selecting and applying the desired north arrow, it is displayed in the layout view.
- Open the ArcGIS Pro project.
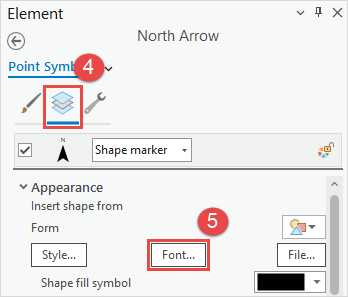
- In the layout view, in the Contents pane, right-click North Arrow, and click Properties.
- In the Element pane, click the drop-down arrow next to North Arrow and select Point Symbol.

- Click the Layers tab.
- Under Appearance, select Font….
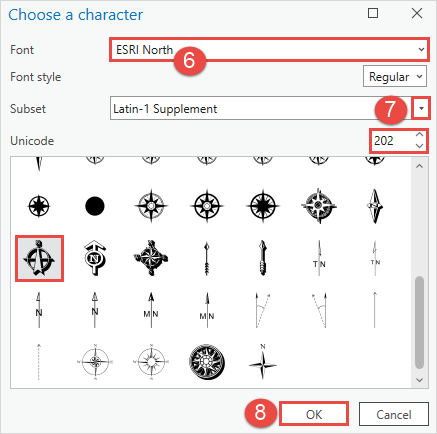
- In the Choose a character dialog box, for Font, ensure ESRI North is selected.
- For Subset, click the drop-down arrow to select the font subset. Scroll through the list of north arrows and select the desired north arrow.
Note:
Alternatively, under the correct Subset, type the Unicode character code into the Unicode text box and press Enter.
- Click OK.
- In the Element pane, click Apply.
Import the ArcMap Esri North style to ArcGIS Pro
In this workflow, the ArcMap Esri North style is imported to ArcGIS Pro. The imported north arrows are located and can be selected under the default category in the north arrow gallery.
- Create a new style in ArcMap and copy the Esri style north arrows.
- Open ArcMap.
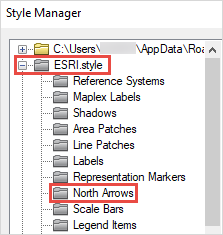
- Create a new style in Style Manager.
- In the Style Manager dialog box, expand ESRI.style and click North Arrows.
- Scroll through the list and right-click the north arrow from the selection. Click Copy.
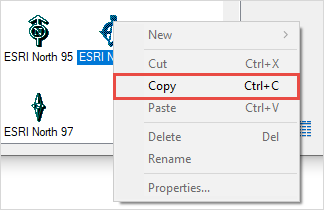
Note:
Multiple north arrows can be selected and copied from the selection.
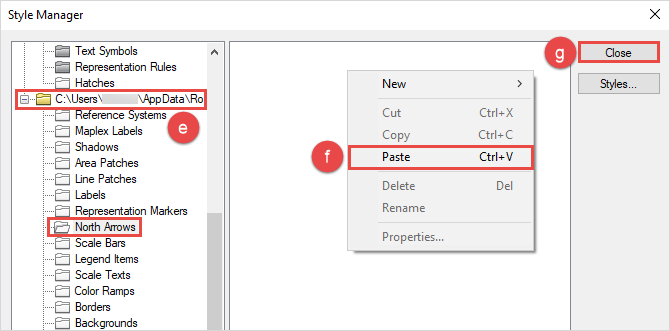
- In the Style Manager dialog box, expand the new style file and click North Arrows.
- Right-click the empty pane in the Style Manager dialog box and click Paste.
- Click Close to close the Style Manager dialog box.
- Close the ArcMap window.
- In ArcGIS Pro, import the north arrows.
- Open the ArcGIS Pro project.
- Refer to ArcGIS Pro: Add styles to a project to add the arrows to the current project. To add the arrows permanently for all projects, refer to How To: Add custom styles to all new ArcGIS Pro projects.
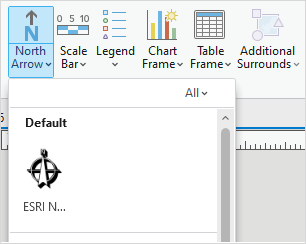
The image below shows the old Esri north arrow added to the ArcGIS Pro north arrow gallery.
Article ID: 000032182
- ArcGIS Pro 3 1
- ArcGIS Pro 3 0
- ArcGIS Pro 3 2
- ArcMap 10 8
Get support with AI
Resolve your issue quickly with the Esri Support AI Chatbot.


Related Information
Discover more on this topic
Search for related information
Find training related to this topic
Explore ideas and give feedback
Get help from ArcGIS experts
Start chatting now