HOW TO
Create a watershed model using Hydrology in ArcGIS Pro
Summary
A watershed is an area of land that drains into a common outlet along a stream. The Hydrology toolset can be used to extract hydrologic information from a digital elevation model (DEM) to create a watershed model. This model is helpful in watershed analysis, which is important in fields such as regional planning, agriculture, and forestry.
This article provides a workflow to create a watershed model using the Hydrology toolset, and convert the model to a watershed bounding polygon using the Raster to Polygon tool.
Procedure
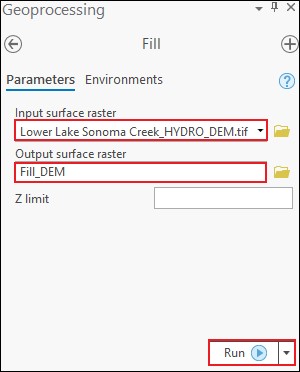
- Run the Fill tool.
- Open the Fill tool.
- For Input surface raster, select the desired DEM layer. In this example, the DEM layer is 'Lower Lake Sonoma Creek_HYDRO_DEM.tif'.
- For Output surface raster, specify an output name in the desired geodatabase location. In this example, the output name in the default geodatabase is 'Fill_DEM'.
- Leave Z limit at default.
- Click Run.
Note:
The Fill tool fills sinks to remove imperfections in the DEM. Esri recommends specifying the Z limit, if the depths of the sinks are known. The Sink tool can be used to identify sinks and their depths before using the Fill tool. If a Z-limit is not specified, all sinks are filled, regardless of depth. Refer to ArcGIS Pro: How Fill works for more information.
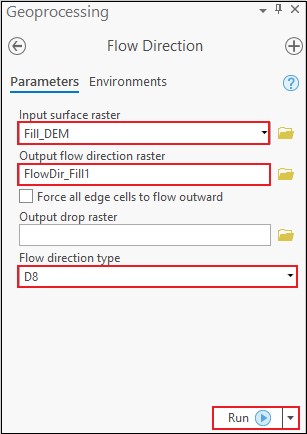
- Run the Flow Direction tool.
- Open the Flow Direction tool.
- For Input surface raster, select the DEM output from Step 1. In this example, it is 'Fill_DEM'.
- For Output flow direction raster, specify a raster output name in the desired geodatabase location. In this example, the output name in the default geodatabase is 'FlowDir_Fill1'.
- Ensure Flow direction type is D8.
- Leave other parameters at default.
- Click Run.
Note:
The Flow Direction tool using the D8 flow method aligns flow direction to the steepest downslope neighbor. This is the default option. Refer to ArcGIS Pro: How Flow Direction works for more information.
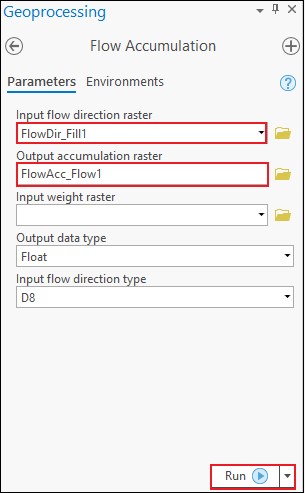
- Run the Flow Accumulation tool.
- Open the Flow Accumulation tool.
- For Input flow direction raster, select the raster output from Step 2. In this example, the input is 'FlowDir_Fill1'.
- For Output accumulation raster, specify a raster output name in the desired geodatabase location. In this example, the output name in the default geodatabase is 'FlowAcc_Flow1'.
- Leave other parameters at default.
- Click Run.
Note:
The Flow Accumulation tool calculates the accumulated flow into each cell, as determined by the accumulated weight of cells that flow into each downslope cell. Refer to ArcGIS Pro: How Flow Accumulation works for more information.
- Create a point feature representing the pour point of the watershed.
- Create a point feature class with the same coordinate system as the DEM layer in Step 1. Refer to ArcGIS Pro: Create a feature class for instructions. In this example, the point feature class Name and Alias are 'PourPoint' and 'Pour_point', respectively.
- Create a point feature. Refer to ArcGIS Pro: Create point and multipoint features for instructions.
Note:
Determine the location of the pour point on the map using the flow accumulation raster layer as reference.
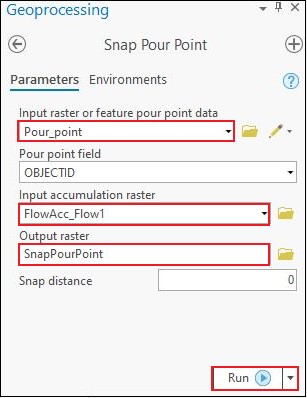
- Run the Snap Pour Point tool.
- Open the Snap Pour Point tool.
- For Input raster or feature pour point data, select the feature output from Step 4. In this example, the input is 'Pour_point'.
- For Input accumulation raster, select the raster output from Step 3. In this example, the input is 'FlowAcc_Flow1'.
- For Output raster, specify an output name in the desired geodatabase location. In this example, the output name in the default geodatabase is 'SnapPourPoint'.
- Leave other parameters at default.
- Click Run.
Note:
Pour points are points at which water flows out of an area. The Snap Pour Point tool snaps these points to the cell of highest flow accumulation within a specified distance. Refer to ArcGIS Pro: Snap Pour Point (Spatial Analyst) for more information.
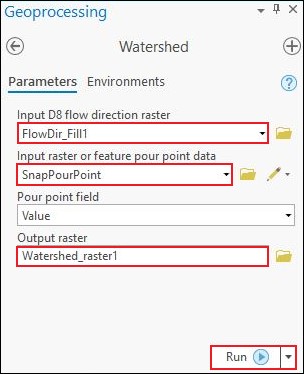
- Run the Watershed tool.
- Open the Watershed tool.
- For Input D8 flow direction raster, select the raster output from Step 2. In this example, the input is 'FlowDir_Fill1'.
- For Input raster or pour point feature data, select the raster output from Step 5. In this example, the input is 'SnapPourPoint'.
- For Output raster, specify an output name in the desired geodatabase location. In this example, the output name in the default geodatabase is 'Watershed_raster1'.
- Leave Pour point field at default.
- Click Run.
Note:
The Watershed tool delineates the upslope contributing area with flow direction input created from a DEM surface. Refer to ArcGIS Pro: How Watershed works for more information.
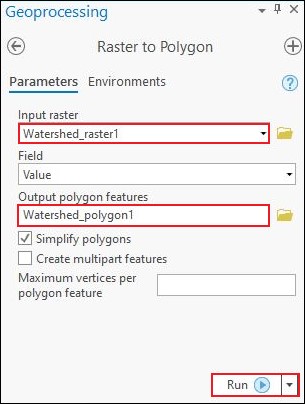
- Run the Raster to Polygon tool to convert the watershed raster output to a polygon.
- Open the Raster to Polygon tool.
- For Input raster, select the raster output from Step 6. In this example, the input is 'Watershed_raster1'.
- For Output polygon features, specify an output name in the desired geodatabase location. In this example, the output name in the default geodatabase is 'Watershed_polygon1'.
- Leave other parameters at default.
- Click Run.
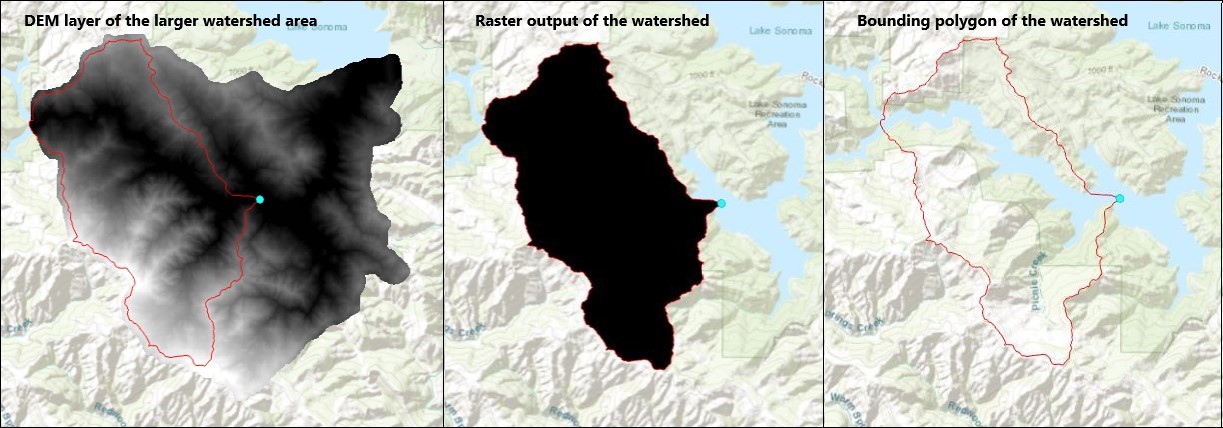
The image below shows the comparison of the DEM layer of the larger watershed area, the raster output created from the watershed model using the Hydrology toolset, and the watershed bounding polygon.
Article ID: 000023169
- ArcGIS Pro 2 x
Get support with AI
Resolve your issue quickly with the Esri Support AI Chatbot.


Related Information
Discover more on this topic
Search for related information
Find training related to this topic
Explore ideas and give feedback
Get help from ArcGIS experts
Start chatting now