HOW TO
Remove the timestamp from the date field in ArcGIS Pro
Summary
In certain cases, when loading new data, the date field is displayed in the format yyyy-mm-dd hh:mm:ss AM/PM. However, there may be instances where displaying the timestamp alongside the date is unnecessary. This article provides instructions to remove the timestamp from the date field in the attribute table in ArcGIS Pro.
Procedure
Use one of the methods below to remove the timestamp from the date fields in the attribute table in ArcGIS Pro.
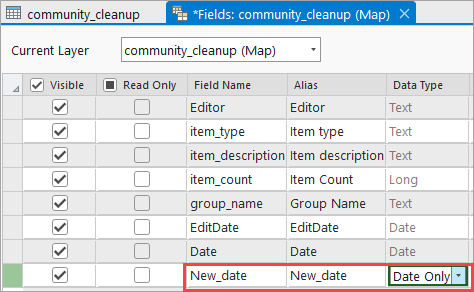
Create a new Date Only field
Note:
This workflow is only applicable to ArcGIS Pro 3.2 and later.
- In ArcGIS Pro, open the attribute table of the layer.
- In the attribute table, click the Add button to add a new field.
- Fill in the new field name and alias for Field Name and Alias.
- Select Date Only for Data Type. Refer to ArcGIS Pro: Add Field (Data Management) for more information. Click Save.
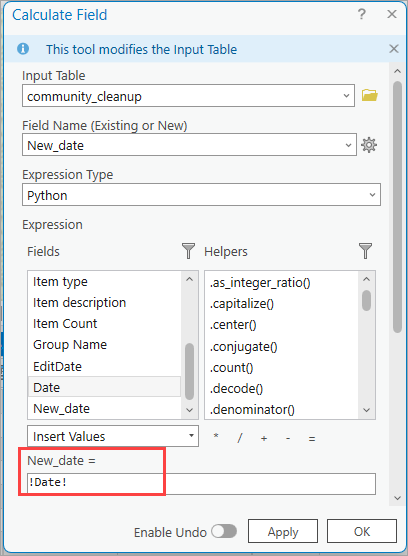
- In the attribute table, right-click the new field heading, and click Calculate Field.
- In the expression box, double-click the original date field under Fields.
- Click Apply > OK.
Use the Field Calculator (Python) function
- In ArcGIS Pro, open the attribute table of the layer.
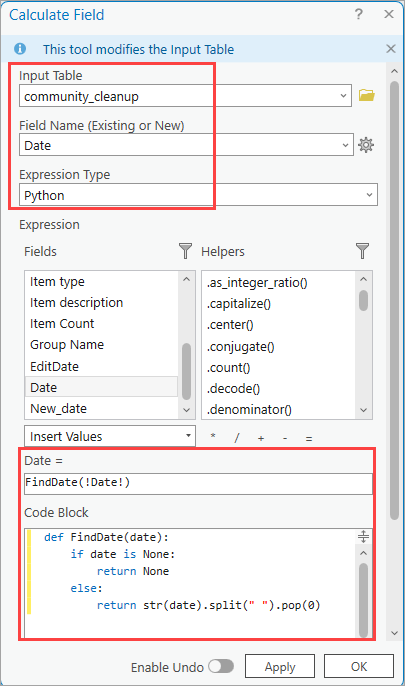
- In the attribute table, right-click the desired field heading, and click Calculate Field.
- In the Calculate Field window, select the feature layer for Input Table, the field name for Field Name (Existing or New), and Python for Expression Type.
- In the expression box, copy and paste the following script and replace FieldName accordingly.
FindDate(!FieldName!)
- In the Code Block box, copy and paste the following script:
def FindDate(date):
    if date is None:
        return None
    else:
        return str(date).split(" ").pop(0)
- Click Apply > OK.
Note:
Alternatively, in the expression box, copy and paste the following script and replace FieldName accordingly.

timestamp(!FieldName!)

In the Code Block box, copy and paste the following script:

from datetime import datetime

def timestamp(mydate):
 date = mydate
 strdate = date.strftime("%Y/%m/%d")
 finaldate = datetime.strptime(strdate,"%Y/%m/%d")
 return finaldate
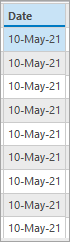
The following image shows the date field with only the date displayed in the attribute table.
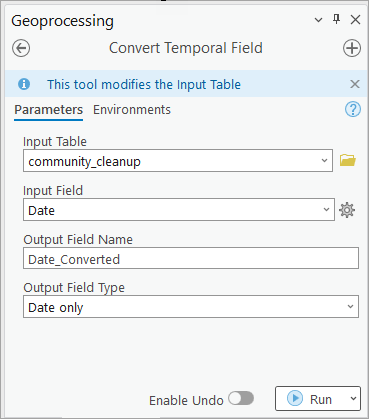
Use the Convert Temporal Field tool
Note:
Using the Convert Temporal Field tool creates a new field in the attribute table.
- In ArcGIS Pro, on the Analysis tab, click Tools in the Geoprocessing group.
- In the Geoprocessing pane, search for and select Convert Temporal Field.
- In the Convert Temporal Field pane, in Parameters, select the input table or layer and input date field for the Input Table and Input Field boxes.
- In the Output Field Name box, fill in the output field name.
- In the Output Field Type box, select Date only to display the output date format selection.
Note:
If Text is selected, select the date format without the timestamp for Output Format.
- Click Run.
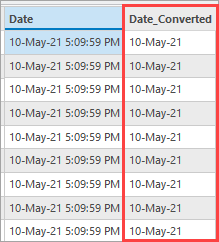
The following image shows the newly created date field with only the date displayed.
Article ID: 000025447
- ArcGIS Pro 3 1
- ArcGIS Pro 3 3
- ArcGIS Pro 3 0
- ArcGIS Pro 3 2
Get support with AI
Resolve your issue quickly with the Esri Support AI Chatbot.


Related Information
Discover more on this topic
Search for related information
Find training related to this topic
Explore ideas and give feedback
Get help from ArcGIS experts
Start chatting now