PROBLEM
Unable to export data from the item details page in Portal for ArcGIS
Description
In Portal for ArcGIS, attempts to export data from a hosted feature layer’s item details page fail. In some cases, an empty file is created and added to the Content page.
Cause
The firewall or antivirus software is preventing the data from being exported by blocking back-end processes.
Solution or Workaround
Add exceptions to the antivirus software
Ensure the proper exceptions are in place for all the ArcGIS Enterprise directories. Refer to FAQ: Which ArcGIS Enterprise directories should be excluded for security or antivirus software? for more information on antivirus exceptions.
Export the data using the Extract Data tool in Map Viewer Classic
Note:
The hosted feature layer can only be exported to CSV, file geodatabase, KML, and shapefile formats when using the Extract Data tool.
- Log in to Portal for ArcGIS. Click Content > My Content.
- Browse to the hosted feature layer, click More Options
 and select Open in Map Viewer Classic with full editing control.
Note:
If the Open in Map Viewer dialog prompt is returned, click NOT RIGHT NOW.
- In Map Viewer Classic, in the Contents pane, browse to the hosted feature layer and click Perform Analysis
 .
. - In the Perform Analysis pane, click Manage Data and select Extract Data.
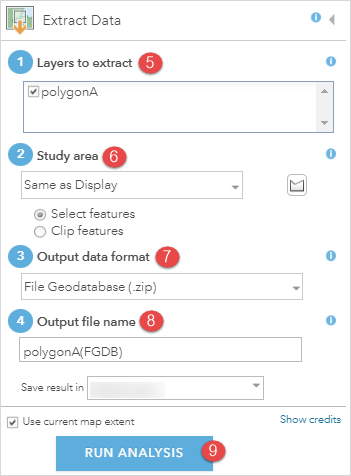
- In the Extract Data pane, under Layers to extract, ensure the hosted feature layer is checked.
- Under Study area, select the boundary for the exported data. Refer to Portal for ArcGIS: Usage notes for more information.
- Select the preferred format for the exported data from the Output data format drop-down list. In this example, File Geodatabase (.zip) is selected.
- Specify the name and location of the exported data under Output file name.
- Click RUN ANALYSIS. The exported data is automatically added to the Content page in Portal for ArcGIS.
Export the data in ArcGIS Pro
- Open a new project in ArcGIS Pro and connect to the organization's portal. Refer to ArcGIS Pro: Create a project for instructions.
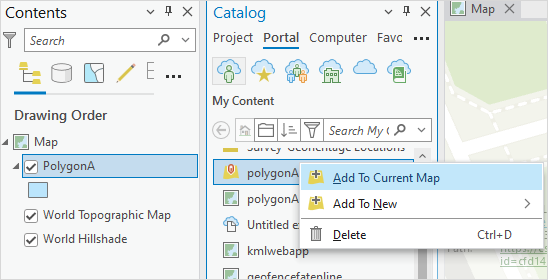
- In the Catalog pane, on the Portal tab, click My Content.
- Browse to and right-click the hosted feature layer. Click Add To Current Map. The hosted feature layer is added to the Contents pane as a feature layer.
- Export the feature layer to the preferred data format in ArcGIS Pro. Refer to ArcGIS Pro: Export data for instructions.
Article ID: 000029669
- Portal for ArcGIS
- ArcGIS Pro 3 1
- ArcGIS Pro 3 0
- ArcGIS Pro 2 x
Get support with AI
Resolve your issue quickly with the Esri Support AI Chatbot.


Related Information
Discover more on this topic
Search for related information
Find training related to this topic
Explore ideas and give feedback
Get help from ArcGIS experts
Start chatting now