HOW TO
Place symbols at the top center of polygons using labels in ArcGIS Pro
Summary
In mapping, placing symbols at the top center of polygons is sometimes necessary to improve visual clarity. For example, in parcel maps, placing symbols at the top center can help distinguish each feature without overlapping important interior details. However, ArcGIS Pro’s symbol placement options can be limited, as symbols are typically fixed to a feature’s geometry and lack dynamic positioning. As a workaround, using labels styled as symbols offers greater flexibility and placement control.
This article outlines the workflow to place symbols at the top center of polygons using labels in ArcGIS Pro.
Procedure
- Open the ArcGIS Pro project.
- Turn the polygon labels on. Refer to ArcGIS Pro: Turn on labels for instructions.
The map below shows the polygons with the labels turned on.

- Add a line callout text symbol.
- In the Contents pane, right-click the polygon feature layer and click Labeling Properties….
- In the Label Class pane, click the Symbol tab.
- On the Symbol tab, under General
 , expand Callout and select Simple line from the drop-down list.
- Add a marker layer to the line callout text symbol.
- In the Label Class pane, under Callout, click the Leader line symbol drop-down arrow and click Format line symbol….
- In the Format Embedded Line Symbol subpane, click the Structure tab
 .
. - Add a marker layer. Refer to Steps 2 through 3 in ArcGIS Pro: Add a symbol layer for instructions. In Step 3, select Marker layer.
Note:
To change the appearance of the marker layer, navigate to the Layers tab, expand Appearance, and click Style. In the Choose a shape dialog box, select the preferred shape.
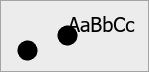
- In the Label Class pane, click Delete layer on the default stroke symbol layer to remove the symbol.
The preview below shows the stroke symbol removed from the label.
- Configure the marker placement settings.
- In the Format Embedded Line Symbol subpane, click the Layers tab
 .
.
- In the Format Embedded Line Symbol subpane, click the Layers tab
Note:
If there are multiple layers present, ensure the newly added marker layer is selected before proceeding with the instructions.
- Under Marker Placement, for Placement, select At extremities. Refer to ArcGIS Pro: Position and place marker symbol layers for more information.
- For Extremities, select At end.
- Hide the default labels by changing the color.
- In the Format Embedded Line Symbol subpane, click Return to previous symbology page
 .
. - Under Appearance, for Color, select No color.
- In the Format Embedded Line Symbol subpane, click Return to previous symbology page
- Configure the Maplex Label Engine placement properties. Refer to ArcGIS Pro: Label with the Maplex Label Engine for more information.
- In the Label Class pane, click Position and click the Position tab
 .
. - Under Placement, click the first drop-down arrow and select Regular placement.
- Click the second drop-down arrow and select Horizontal around polygon.
- Specify a value for Preferred offset to add distance between the labels and their features.
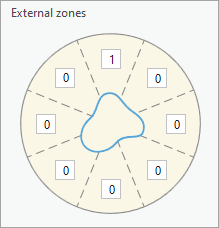
- Specify a value for each zone under External zones. Refer to ArcGIS Pro: Place labels using internal and external zones for more information. To place the label symbols at the top center of the polygons, set the middle top zone value to 1 (highest priority) and the remaining zones to 0 (blocked).
- In the Label Class pane, click Position and click the Position tab
- Expand Leader line anchor points and select Closest point on the polygon outline. Refer to ArcGIS Pro: Set an anchor point position for callouts for more information.
Note:
The position of the marker symbol may vary depending on the selected labeling field.
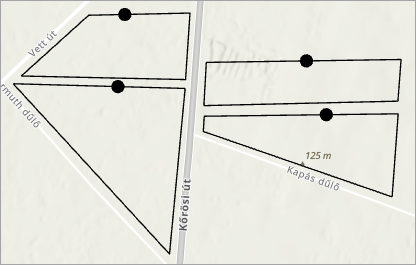
The map below shows the labels positioned at the top center of the polygons in ArcGIS Pro.
Article ID: 000035877
- ArcGIS Pro
Get support with AI
Resolve your issue quickly with the Esri Support AI Chatbot.


Related Information
Discover more on this topic
Search for related information
Find training related to this topic
Explore ideas and give feedback
Get help from ArcGIS experts
Start chatting now