HOW TO
Generate and export an elevation profile view chart from a GPX file in ArcGIS Pro
Summary
In ArcGIS Pro, a profile view chart can be created using a GPX file by extracting and processing the GPX data to generate detailed elevation profiles. The resulting charts are useful in route planning, terrain analysis, or environmental studies. This article describes the workflow to generate and export an elevation profile view chart from a GPX file in ArcGIS Pro.
Procedure
- Open the ArcGIS Pro project.
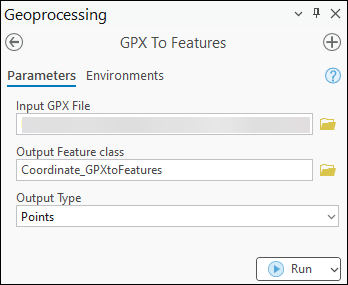
- Convert the GPX file to point features using the GPX To Features tool.
- On the Analysis tab, in the Geoprocessing group, click Tools.
- In the Geoprocessing pane, search for and click GPX To Features (Conversion Tools).
- In the GPX To Features pane, for Input GPX File, click Browse and navigate to the GPX file.
- For Output Feature class, specify a name and location.
- Leave the other parameters as default. Click Run.
- Convert the map to a 3D scene. Refer to ArcGIS Pro: Create a scene from the map for instructions.
- Add an elevation surface layer to the 3D scene. Refer to ArcGIS Pro: Work with custom elevation surface layers for instructions.
- Create an elevation profile using the Elevation Profile tool. Refer to ArcGIS Pro: Interactive Placement for instructions.
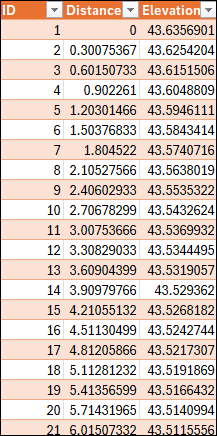
- Export the elevation profile chart to a preferred format. In this example, the chart is exported to a CSV table. Refer to ArcGIS Pro: Profile graph export options for instructions.
The image below shows the CSV table generated from the GPX file.
Article ID: 000034258
- ArcGIS Pro 3 3
- ArcGIS Pro 3 2
- ArcGIS Pro 3 4
Get support with AI
Resolve your issue quickly with the Esri Support AI Chatbot.


Related Information
Discover more on this topic
Search for related information
Find training related to this topic
Explore ideas and give feedback
Get help from ArcGIS experts
Start chatting now