HOW TO
Batch-create assignments in Workforce for ArcGIS using Python or manually appending pre-existing datasets
Summary
It may be necessary to batch-create assignments based on existing datasets in Workforce for ArcGIS to be able to manage and review multiple datasets. Currently, there is no built-in tool to batch import data as assignments.
Procedure
It is possible to either manually append the data from an existing dataset, or to batch-create assignments using a Python script. For more information on how to batch-create assignments using the Python script, refer to the following Esri Github page.
To manually append the data, follow the instructions below.
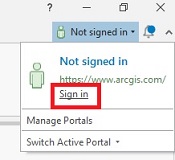
- Open ArcGIS Pro and log in to ArcGIS Online with the ArcGIS account that created the workforce project.
- In Contents, add a .csv table containing unique IDs of the data and XY data or spatial dataset to the map.
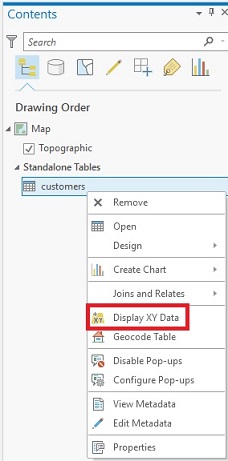
- If the dataset is not spatially enabled, right-click the newly added table > Display XY Data.
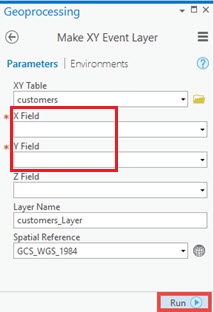
- Ensure the X and Y fields are correct, and click Run. A temporary layer is added to the map.
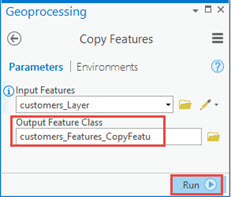
- Right-click the newly added layer > Data > Export Features.
- Modify the output feature class name, and click Run. A new layer is added to the map.
- Remove the temporary event layer from the map.
- If the dataset is not spatially enabled, right-click the newly added table > Display XY Data.
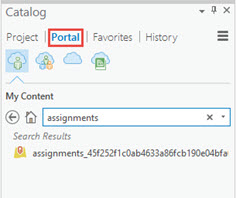
- In the Catalog pane, click Portal, and open the workforce project folder. Locate the assignment layer in the folder.
- Drag and drop the assignment layer to the map.
- In the Geoprocessing pane, open the Append tool.
- Specify the parameters as follows:
- Input Datasets: The exported feature layer created in Step 2d
- Target Dataset: The assignment layer
- Schema Type: Select Use the Field Map to reconcile schema differences
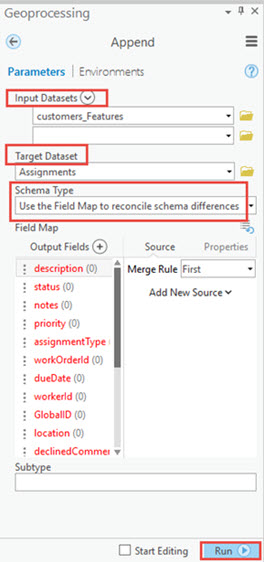
- Ensure the required fields are mapped correctly, and click Run. The assignments are appended to the assignment layer.
Article ID: 000017246
- ArcGIS Pro
- Online
- ArcGIS Workforce
Get support with AI
Resolve your issue quickly with the Esri Support AI Chatbot.


Related Information
Discover more on this topic
Search for related information
Find training related to this topic
Explore ideas and give feedback
Get help from ArcGIS experts
Start chatting now