HOW TO
Berechnen der Fläche von Löchern in einem Polygon-Feature in ArcGIS Pro
Zusammenfassung
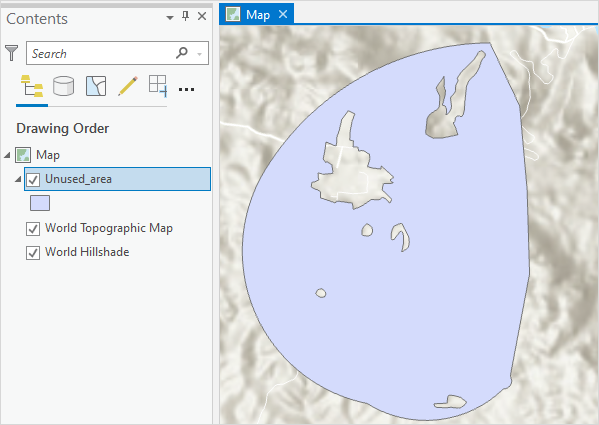
A polygon feature layer may contain holes. Sometimes it is necessary to calculate the area of these holes in the course of performing spatial analysis. In the examples in this article, calculations are made to determine the area of the holes in the polygon feature layer Unused_area.
Vorgehensweise
- Open the ArcGIS Pro project.
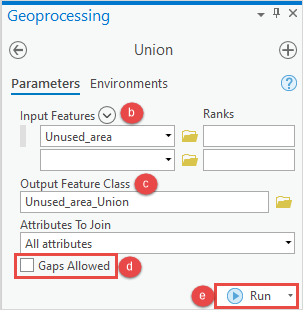
- Use the Union tool to create a feature from the holes in the polygon feature layer.
- In the Geoprocessing pane, search for and click the Union tool. Refer to ArcGIS Pro: Run a tool in the Geoprocessing pane for instructions.
- In the Union pane, under the Parameters tab, select the polygon feature layer from the Input Features drop-down list.
- Provide a name for the Output Feature Class and Browse…
 to the location where the output feature should save.
 - Uncheck the Gaps Allowed check box. This allows the tool to create a feature for the areas completely enclosed by the polygon. Refer to ArcGIS Pro: Parameters for more information.
- Click Run.
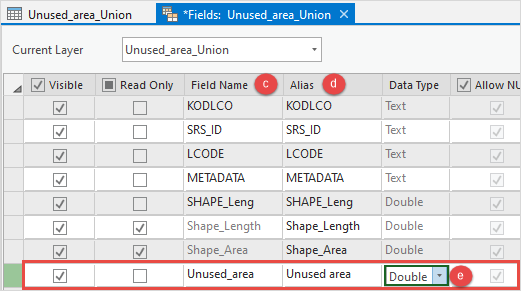
- Add a new field to the attribute table of the new feature class.
- In the Contents pane, right-click the feature layer and select Attribute Table.
- In the attribute table, click Add Field
 . The Fields view opens.
 - In the Fields view, specify a name for the field in the Field Name column.
- Double-click the Alias column of the new field and specify an alias for it.
- Double-click the Data Type column of the new field and select Double from the drop-down menu.
- On the top ribbon, in the Fields tab, click Save.
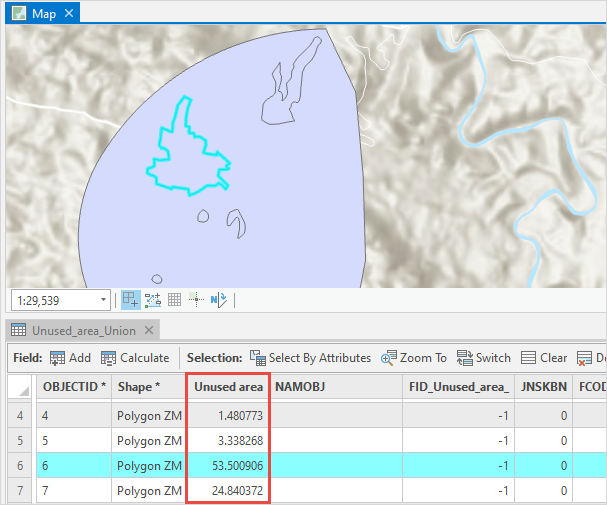
- Populate the spatial information for the field using the Calculate Geometry tool.
- Right-click the field header and select Calculate Geometry to open the Calculate Geometry window.
- In the Calculate Geometry window, under Geometry Attributes, select the field for Field (Existing or New) and set Property to Area (geodesic).
- Select the unit of measurement for Area Unit. In this example, Acres is selected.
- Select Current Map [Map] from the Coordinate System drop-down list.
- Click OK.

The image below shows the Unused area field in the table, indicating the area of the holes in the polygon.
Artikel-ID: 000027463
Holen Sie sich Unterstützung mit KI
Lösen Sie Ihr Problem schnell mit dem Esri Support AI Chatbot.


Zugehörige Informationen
Weitere Informationen zu diesem Thema erkunden
Search for related information
Find training related to this topic
Explore ideas and give feedback
Unterstützung durch ArcGIS-Experten anfordern
Beginnen Sie jetzt mit dem Chatten