操作方法
操作方法:在 ArcGIS Pro 中围绕点要素创建方形缓冲区
摘要
In ArcGIS Pro, the Buffer tool creates a circular polygon buffer by default when used on a point feature. The circular buffer can be used as a base to create a square buffer. Creating a square buffer is helpful in some studies. For example, when studying the crime rate within 4 square miles of a city. Displaying the area of study on the map with a square buffer draws the viewer's attention to the center point of crime.
There are no tools available to create square buffers around point features directly. However, this can be achieved indirectly, using the Feature Envelope To Polygon tool, or the Minimum Bounding Geometry tool, after a circular buffer is created.
过程
Follow the steps below to create a circular buffer around the point feature using the Buffer tool.
- In the Geoprocessing pane, navigate to Toolboxes > Analysis Tools > Proximity, and click the Buffer tool.
- Configure the Buffer parameters as follows:
- For Input Features, select the point feature to create a buffer from the drop-down menu. In this example, it is PointFeature.
- For Output Feature Class, specify a name and save the location for the output buffer polygon.
- For Distance [value or field], specify the distance from the center point to be buffered.
- Click Run.

Choose either the Minimum Bounding Geometry tool, or the Feature Envelope to Polygon tool to create a square buffer.
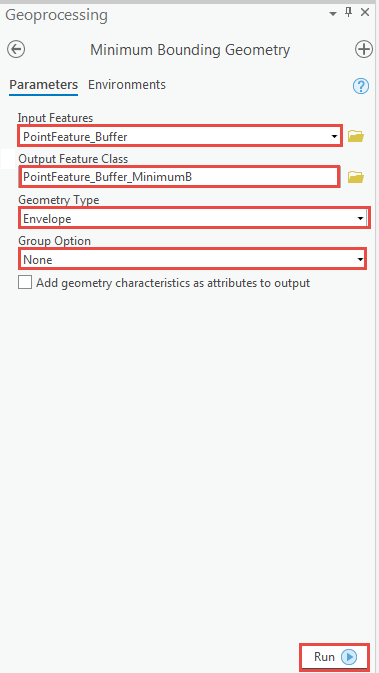
Use the Minimum Bounding Geometry tool
- In the Geoprocessing pane, navigate to Toolboxes > Data Management Tools > Features, and click Minimum Bounding Geometry.
- Configure the Minimum Bounding Geometry parameters as follows:
- For Input Features, select the buffer polygon from the drop-down menu. In this example it is PointFeature_Buffer.
- For Output Features, specify a name and save the location for the output buffer polygon.
- For Geometry Type, select Envelope from the drop-down menu.
- For Group Option, select None from the drop-down menu.
- Click Run.
Use the Feature Envelope To Polygon tool
- In the Geoprocessing pane, navigate to Toolboxes > Data Management Tools > Features, and click Feature Envelope To Polygon.
- Configure the Feature Envelope To Polygon parameters as follows:
- For Input Features, select the buffer polygon from the drop-down menu. In this example it is PointFeature_Buffer.
- For Output Features, specify a name and save the location for the output buffer polygon.
- Click Run.

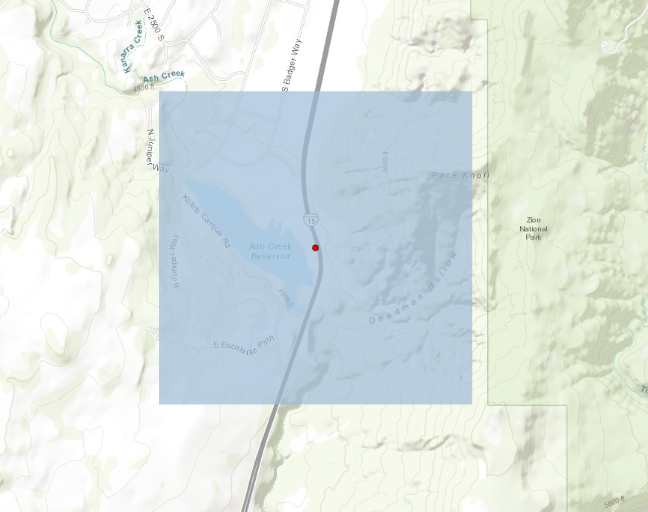
A square buffer is created around the point feature as shown in the image below.
文章 ID: 000023198
获得人工智能支持
使用 Esri Support AI Chatbot 快速解决您的问题。


相关信息
发现关于本主题的更多内容
Search for related information
Find training related to this topic
Explore ideas and give feedback
获取来自 ArcGIS 专家的帮助
立即开始聊天