HOW TO
Plan a flight in Site Scan Manager for ArcGIS
Summary
Instructions provided describe how to plan flights in Site Scan Manager for ArcGIS.
With this feature, it is possible to
- Plan a flight in either Site Scan Flight or Manager
- Plan a flight from the office, and a colleague can execute the flight plan at the jobsite
- Plan a flight ahead of time with orthomosaics, overlays, and ground control points (GCP)
- Plan a flight without access to an iPad. Anyone with a Full-access Site Scan account can create a flight plan in Manager, which allows more cross-team functionality and collaboration.
Procedure
- Log in to Site Scan Manager for ArcGIS. Once logged in, navigate to the Projects section from the left sidebar.

- Select any of the projects under the organization account. It is not necessary to be a project administrator to create a flight plan.
- Select a project in which to create a flight plan, and navigate to the Flight Plans section at the upper-left corner. View any previously planned flights (all of which are available on the Site Scan for ArcGIS Flight Planning app).

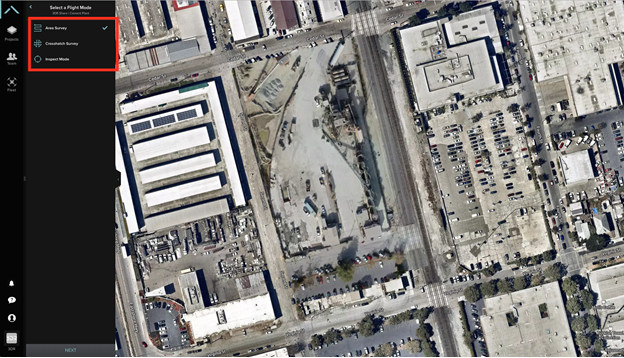
- Click the New Flight Plan button on the top right corner to go to the map screen for the project and select the type of flight to plan:
- Area Survey
- Crosshatch Survey, or
- Inspect Mode.
A blue checkmark appears next to the Flight Mode selected.
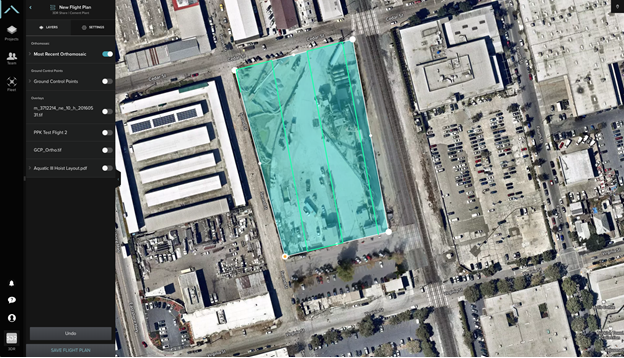
- Click Next to draw the Flight Path and select any map layers, including GCPs, previously created orthomosaics, or any of the overlays already uploaded. To restore the flight path to its original layout, use the Undo button on the bottom left of the screen.
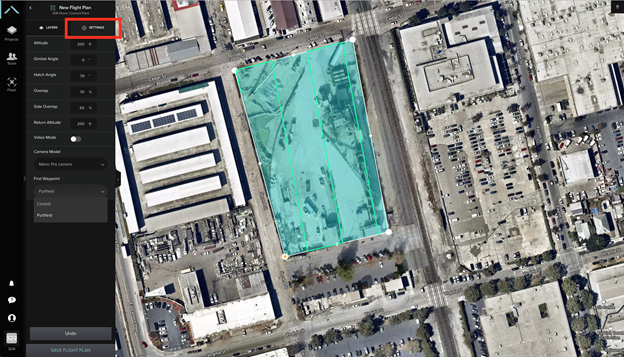
- When finished with the flight path and all the necessary layers for your flight have been toggled, click the Settings button and update any of the flight settings, including:
- Altitude
- Gimbal Angle
- Hatch Angle
- photo Overlap
- Side Overlap
- Return Altitude
- Video Mode (on or off)
- Camera Model used
- First Waypoint (closest or furthest)
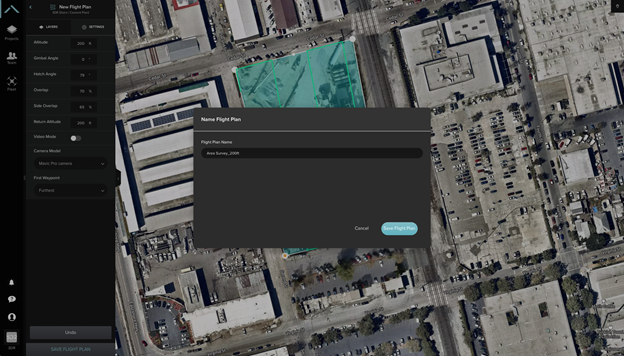
- Once finished editing the flight settings, click Save Flight Plan and name it so the rest of the team can access it.
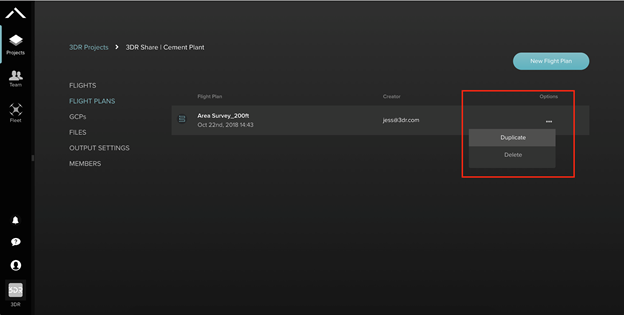
This flight plan is now accessible on the web and on the Flight Planning app. It is easy to duplicate or delete the new Flight Plan by navigating to the Flight Plans section of the project and clicking the ellipsis (...) symbol.
Article ID: 000023043
- Site Scan Manager for ArcGIS
Get support with AI
Resolve your issue quickly with the Esri Support AI Chatbot.


Related Information
Discover more on this topic
Search for related information
Find training related to this topic
Explore ideas and give feedback
Get help from ArcGIS experts
Start chatting now