PROBLEM
Unable to use geoprocessing tools on the ArcGIS Living Atlas of the World image service in ArcGIS Pro
Description
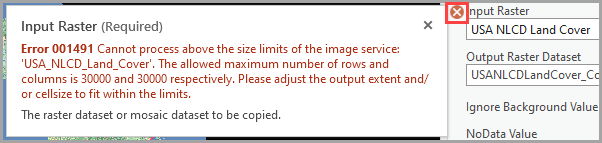
In ArcGIS Pro, when using geoprocessing tools such as Clip Raster, Copy Raster, and Resample, an error icon  is displayed next to the Input Raster parameter upon selecting an image service from ArcGIS Living Atlas of the World. Hovering the pointer to the error icon displays the following error message:
Error:
Error 001491 Cannot process above the size limits of the image service: <Image_service name>. The allowed maximum number of rows and columns is <maximum_number_of_rows> and <maximum_number_of_columns> respectively. Please adjust the output extent and/or cellsize to fit within the limits.
Cause
The output extent exceeds the maximum number of rows and columns that the ArcGIS Living Atlas of the World image service can query. When selecting an ArcGIS Living Atlas of the World image service for the Input Raster parameter, the geoprocessing tools recognize the original extent of the image service as the processing extent, unless specified differently. Most ArcGIS Living Atlas of the World image services provide data for a large coordinate extent, exceeding the query limitation set for an image service.
Solution or Workaround
Set a smaller output extent
Note:
This workaround is practical if a smaller output extent, within the limitations specified in the error message, is determined for the image service. This approach preserves the raster resolution.
- In ArcGIS Pro, open the project with the ArcGIS Living Atlas of the World image service.
- On the Analysis ribbon tab, in the Geoprocessing group, click Tools.
- In the Geoprocessing pane, in the search bar, type and select the geoprocessing tool to be used. In this example, the Copy Raster (Data Management) tool is selected.
- For Input Raster, click the drop-down arrow and select the ArcGIS Living Atlas of the World image service. In this example, the USA NLCD Land Cover is selected.
- Click OK.
- On the map, zoom in to a smaller extent (displaying the necessary area of interest in the map frame).
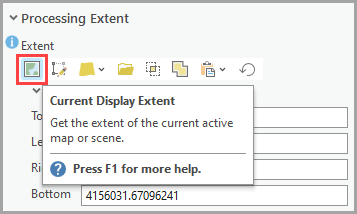
- In the Copy Raster pane, on the Environments tab, if necessary, expand Processing Extent.
- For Extent, select the Current Display Extent option. Refer to ArcGIS Pro: Processing extent for more information.
- Click Run.
Adjust the raster size by exporting an image service for offline use
Note:
This workaround is practical to readjust the raster size to match the maximum number of pixel rows and columns limitation when exporting a larger extent of the image service. When a larger clipping extent is specified, the image service data is resampled, resulting in a larger output cell size and a reduction in output resolution.
- In ArcGIS Pro, open the project with the ArcGIS Living Atlas of the World image service.
- In the Contents pane, browse to and right-click the image service, and select Data > Export Raster to open the Export Raster pane.
- In the Export Raster pane, on the General tab, under Spatial Reference System and Clipping Options, for Clipping Geometry, click the drop-down arrow and select Default.
Note:
Selecting Default exports the image service based on the image service's original extent.
- Check the Maintain Clipping Extent check box.
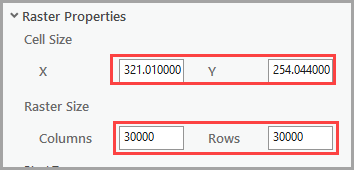
- Under Raster Properties, specify the value for Raster Size to match the limitation stated in the error message. In this example, the value for Raster Size is specified as 30000 for both Columns and Rows. The cell sizes for X and Y are automatically adjusted to 321.01000000000005 and 254.04400000000004 to accommodate the specified raster size.
- Click Export, and add the exported TIFF file to the Input Raster parameter of the geoprocessing tools.
Article ID: 000033223
- ArcGIS Pro 3 1
- ArcGIS Pro 3 3
- ArcGIS Pro 3 2
- ArcGIS Living Atlas
Get support with AI
Resolve your issue quickly with the Esri Support AI Chatbot.


Related Information
Discover more on this topic
Search for related information
Find training related to this topic
Explore ideas and give feedback
Get help from ArcGIS experts
Start chatting now