PROBLEM
Interactive Legend template displays zero count for merged symbology in ArcGIS Instant Apps
Description
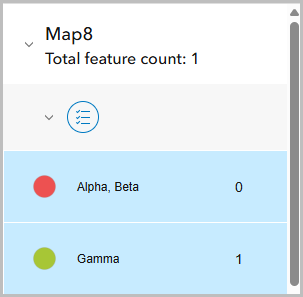
When using the ArcGIS Instant Apps Interactive Legend template with a feature layer that has merged values in its symbology, the web app displays a feature count of 0 for those merged categories.
The image below shows the feature count for the merged values of Alpha and Beta is zero.
Cause
This is currently a known limitation as per BUG-000169496. The Interactive Legend template does not correctly interpret merged values in the layer’s renderer.
Solution or Workaround
Create a new field based on the merged values before creating a web app
- Create a new field in the table in ArcGIS Online.
- Log in to ArcGIS Online and open the item page of the feature layer. Click the Data tab.
- Select the Table view, and click Add Field.
- In the Add field dialog box, click the Text drop-down arrow and select String. Click Next.
- Under Field name, specify a name for the field. In this example, the name is Merged_Town.
- Under Display name, specify an alias.
- Click Add field.
- Specify the value of the new field in the table.
- Under the field header, click the column cell and specify the intended merged value. In this example, 'Alpha, Beta' is specified in both the Alpha and Beta rows.
- If necessary, repeat Step 2 (a) for other values to be merged. Otherwise, specify the original values in the remaining rows. In this example, 'Gamma' is specified in the Gamma row.

- Apply the new field in the Styles pane in Map Viewer.
- Click the Overview tab and click Open in Map Viewer.
- On the Content (dark) toolbar, click the feature layer.
- On the Settings (light) toolbar, click Styles.
- In the Styles pane, under Choose attributes, click Field, and click the newly added field. Click Add.
- Click Done.
- Save the web map before publishing to ArcGIS Instant Apps.
Split and merge the data into a new feature layer in ArcGIS Pro before publishing to ArcGIS Online
Note:
When using separate layers for grouped categories, apply the Single Symbol symbology to each layer, as each layer represents a single category.
- Open the ArcGIS Pro project with the feature layer.
- Split the data to merge from the original feature layer to a new feature layer using Select Layer By Attribute.
- On the ribbon, click the Analysis tab.
- On the Analysis tab, in the Geoprocessing group, click Tools.
- In the Geoprocessing pane, search for and select the Select Layer By Attribute tool.
- In the Select Layer By Attribute pane, for Input Rows, click the drop-down arrow and select the feature layer.
- For Selection Type, click the drop-down arrow and select New selection.
- For SQL Expression, click Add Clause and define the clause. In this example, the clause is set to 'Town is equal to Alpha'.
- Add another clause for the other data to merge. In this example, the clause is set to 'Town is equal to Beta', and the And operator is replaced with the Or operator.
- Click Run.
- Merge the data into a new feature layer using Export Features. Refer to ArcGIS Pro: Export Features (Conversion) for more information.
- In the Contents pane, right-click the feature layer, navigate to Data, and click Export Features.
- In the Export Features window, for Output Feature Class, specify a name. In this example, the name is Alpha_Beta_Merged.
- Click OK.
- Remove the data fields used in the merge from the original feature layer. Refer to ArcGIS Pro: Delete Field (Data Management) for more information.
- In the Contents pane, right-click the original feature layer and click Attribute Table.
- On the Attribute Table, select the data to delete. In this example, Alpha and Beta records are deleted.
- On the Field tab, click Delete.
- In the Delete pop-pup window, click Yes.
- On the Edit tab, in the Manage Edits group, click Save.
- Publish the feature layers to ArcGIS Online. Refer to ArcGIS Pro: Share a web feature layer using the default configuration for instructions.
- In ArcGIS Online Map Viewer, merge the features and save the web map before publishing to ArcGIS Instant Apps.
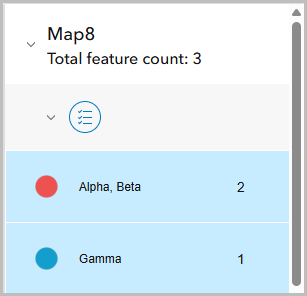
The image below shows the number for the merged values displayed correctly.
Article ID: 000039049
- ArcGIS Online
Get support with AI
Resolve your issue quickly with the Esri Support AI Chatbot.


Related Information
Discover more on this topic
Search for related information
Find training related to this topic
Explore ideas and give feedback
Get help from ArcGIS experts
Start chatting now