HOW TO
Query attributes from a feature layer as survey responses in ArcGIS Survey123
Summary
In ArcGIS Survey123, integrating a feature layer from the ArcGIS Enterprise portal or ArcGIS Online allows surveys to query attribute values and return real-time responses. This capability enhances workflows such as asset management, field inspections, and customer service by automating data entry and reducing errors. Modifications to the feature layer, such as attribute corrections or newly added records, are automatically reflected in the survey.
This article describes the workflows to dynamically query attributes from a feature layer as survey responses in ArcGIS Survey123 Connect or the ArcGIS Survey123 web designer. In this example, when a user enters or selects an ID number from a feature layer with the field name 'ID_NO', the survey retrieves and displays the corresponding first name from the field 'FIRSTNAME'.
Procedure
In ArcGIS Survey123 Connect
- In ArcGIS Survey123 Connect, open the survey's XLSForm.
- Create and configure the first question to collect user input attributes.
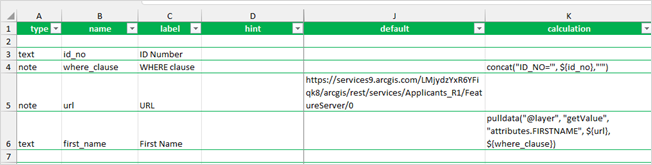
- In the survey worksheet, in the type column, select text from the drop-down list.
- Specify the values in the name and label columns. In this example, the first question is named 'id_no' and labeled 'ID Number'.
- Create an expression to filter and retrieve relevant records from the feature layer based on the user input attributes.
- In the survey worksheet, in the type column, select note from the drop-down list.
- Specify the values in the name and label columns. In this example, the note is named 'where_clause' and labeled 'WHERE clause'.
- In the calculation column, specify the following expression. Replace <field name> with the field from the feature layer that stores the user input attributes and <question name> with the question name from Step 2b.
concat("<field name>='", ${<question name >},"'")
The following is an example of the expression.
concat("ID_NO='", ${id_no},"'")
- Add the REST endpoint URL of the feature layer to the survey.
- In the survey worksheet, in the type column, select note from the drop-down list.
- Specify the values in the name and label columns. In this example, the note is named 'url' and labeled 'URL'.
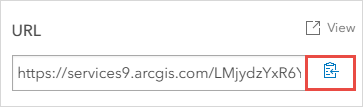
- Copy the URL of the feature layer from the item page.
- Open the item page of the feature layer in the ArcGIS Enterprise portal or ArcGIS Online.
- On the Overview tab, under Layers, click the feature layer containing the attribute data to query in ArcGIS Survey123.
- Under URL, click Copy to copy the URL of the feature layer.
- In the survey worksheet, in the default column, paste the copied URL.
- Optionally, in the appearance column, select hidden from the drop-down list to hide the question from being displayed on the survey.
- Create a second text question that is automatically populated with responses based on previous user input.
- In the survey worksheet, in the type column, select text from the drop-down list.
- Specify the values in the name and label columns. In this example, the second question is named 'first_name' and labeled 'First Name'.
- In the calculation column, specify the following expression. Replace <field name> with the field from the feature layer to be automatically populated.
pulldata("@layer", "getValue", "attributes.<field name>", ${url}, ${where_clause})
The following is an example of the expression.
pulldata("@layer", "getValue", "attributes.FIRSTNAME", ${url}, ${where_clause})
- Save the XLSForm and publish the survey.
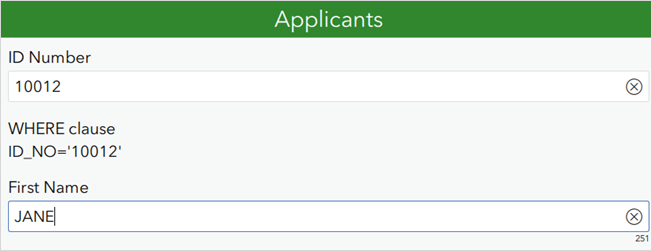
The survey below shows the First Name question automatically populated after entering the ID Number question.
In the ArcGIS Survey123 web designer
- Open the ArcGIS Survey123 web designer.
- Add and configure the first question to collect user input attributes.
- On the Design tab, click a text or choice question. In this example, the Dropdown question is selected.
- In the Label text box, specify a name. In this example, 'ID Number' is specified.
Note:
Skip to Step 3 if a text question is selected.
- For Choices, click Edit.
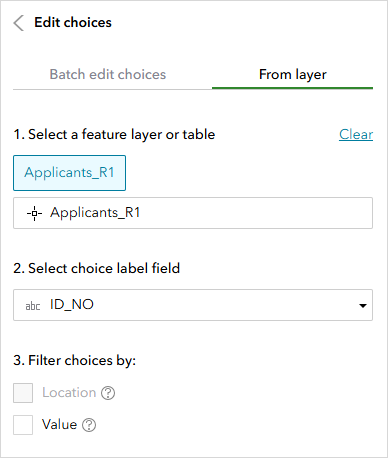
- In the Edit choices pane, click From layer.
- For 1. Select a feature layer or table, click Add and select the feature layer. Click OK.
- For 2. Select choice label field, select the field name containing the attributes to choose from. In this example, the 'ID_NO' field is selected.
- Click OK.
- Add and configure the second text question that is automatically populated with responses based on previous user input.
- On the Add tab, click the Singleline text question.
- In the Label text box, specify a name. In this example, 'First Name' is specified.
- For Calculation, click Edit.
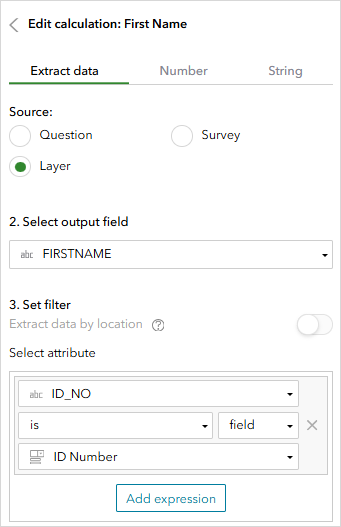
- In the Edit calculation pane, on the Extract data tab, for Source, click Layer.
- For 1. Select layer or table, click Add and select the feature layer to retrieve the attributes from. Click OK.
- For 2. Select output field, select the field name to be populated as responses. In this example, 'FIRSTNAME' is selected.
- For Set filter, under Select attribute, click Add expression.
- Click the first drop-down menu and select the user input field. Change value to field. Click the last drop-down menu and select the question created in Step 2. In this example, the expression is 'ID_NO is ID number'.
- Click OK.
- Click Save and Publish.
When an ID Number is selected from the drop-down menu, the First Name question is automatically populated with the corresponding data from the feature layer, as shown in the image below.

Article ID: 000035615
- ArcGIS Online
- Portal for ArcGIS
- ArcGIS Enterprise
- ArcGIS Survey123 Connect
- ArcGIS Survey123 Website
Get support with AI
Resolve your issue quickly with the Esri Support AI Chatbot.


Related Information
Discover more on this topic
Search for related information
Find training related to this topic
Explore ideas and give feedback
Get help from ArcGIS experts
Start chatting now