HOW TO
Publish a BIM scene layer package to ArcGIS Online
Summary
Building information modeling (BIM) models a building and infrastructure in 3D, 4D, and 5D for multidisciplinary construction projects. In ArcGIS Online, the BIM data can be added to a web scene to visualize and analyze geographic information in an intuitive and interactive 3D environment. These methods enable in-depth GIS analyses in aspects such as flood and line of sight. The only way to add the BIM data to ArcGIS Online is by publishing the scene layer package as a web scene layer. The workflows provided in this article involves creating a scene layer package using the Create Building Scene Layer Content or Create 3D Object Scene Layer Content tools in ArcGIS Pro before publishing it to ArcGIS Online.
Procedure
Using the Create Building Scene Layer Content tool
Note:
ArcGIS Pro supports Autodesk Revit (.rvt) file versions from 2018 to 2023 and a selected number of Industry Foundation Classes (IFC) file formats. Refer to ArcGIS Pro: Supported BIM geometry for more information. Using unsupported BIM files can return the "Unsupported BIM file" error or the "WARNING 000229: Cannot open <BIM file>" warning.
Note:
Ensure the BIM data has a defined projection before adding it to a scene view. Refer to ArcGIS Pro: Define the projection for more information.
- In ArcGIS Pro, click the View tab.
- In the View group, click Local
 to change from the map view to the local scene view.
 - Add the building layer from the BIM file to the local scene view. Refer to ArcGIS Pro: Work with a building layer for instructions. In this example, the building layer named Tower_ft is used.
- Create a scene layer package from the building layer using the Create Building Scene Layer Content tool.
- In the Geoprocessing pane, search for and click Create Building Scene Layer Content (Data Management Tools).
- In the Create Building Scene Layer Content pane, for Input Dataset, select the building layer from the drop-down list.
- For Output Scene Layer Package, specify a name and location to export the scene layer package.
- For Output Coordinate System, click Select coordinate system
 to open the Coordinate System window.
 - In the Coordinate System window, expand Projected Coordinate System or Geographic Coordinate System to specify the coordinate system. In this example, WGS 1984 Web Mercator (auxiliary sphere) is selected. Click OK.
- Click Run.

- Publish the scene layer package as a web scene layer to ArcGIS Online.
Note:
Alternatively, share the scene layer package to ArcGIS Online using the Share Package geoprocessing tool. Select the scene layer package for Input Package and check the Publish web layer check box to publish the scene layer package as a web scene layer.
Using the Create 3D Object Scene Layer Content tool
- In ArcGIS Pro, click the View tab.
- In the View group, click Local
 to change from the map view to the local scene view.
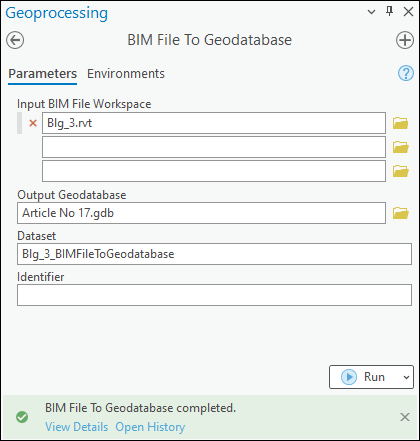
 - Import the contents of the BIM file workspaces into a single geodatabase feature dataset using the BIM File To Geodatabase tool. Refer to ArcGIS Pro: Convert a BIM file workspace to a geodatabase for instructions. In this example, the BIM file named Blg_3.rvt is used.
- Add the feature dataset to the local scene view as a new layer. Refer to ArcGIS Pro: Browse to data to add to a map or scene for instructions.
- Create a scene layer package from the 3D object feature layer using the Create 3D Object Scene Layer Content tool.
- In the Geoprocessing pane, search for and click Create 3D Object Scene Layer Content (Data Management Tools).
- In the Create 3D Object Scene Layer Content pane, for Input Dataset, select the 3D object feature layer from the drop-down list. In this example, the feature layer named PipeFitting is used.
- For Output Scene Layer Package, specify a name and location to export the scene layer package.
- For Output Coordinate System, click Select coordinate system
 to open the Coordinate System window.
 - In the Coordinate System window, expand Projected Coordinate System or Geographic Coordinate System to specify the coordinate system. In this example, WGS 1984 Web Mercator (auxiliary sphere) is selected. Click OK.
- Click Run.

Note:
Repeat Steps 5b through 5f to create a scene layer for each 3D feature layer.
- Publish the scene layer package as a web scene layer to ArcGIS Online.
Demonstrated below is the 3D building of the BIM data published as a web scene layer in ArcGIS Online.

Article ID: 000030993
- ArcGIS Online
- ArcGIS Pro 3 1
- ArcGIS Pro 3 0
- ArcGIS Pro 2 9x
Get support with AI
Resolve your issue quickly with the Esri Support AI Chatbot.


Related Information
Discover more on this topic
Search for related information
Find training related to this topic
Explore ideas and give feedback
Get help from ArcGIS experts
Start chatting now