HOW TO
Export the fields view in ArcGIS Pro to Excel
Summary
The fields view in ArcGIS Pro provides insight into the structure and properties of a dataset. Exporting field information to Excel is particularly useful for aligning data structures with project requirements and reviewing schema elements within a feature class. This is also helpful for examining datasets with many fields. This article describes the workflow to export the fields view to an Excel file in ArcGIS Pro.
Procedure
Export the fields view using the Generate Schema Report tool
- Open the ArcGIS Pro project.
- Export the fields view using the Generate Schema Report tool.
- On the Analysis tab, in the Geoprocessing group, click Tools.
- In the Geoprocessing pane, search for and click Generate Schema Report.
- For Input Dataset, select the feature layer from the drop-down list.
- For Output Location, click Browse and navigate to the folder. Click OK.
- For Name, specify an output name.
- For Output Formats, check the XLSX check box.
- Click Run.
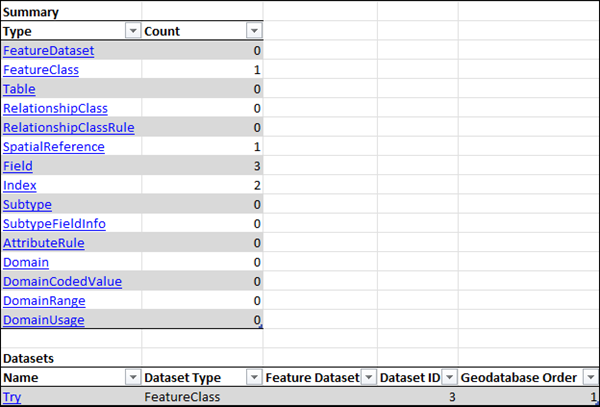
The image below shows the example of the exported schema report containing fields view information.
Export the fields view using the Export XML Workspace Document tool
- Open the ArcGIS Pro project.
- Export the fields view to an XML file.
- In the Catalog pane, right-click the feature layer and click Export > Feature Class(es) To XML Workspace Document....
- In the Export XML Workspace Document pane, for Output File, specify a name and location.
- For Export Options, select Schema only from the drop-down list.
- Click Run.
- Open the exported XML file in Excel.
- Open a new Excel file.
- In the Excel file, click File > Open. Browse to the location that contains the exported XML file.
- In the Open dialog box, select the XML file and click Open.
- In the Open XML dialog box, select As an XML table, and click OK.
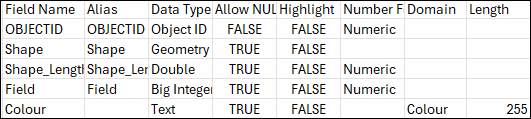
The image below shows the exported XML file opened in Excel.

Copy and paste the fields view information to Excel
- Open the ArcGIS Pro project.
- Open the fields view and copy all the information.
- In the Contents pane, right-click the feature layer, and select Data Design > Fields.
- In the fields view, click the row header (the small gray square containing the row number) to select all the information.
- Right-click the selection and select Copy.
- Paste the selection in Excel.
- Open a new Excel file.
- In the Excel file, on the A1 cell, press CTRL + V to paste the copied information.
- Save the file.
The image below shows the fields view information pasted in Excel.
Article ID: 000037867
- ArcGIS Pro
Get support with AI
Resolve your issue quickly with the Esri Support AI Chatbot.


Related Information
Discover more on this topic
Search for related information
Find training related to this topic
Explore ideas and give feedback
Get help from ArcGIS experts
Start chatting now