HOW TO
Copy attachments from one feature layer to another in ArcGIS Pro
Summary
In ArcGIS Pro, running geoprocessing tools such as the Feature To Line, Feature To Point, or Feature To 3D By Attribute tool on a feature layer containing attachments does not copy attachments from the input features to the output features. While tools with the Maintain Attachments geoprocessing environment setting are available, they do not necessarily return the desired results. For instance, when attempting to convert a polygon layer to points using a geoprocessing tool, running the Feature Class To Feature Class tool on the polygon layer retains attachments in the output layer but does not convert the polygon features to points.
This article details the steps to copy attachments from one feature layer to another using the Add Attachment tool after running the desired geoprocessing tool in ArcGIS Pro. In this example, a polygon layer containing attachments is to be converted to points using the Feature To Point tool. The polygon layer's attachments are exported to a local file using a Python script tool and copied to the point layer using the Add Attachment tool.
Procedure
- In ArcGIS Pro, batch export attachments from the polygon layer to a local file using the following Python script. Refer to How To: Batch export attachments from a feature class in ArcGIS Pro for instructions.
import arcpy
from arcpy import da
import os

inTable = arcpy.GetParameterAsText(0)
fileLocation = arcpy.GetParameterAsText(1)

with da.SearchCursor(inTable, ['DATA', 'ATT_NAME', 'ATTACHMENTID']) as cursor:
    for item in cursor:
        attachment = item[0]
        filenum = "ATT" + str(item[2]) + "_"
        filename = filenum + str(item[1])
        open(fileLocation + os.sep + filename, 'wb').write(attachment.tobytes())
        del item
        del filenum
        del filename
        del attachment
- In the Contents pane, browse to and right-click the polygon layer, and select Attribute Table.
- Add a new field to the polygon layer.
- In the attribute table, click Add Field
 to add a field named Control_ID to the layer, and set Data Type as Text.
 - On the top ribbon, click Save in the Manage Edits group to save the edits made.
- In the attribute table, click Add Field
- Populate the Control_ID field from the OBJECTID field for the polygon layer using the Calculate Field option.
Note:
Use GlobalID and REL_GLOBALID if OBJECTID and REL_OBJECTID are not available.
- In the attribute table, right-click the Control_ID field header, and select Calculate Field. The Calculate Field window opens.
- In the Calculate Field window, under Expression Type, select Python.
- Select and double-click OBJECTID in the Fields section to insert it under the Control_ID = section. The expression is specified as Control_ID = !OBJECTID!.
- Click OK.
- In the Contents pane, browse to and right-click the polygon layer’s attachment table, and select Open.
- Add two new fields to the attachment table.
- In the attachment table, click Add Field to add two fields named Control_ID and Path respectively, and set Data Type as Text for both fields.
- On the top ribbon, click Save in the Manage Edits group to save the edits made.
- In the attachment table, click Add Field
- Follow Step 4 to populate the Control_ID field from the REL_OBJECTID field for the attachment table using the Calculate Field option. The expression is specified as Control_ID = !REL_OBJECTID!.
- Populate the Path field using an Arcade expression for the attachment table.
- In the attachment table, right-click the Path field header, and select Calculate Field. The Calculate Field window opens.
- In the Calculate Field window, under Expression Type, select Arcade.
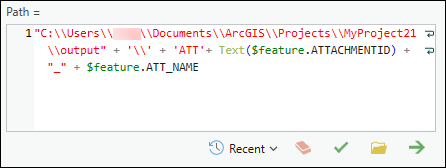
- Specify the following Arcade expression under the Path = section.
“local_drive:\\local_file_path” + “\\” + 'ATT'+ Text($feature.ATTACHMENTID) + "_" + $feature.ATT_NAME
Note:
Double backslashes (\\) are used when specifying the file path in the Arcade expression because a single backslash is used as an escape character in Arcade. Refer to BUG-000132958 for more information.
- Click OK.
- Convert the polygon layer to a point layer using the Feature To Point geoprocessing tool.
- On the top ribbon, on the View tab, click Geoprocessing in the Windows group.
- In the Geoprocessing window, search for and click the Feature To Point tool.
- In the Feature To Point window, select the polygon layer from the Input Features drop-down menu.
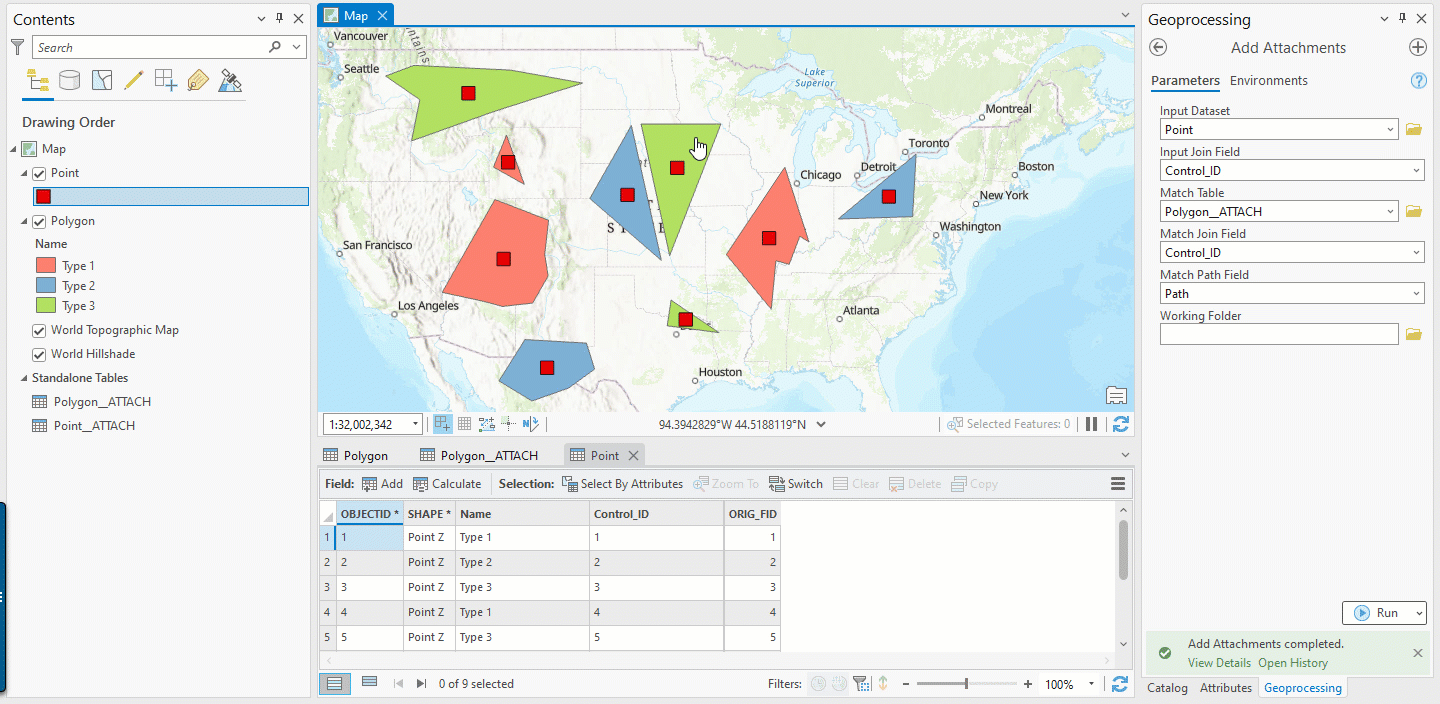
- Click Run. The output point layer is added to the Contents pane.
Note:
When using a geoprocessing tool containing settings that alter the original feature ID, ensure to disable the setting to preserve the original feature ID. For instance, uncheck the Identify and store polygon neighboring information check box when using the Polygon To Line tool to preserve the input polygon feature IDs in the output features.
- Enable attachments on the point layer using the Enable Attachments tool.
- In the Geoprocessing pane, search for and click the Enable Attachments tool.
- In Enable Attachments window, select the point layer from the Input Dataset drop-down menu.
- Click Run. The point layer’s attachment table and attachment relationship class are created and stored in the geodatabase.
- Add the point layer’s attachment table to the map.
- In the Catalog pane, browse to and expand Databases, right-click the geodatabase, and click Refresh.
- Under Databases, browse to the point layer’s attachment table, and drag and drop it to the map.
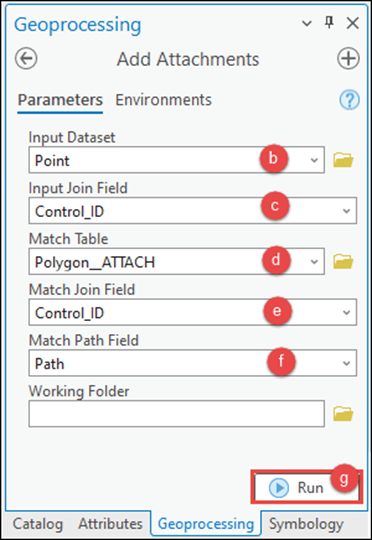
- Use the Add Attachments tool to add the attachments exported from the polygon layer to the point layer.
- In the Geoprocessing pane, search for and click the Add Attachments tool.
- In Add Attachments window, select the point layer from the Input Dataset drop-down menu.
- For Input Join Field, select Control_ID from the drop-down menu.
- For Match Table, select the polygon layer’s attachment layer from the drop-down menu. In this example, the attachment table is named Polygon_ATTACH.
- For Match Join Field, select Control_ID from the drop-down menu.
- For Match Path Field, select Path from the drop-down menu.
- Click Run.
Attachments exported from the polygon layer to a local file are added to the matching point features.
Article ID: 000028098
- ArcGIS Pro
Get support with AI
Resolve your issue quickly with the Esri Support AI Chatbot.


Related Information
Discover more on this topic
Search for related information
Find training related to this topic
Explore ideas and give feedback
Get help from ArcGIS experts
Start chatting now