HOW TO
Convert 3D point features in the XYZ file format to raster in ArcGIS Pro
Summary
Points are generally represented by x,y coordinates in vector form. Some points include z coordinates, if elevation data such as 3D point features are added. 3D point features can be stored in the XYZ file format, and converted to raster in ArcGIS Pro.
This article provides steps to convert 3D point features in the XYZ file format to raster in ArcGIS Pro.
Procedure
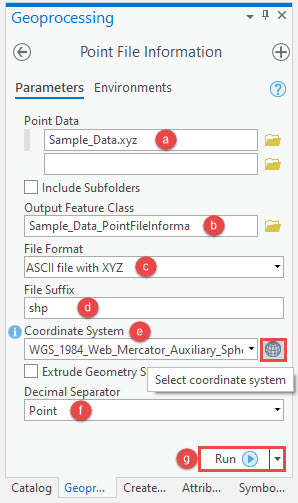
- In ArcGIS Pro, use the Point File Information tool from the 3D Analyst toolbox to determine the average point spacing value (Pt_Spacing) of the 3D point features.
- In the Point File Information geoprocessing pane, for Point Data, specify a location and name for the folder path containing the XYZ file (.xyz).
- Specify a name for Output Feature Class.
- Click the File Format drop-down list, and select ACSII file with XYZ.
- For File Suffix, type shp.
- For Coordinate System, click the drop-down list, and select a coordinate system for the XYZ file from the list.
Note:
Optionally, click the Select coordinate system icon, and select the desired coordinate system from the Coordinate System dialog box.
- For Decimal Separator, click the drop-down list and select Point.
- Click Run to execute the tool.
- In the Contents pane, right-click the output feature class specified in Step 1b, and click Attribute Table. Copy the Pt_Spacing value in the attribute table of the output layer.

- Use the ASCII 3D To Feature Class tool from the 3D Analysts toolbox to convert the XYZ file to a feature class.
- In the ASCII 3D To Feature Class geoprocessing pane, for ASCII 3D Data, specify a location and name for the folder path containing the XYZ file (.xyz).
- Click the File Format drop-down list, and select XYZ.
- Specify a name for Output Feature Class.
- For Coordinate System, click the drop-down list, and select a coordinate system for the XYZ file from the list.
Note:
Optionally, click the Select coordinate system icon, and select the desired coordinate system from the Coordinate System dialog box.
- For Average Point Spacing, paste the value of the Pt_Spacing value copied from the attribute table in Step 1(h).
- For File Suffix, type shp.
- For Decimal Separator, click the drop-down list, and select Point.
- Leave the other parameters at default, and click Run to execute the tool.

- Use the Point to Raster tool from the Conversion toolbox to convert the point feature class to raster.
- In the Point to Raster geoprocessing pane, for Input Features, click the drop-down list, and select the output feature class created in Step 2.
- Specify a name for Output Raster Dataset.
- Leave other parameters at default, and click Run to execute the tool.

The following image shows the output raster converted from the XYZ file format (.xyz).

Article ID: 000023381
- ArcGIS Pro 2 x
Get support with AI
Resolve your issue quickly with the Esri Support AI Chatbot.


Related Information
Discover more on this topic
Search for related information
Find training related to this topic
Explore ideas and give feedback
Get help from ArcGIS experts
Start chatting now