Frequently asked question
Can only charts be filtered in ArcGIS Online Map Viewer?
No, it is not possible to filter only charts in ArcGIS Online Map Viewer, as charts are dynamically linked to the map. When a filter is applied to a web map, the changes are also reflected in the data displayed on the chart. The filter tool is designed to maintain consistency across all visual elements, including both the map and associated charts. As workarounds, duplicate the feature layer in ArcGIS Online Map Viewer or use the Extract Data tool in ArcGIS Online Map Viewer to export the filtered data separately. Alternatively, use ArcGIS Dashboards to display different data views within the same interface.
Duplicate the feature layer
In ArcGIS Online Map Viewer, duplicate the feature layer within the web map to filter chart data without affecting the full map display. This action adds a second instance of the same layer, not a new hosted feature layer item. For detailed steps, refer to ArcGIS Online: Duplicate a layer.
Apply the desired filter to the duplicated layer and configure the charts using that layer. The original layer remains unfiltered and continues to display the full dataset on the map, while the duplicated layer provides filtered data to the charts. This method maintains the complete map visualization while allowing the charts to reflect only the filtered content.
Use the Extract Data tool in ArcGIS Online Map Viewer
Note:
This workflow requires the use of credits.
- Log in to ArcGIS Online and click Content > My content.
- Browse to and click the web map. On the item page, click Open in Map Viewer.
- On the Contents (dark) toolbar, click Layer
 .
. - In the Layers pane, click the layer.
- On the Settings (light) toolbar, click Analysis
 .
. - In the Analysis pane, click the Tools
 tab.
tab. - In the Tools pane, search for and click Extract Data.
- In the Extract Data pane, configure the following parameters:
- Under Input layers, click Layer. In the Select layer pop-up window, under Map layers, select the layer to be filtered and click Close
 .
. - Under Extent settings, click Draw input features
 . On the left side of the Extract Data pane, select Polygon and draw the polygon to define the extent of the features to be extracted.
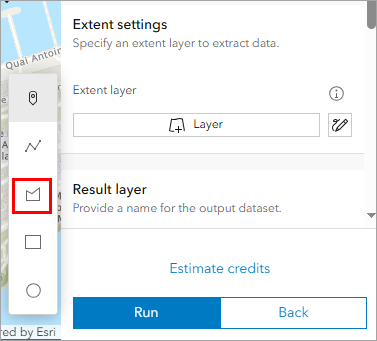
- Under Result layer, for Output data format, click the drop-down arrow and select either File geodatabase (.zip) or Shapefile (.zip) as the output data format. In this example, Shapefile (.zip) is selected.

- For Output name, specify a name for the output.
- Click Estimate credits to calculate the amount of credits that will be consumed during analysis.
- Click Run.
- Under Input layers, click Layer. In the Select layer pop-up window, under Map layers, select the layer to be filtered and click Close
- Open ArcGIS Online and click Content > My content.
- On the Content page, browse to the shapefile, click More
 and select View details.
 - On the Overview tab, click Publish.
- In the New item window, click Save.
Note:
The data can also be extracted using Map Viewer Classic. Refer to How To: Use the Extract Data tool with Map Viewer Classic to download data to ArcGIS Pro for instructions.
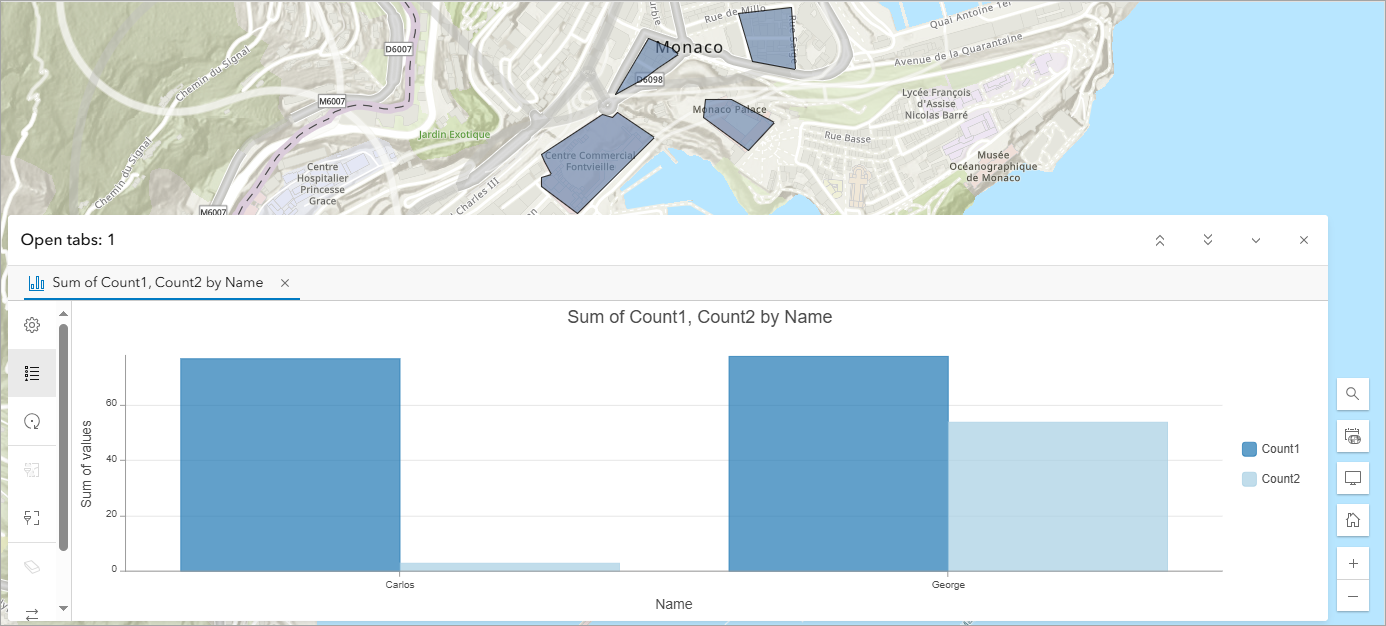
The image below shows the chart with the extracted data on the web map.
Use ArcGIS Dashboards elements
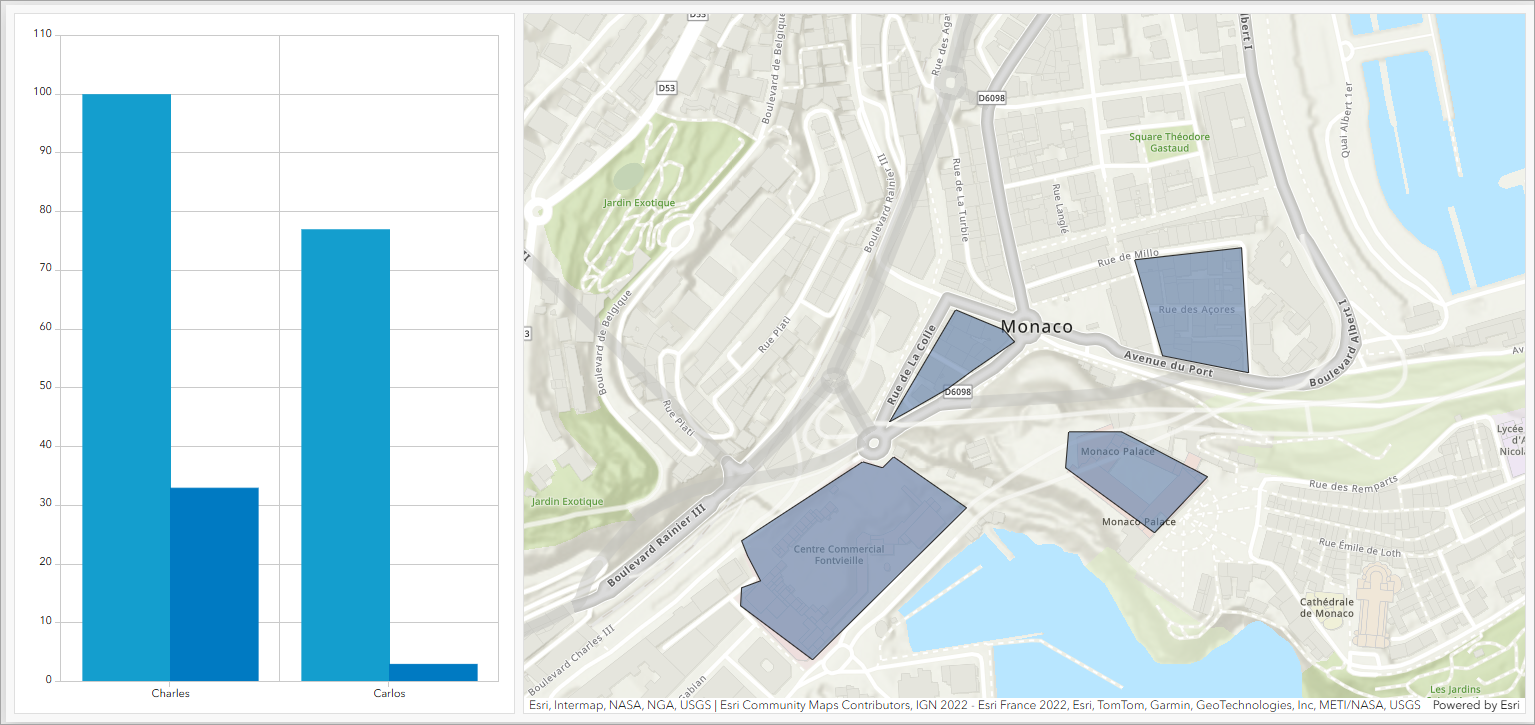
Display different data views using separate elements, such as the map and serial chart elements in ArcGIS Dashboards.
Apply a filter to the serial chart element to control its data display independently. Refer to ArcGIS Dashboards: Configure actions for elements for instructions.
The image below shows the dashboard with a filtered serial chart and a map element.
Article ID: 000036373
- ArcGIS Online
- ArcGIS Dashboards
Get support with AI
Resolve your issue quickly with the Esri Support AI Chatbot.


Related Information
Discover more on this topic
Search for related information
Find training related to this topic
Explore ideas and give feedback
Get help from ArcGIS experts
Start chatting now