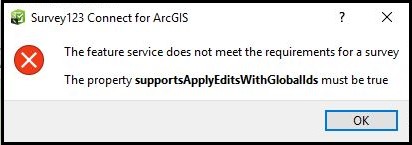
ERROR
ArcGIS Survey123 | The feature service does not meet the requirements. The property supportsApplyEditsWithGlobalIds must be true
Error Message
In ArcGIS Survey123 Connect, when attempting to create a survey from an existing feature service in ArcGIS Online or Portal for ArcGIS, the following error message is returned:
Error:
The feature service does not meet the requirements for a survey

The property supportsApplyEditsWithGlobalIds must be true
Cause
Since the release of ArcGIS Survey123 Connect 3.0, the supportsApplyEditsWithGlobalIds property must be set to true in order to submit data to feature layers. Previously, this property was only enforced in surveys containing repeats.
The supportsApplyEditsWithGlobalIds property is set to false if certain requirements are not met. The requirements are:
- Feature services must have the sync capability enabled.
- The layers must have an indexed GlobalID field and all relationships must leverage the GlobalID fields.
Solution or Workaround
Enable the sync capability of the feature service and add the related Global IDs for the feature service. Refer to the instructions provided below for ArcGIS Pro and ArcMap.
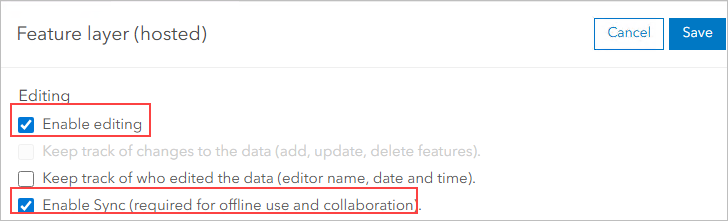
Enable the sync capability of the feature service
- In ArcGIS Online or Portal for ArcGIS, navigate to Content > My Content > Folders and browse to the hosted feature layer.
- Click the Options button
 , and click View item details. In the item details page, click the Settings tab.
 - Under the Feature Layer (hosted) settings, in the Editing section, check the Enable editing and Enable Sync (required for offline use and collaboration) check boxes, or toggle on the options in ArcGIS Online.
- Click Save and proceed to create the survey in ArcGIS Survey123 Connect.
If the problem persists after enabling the sync capability, identify the layers that have the supportsApplyEditsWithGlobalIds property set to false, and set the property to true by ensuring the GlobalId field is present or by enabling Global IDs in the layers in ArcGIS Pro. Refer to ArcGIS Pro: Access and manage geodatabase dataset properties for more information.
Add Global IDs to all layers, related tables and attachments of the feature service in ArcGIS Pro
- Export the feature service as a file geodatabase.
- Navigate to the item details page of the hosted feature service in ArcGIS Online or Portal for ArcGIS. In the Overview tab, click Export Data > Export to FGDB.
- In the Export to File Geodatabase window, fill in the necessary details, and click Export.
- In the item details page of the exported layer (File Geodatabase), navigate to the Overview tab and click Download.
- Add the downloaded file geodatabase from step 1 to ArcGIS Pro. Refer to ArcGIS Pro: Add data from a geodatabase for steps to do this.
- Run the Add Global IDs geoprocessing tool on all the layers and related tables in the file geodatabase (if the feature layer contains multiple layers and related tables).
- In the Geoprocessing pane, click Toolboxes > Data Management Tools > Fields > Database >Add Global IDs.
- In the Add Global IDs window, under Parameters, click the drop-down button next to Input Datasets.
- Check the check boxes of all the layers and related tables, and click Add. Then click Run.
- Run the Migrate Relationship Class geoprocessing tool against the attachments (if the feature layer contains attachments).
- In the Geoprocessing pane, click Toolboxes > Data Management Tools > Relationship Classes > Migrate Relationship Class. Under Input Relationship Class, click the folder icon.
- In the Input Relationship Class window, browse to the file geodatabase, and select all the attachments related to the feature service. Click OK.
- Run the Disable Editor Tracking geoprocessing tool for the file geodatabase.
- In the Geoprocessing pane, click Toolboxes > Data Management Tools > Fields > Database > Disable Editor Tracking.
- In the Disable Editor Tracking window, look for Parameters and click Input Dataset. Select the folder icon.
- In the Input Dataset window, browse to the file geodatabase, select all the attachments related to the feature service, and click OK. Then click Run.
- Set all the editor tracking fields to the Read Only mode.
- In the Contents pane, right-click the feature layer, and click Data Design > Fields.
- In the table under Current Layer, check all the boxes in the Read Only column. Click Save.
- Overwrite the feature layer service. Refer to ArcGIS Pro: Share a web feature layer using the default configuration for steps to do this.
- Re-enable editing in the hosted feature layer.
- In the item details page of the hosted feature layer, click the Settings tab.
- Under the Feature Layer (hosted) setting, in the Editing section, check the Enable editing check box or toggle on the option. Click Save.
- Check if the supportsApplyEditsWithGlobalIds property is set to true in the ArcGIS REST Services Directory page.
Add Global IDs to all the related tables and attachments of the feature service in ArcMap
Note:
This workflow is similar to the workflow described for ArcGIS Pro.
- Export the feature service as a file geodatabase. Refer to step 1 described in the workflow for ArcGIS Pro.
- Add the downloaded file geodatabase to ArcMap. Refer to ArcMap: Adding data and tools for steps to do this.
- Run the Add Global IDs geoprocessing tool on all the layers and related tables in the file geodatabase (if the feature layer contains multiple layers and related tables).
- Navigate to ArcToolbox > Data Management Tools > Distributed Geodatabase > Add Global IDs.
- In the Add Global IDs window, click the drop-down button next to the box under Input Datasets. Select all the layers and related tables, then click OK.
- Run the Migrate Relationship Class geoprocessing tool against the attachments (if the feature layer contains attachments).
- Navigate to ArcToolbox > Data Management Tools > Relationship Classes > Migrate Relationship Class.
- In the Migrate Relationship Class window, under Input Relationship Class, click the folder icon.
- In the Input Relationship Class window, browse to the file geodatabase. Select all the attachments related to the feature service, and click Add. Then click OK.
- Run the Disable Editor Tracking geoprocessing tool for the file geodatabase.
- Navigate to ArcToolbox > Data Management Tools > Fields > Disable Editor Tracking.
- In the Disable Editor Tracking window, under the Input Dataset section, click the folder icon.
- In the Input Dataset window, browse to the file geodatabase. Select all the attachments related to the feature service, and click Add. Then click OK.
- Overwrite the feature layer service. Refer to ArcGIS Server: Overwriting a service in ArcMap for steps to do this.
- Enable editing in the hosted feature layer and check if the supportsApplyEditsWithGlobalIds property is set to true in the ArcGIS REST Services Directory page. Refer to steps 8 and 9 described for ArcGIS Pro.
Article ID: 000019862
- ArcGIS Survey123 Connect
Get support with AI
Resolve your issue quickly with the Esri Support AI Chatbot.


Related Information
Discover more on this topic
Search for related information
Find training related to this topic
Explore ideas and give feedback
Get help from ArcGIS experts
Start chatting now