操作方法
操作方法:在 ArcGIS Pro 中将激光雷达数据导出到 CSV 文件,并保留 x、y 和 z 值。
摘要
ArcGIS Pro supports lidar data provided as LAS or Optimized LAS (.ZLAS) files and can be used in three different formats: LAS dataset, terrain dataset, and mosaic dataset. This article provides steps to export lidar data to a CSV file in ArcGIS Pro while retaining the x, y, and z values.
过程
- If necessary, convert the lidar data to a LAS dataset using the Create LAS Dataset tool. Refer to Create a LAS dataset using the Create LAS Dataset geoprocessing tool for steps to do this.
- Convert the LAS dataset to a raster dataset using the LAS Point Statistics As Raster tool.
- Select the LAS dataset to convert for Input LAS Dataset.
- Set a name and location for Output Raster.
- In the Method drop-down list, select the desired type of statistics collected for the LAS points in each cell of the output raster. Click Run.
- Convert the raster dataset to point features using the Raster to Point tool.
- Select the output raster dataset from Step 2 for Input raster.
- Select VALUE in the Field drop-down list.
- Set a name and location for Output point features, and click Run.
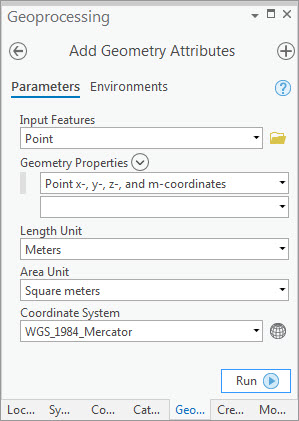
- Add the x-, y-, and z-coordinate values to the attribute table of the point shapefile or feature class using the Add Geometry Attributes tool.
- Select the point shapefile or feature class as Input Features.
- In the Geometry Properties drop-down list, select Point x-, y-, z-, and m-coordinates.
- Select the proper Length Unit, Area Unit, and Coordinate System for the input features, and click Run.
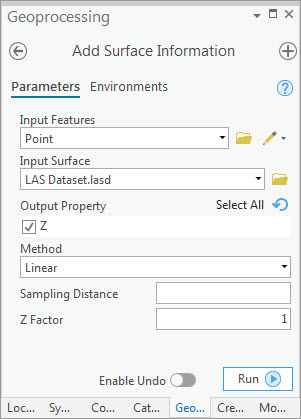
- Use the Add Surface Information tool to add z values to the attribute table.
Note:
The Add Surface Information tool is only available with a 3D Analyst extension.
- Select the point shapefile or feature class as Input Features.
- Select the lidar dataset as Input Surface.
- Check the Z check box under Output Property, and click Run.
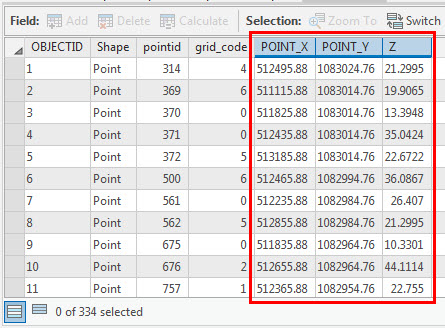
The attribute table is populated with the x, y, and z values.
- Export the attribute table to a CSV file using the Table To Table tool.
- Select the point shapefile or feature class containing the x, y, and z values for Input Rows.
- Select a folder for Output Location.
- Set a name and include the .csv extension for Output Name, and click Run.
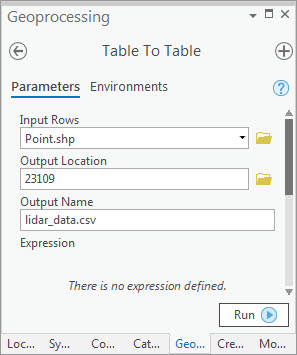
The exported CSV file containing the x, y, and z values of the lidar data is added to the project and in the specified folder.
文章 ID:000023109
从 ArcGIS 专家处获得帮助
下载 Esri 支持应用程序
相关信息
发现关于本主题的更多内容
Search for related information
Find training related to this topic
Explore ideas and give feedback