操作方法
操作方法:将 NetCDF 图层中的每个时间片导出为单个栅格 (*.tif)
摘要
提供的说明描述了如何将 NetCDF 图层中的每个时间片导出为单个栅格 (*.tif)。
必须先在 ArcMap 内容列表中创建 NetCDF 图层,才能导出 NetCDF 栅格波段。 请从此处下载所需工具箱和示例数据:NetCDF_time_slice_to_Raster.zip
过程
- 启动 ArcMap 并根据 NetCDF 文件创建 NetCDF 栅格图层。
- 导航至 ArcToolbox > 多维工具 > 创建 NetCDF 栅格图层。
- 选择一个文件作为输入 netCDF 文件,并设置所有其他参数。
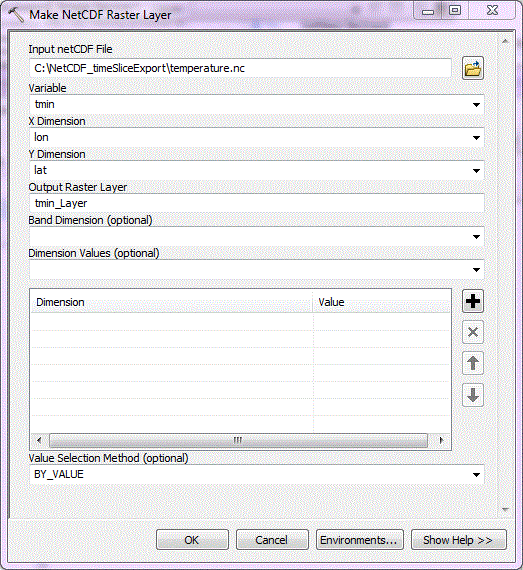
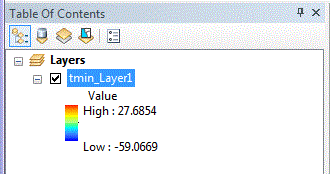
- 单击确定。 此工具将创建 NetCDF 栅格图层并将其添加到内容列表。
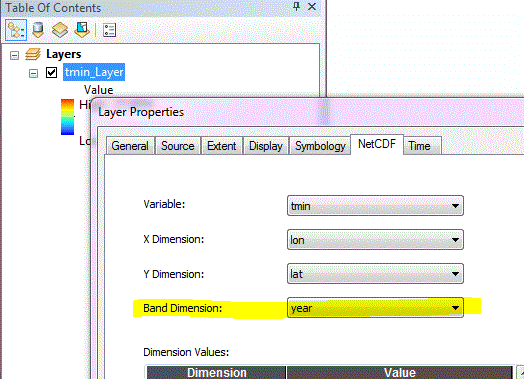
- 右键单击 NetCDF 图层,然后导航至图层属性 > NetCDF。 如果尚未选择波段维度,请进行选择。
- 在 ArcMap 目录中,浏览至已下载数据 (NetCDF_time_slice_to_Raster.zip),其中包含地理数据库内部的工具箱。
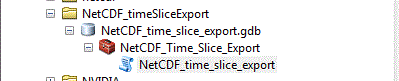
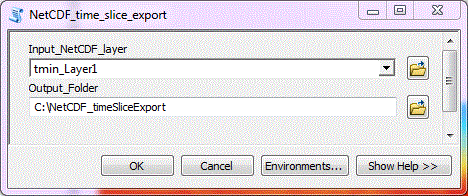
- 打开 NetCDF_time_slice_export 脚本工具。
- 选择 Input_NetCDF_layer 和 输出文件夹。 单击确定运行工具。
该工具将从 NetCDF 栅格图层中将所有时间片(波段)导出为 TIF。 如下所示为在此脚本工具中使用的 Python 代码。 可以修改此编码以满足不同需求。
# 导入模块 import arcpy, os #输入 Input_NetCDF_layer = arcpy.GetParameterAsText(0) Output_Folder = arcpy.GetParameterAsText(1) Input_Name = Input_NetCDF_layer Output_Raster = Output_Folder + os.sep + "NetCDF_Raster.tif" #复制 NetCDF 图层作为 TIF 文件。 arcpy.CopyRaster_management(Input_Name, Output_Raster) arcpy.AddMessage(Output_Raster + " " + "created from NetCDF layer") #从已保存 TIF 读取波段数信息 bandcount = arcpy.GetRasterProperties_management (Output_Raster, "BANDCOUNT") resultValue = bandcount.getOutput(0) count = 1 arcpy.AddMessage("Exporting individual bands from" + Output_Raster) #循环遍历波段并复制波段作为单独的 TIF 文件。 while count <= int(resultValue): Input_Raster_Name = Output_Raster + os.sep+ "Band_" + str(count) Output_Band = Output_Folder + os.sep + "Band_" + str(count) +".tif" arcpy.CopyRaster_management(Input_Raster_Name, Output_Band) arcpy.AddMessage("Band_" + str(count) +".tif" + " " "exported" + " " + "successfully") count +=1 # 以下将删除由 CopyRaster 工具创建的 TIF 文件。 arcpy.Delete_management(Output_Raster,"#") arcpy.AddMessage("Tool Executed Successfully")
文章 ID:000011318
从 ArcGIS 专家处获得帮助
下载 Esri 支持应用程序
相关信息
发现关于本主题的更多内容
Search for related information
Find training related to this topic
Explore ideas and give feedback