操作方法
操作方法:将 3D shapefile 转换为 2D shapefile
摘要
在某些情况下,必须将包含 3D 要素的 3D shapefile 转换为 2D shapefile,以完成需要 2D 要素的进一步数据分析。 本文提供了有关如何在 ArcMap 中将 3D shapefile 转换为 2D shapefile 的说明。
过程
转化 3D 点、线和面要素
要将 3D shapefile 转换为 2D shapefile,请执行以下步骤:
- 将 3D shapefile 添加到 ArcMap。
- 使用创建要素类工具来创建一个新的 2D shapefile。
- 打开 ArcToolbox,导航至数据管理工具 > 要素类 > 创建要素类。
- 指定输出 2D shapefile 的要素类位置和要素类名称。
- 指定输出 2D shapefile 的几何类型。 输出 shapefile 的几何类型必须与 3D shapefile 相同。 例如,如果 3D shapefile 包含面要素,则选择面。
- 在模板要素类中,选择现有 3D shapefile。 此步骤将要素粘贴到所有属性字段中。
- 将包含 M 和包含 Z 参数设置为已禁用。
- 对于坐标系,输入 3D shapefile 的空间参考。
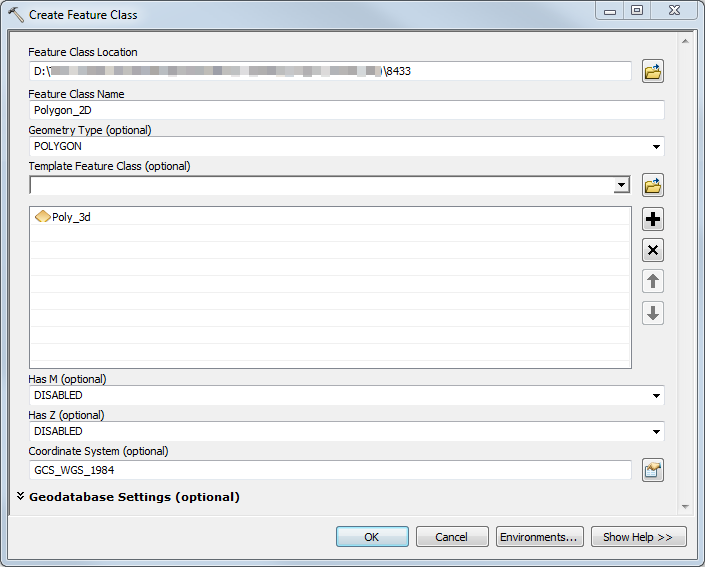
- 单击确定。 随即创建新 2D shapefile,并添加到内容列表。
- 在编辑器工具栏中,单击开始编辑,以开始在新 2D shapefile 上进行编辑。
- 右键单击内容列表 > 选择 > 全选中的 3D 图层以选择 3D shapefile 中的所有要素
- 在标准工具栏中,单击复制
 以复制所选要素 。
 - 单击粘贴
 已将复制的要素及其属性粘贴到 2D shapefile 中。 在粘贴对话框中,选择 2D shapefile 作为目标并单击确定。

注:
通过在编辑目录中单击编辑 > 复制或编辑 > 粘贴,可以访问复制和粘贴功能。

- 在编辑器工具栏中,单击编辑 > 保存编辑来保存修改。 单击编辑器 > 停止编辑以停止编辑模式。
转换 3D 多面体要素
使用“多面体覆盖区”工具将 3D 多面体要素转换为 2D 要素。 该工具需要 3D Analyst 许可。 有关详细信息,请参阅:多面体覆盖区。
文章 ID:000008433
从 ArcGIS 专家处获得帮助
下载 Esri 支持应用程序
相关信息
发现关于本主题的更多内容
Search for related information
Find training related to this topic
Explore ideas and give feedback