HOW TO
Convert ArcGIS Pro Named User licenses to concurrent or single-use licenses
Summary
Prior to ArcGIS Pro version 1.2, a Named User license is required to use the application. With the release of ArcGIS Pro version 1.2, users have the option to convert Named User licenses to concurrent-use or single-use licenses similar to ArcMap. This article describes the steps to convert existing Named User licenses to concurrent-use or single-use licenses. However, ArcGIS Pro and ArcMap use different authorization numbers. The licenses for ArcGIS Pro cannot be used for ArcMap and vice versa. This is an important distinction to note. Here are some examples that show how the licenses are differentiated:
- Pro: ArcGIS Pro for Desktop Advanced
- ArcMap: ArcGIS for Desktop Advanced
ArcGIS Pro uses the Named User license option by default. To obtain concurrent or single-use licenses for ArcGIS Pro, go to My Esri and create them by converting Named User licenses to ArcGIS Pro concurrent or single-use licenses. Refer to ArcGIS Pro: ArcGIS Pro license types for more information.
This article describes the following steps:
Converting ArcGIS Pro Named User licenses to concurrent-use or single-use in My Esri, and depending on the licensing environment, either:
- Authorizing ArcGIS Pro concurrent-use licenses on an ArcGIS License Manager and configuring ArcGIS Pro, or
- Authorizing ArcGIS Pro single-use licenses and configuring ArcGIS Pro.
Note:
Customers with an Enterprise License Agreement (ELA) must contact Esri Customer Service to convert Named User licenses to ArcGIS Pro concurrent or single-use licenses. Users without the access to My Esri must also contact Customer Service or the distributor to arrange for licenses to be converted.
Procedure
Convert Pro Named User licenses to single-use or concurrent-use licenses
Follow these steps to convert ArcGIS Pro licenses from Named User licenses to concurrent or single-use licenses. The workflow is similar for both license types.
- Open a web browser and log in to My Esri with the Esri organization account.
- Click Licensing on the top ribbon.
- Expand LICENSING TOOLS and click Convert ArcGIS Pro Named Users. This lists all licenses.
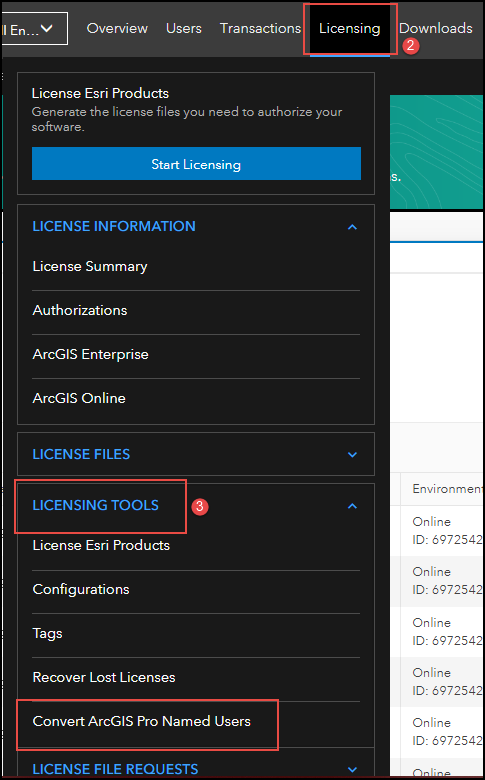
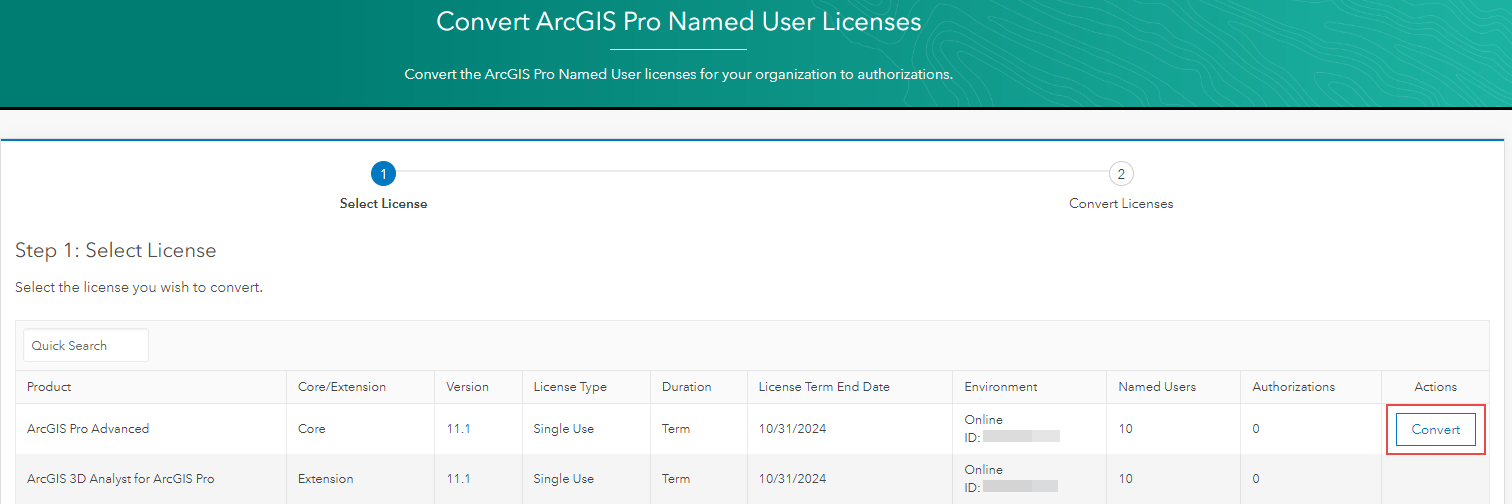
- Locate the ArcGIS Pro Named User license to convert and click the Convert button.
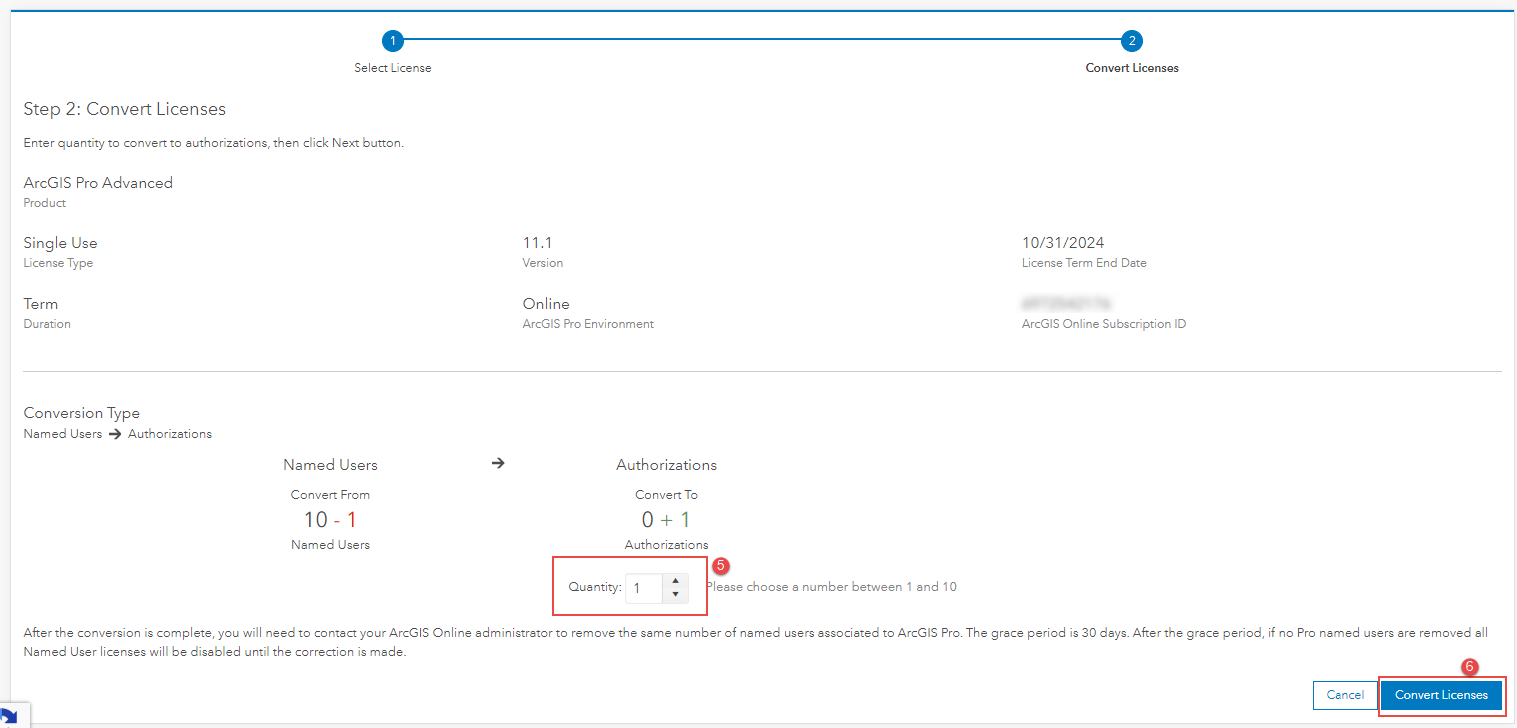
- Select the number of licenses to be converted on the Quantity text box.
- Click the Convert Licenses button.
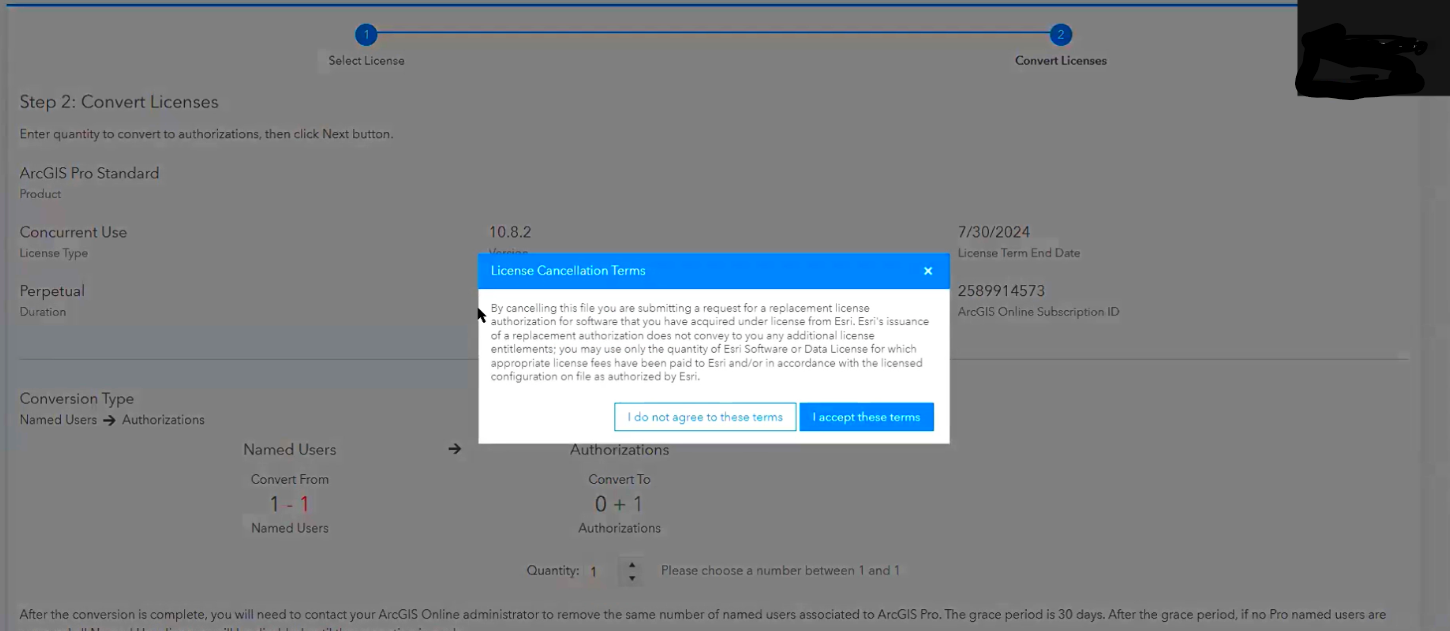
- Click I accept these terms when the License Cancellation Terms pop-up window appears.
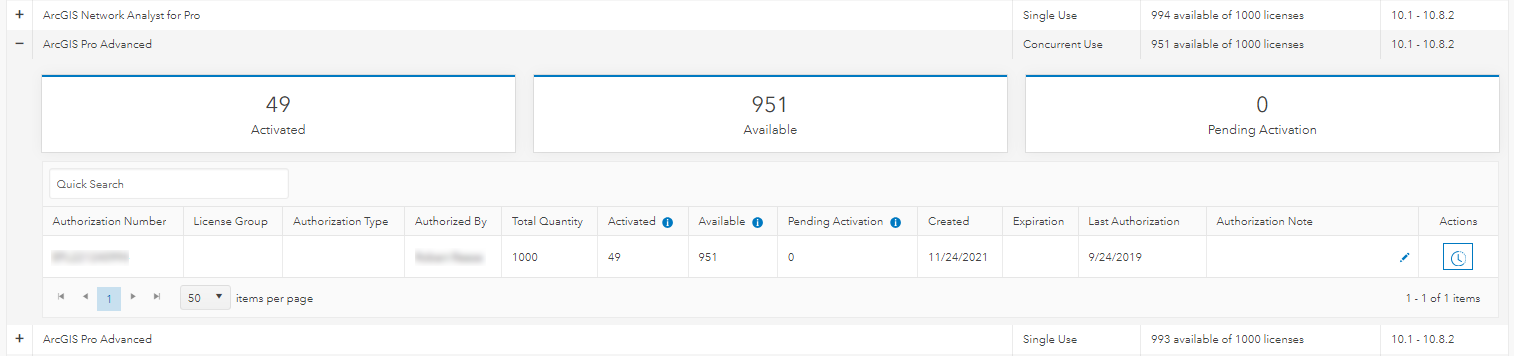
- To check the available concurrent license, click Licensing on the top ribbon.
- Expand LICENSE INFORMATION, and click Authorizations.
- Copy the Authorization number. The number is used during licensing process.
- Search for the product and expand the product name to view the details.
Authorize concurrent-use licenses
Follow these steps to download and install the ArcGIS License Manager, authorize ArcGIS Pro concurrent-use licenses, and configure ArcGIS Pro to point to the License Manager server.
- Download the ArcGIS License Manager installation file from My Esri and run the License Manager setup.
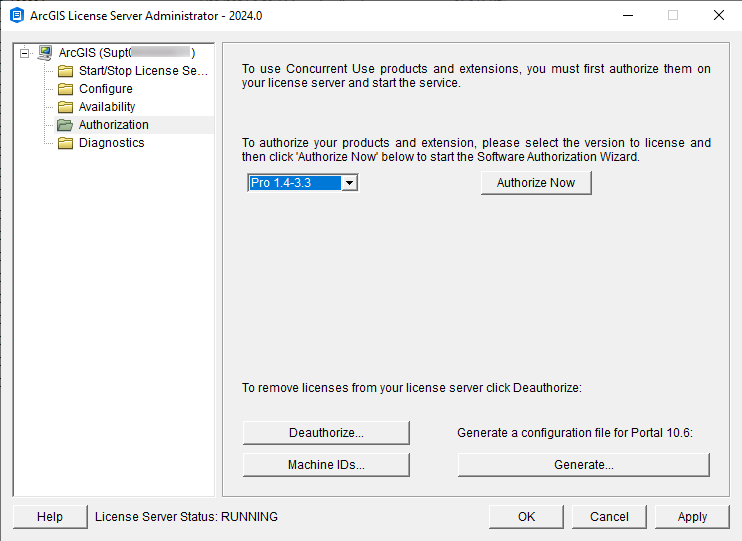
- Follow the instructions to install the License Manager to the desired location. At the end of the installation, the ArcGIS License Server Administrator displays.
- Complete the authorization process.
Note:
Access the License Server Administrator from Start > Programs > ArcGIS > License Manager > License Server Administrator. On Linux, run the License Server Administrator from the installation location using the following command: <installation_path>/arcgis/license <Version>.<Version_sub_number>.X/LSAdmin.
- Click Authorization in the table of contents, select the ArcGIS Pro version from the Version drop-down selection and click the Authorize Now button to launch the Software Authorization Wizard.
Note:
Follow the instructions in the dialog boxes of the Software Authorization Wizard to complete the authorization process, either using a provisioning file to enter the authorization numbers, or manually. Note that there are many variations available to authorize licenses, such as online, offline file upload, offline email, etc. The following steps cover the online method.
- In the Authorization Options window, for manual entry of the Authorization Numbers obtained from previous section, use the following settings:
Note:
To use a provisioning file (.prvc), select I have received an authorization file and am now ready to finish the authorization process.
- For Authorize Options, select I have installed my software and need to authorize it.
- For Product to be Authorized: select ArcGIS Pro.

- Click Next.
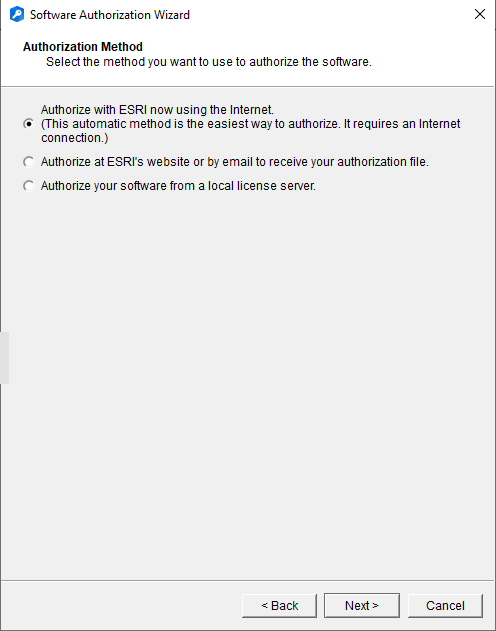
- Under Authorization Method, choose the default option, Authorize with ESRI now using the Internet, and click Next.
- In the Authorization Information dialog, verify and complete all required information marked with an asterisk (*). Click Next.
- In the continuation of the Authorization Information dialog, verify and complete all required information marked with an asterisk (*). Click Next.
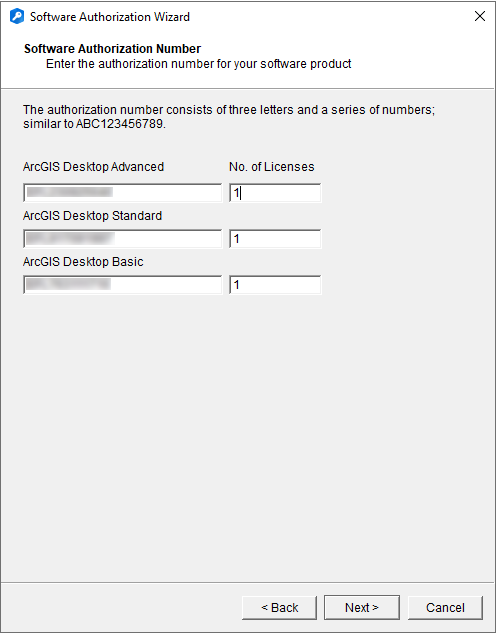
- Under the Software Authorization Number dialog, type the authorization numbers for the selected products, or verify the data was inserted correctly if using a provisioning file. Click Next.
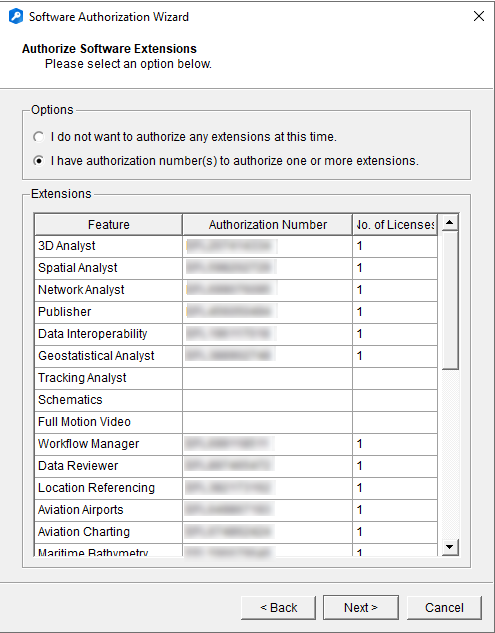
- Under Authorize Software Extensions, provide the authorization numbers for any extensions to be authorized, or verify data was inserted correctly if using provisioning file. Click Next to start the authorization process.
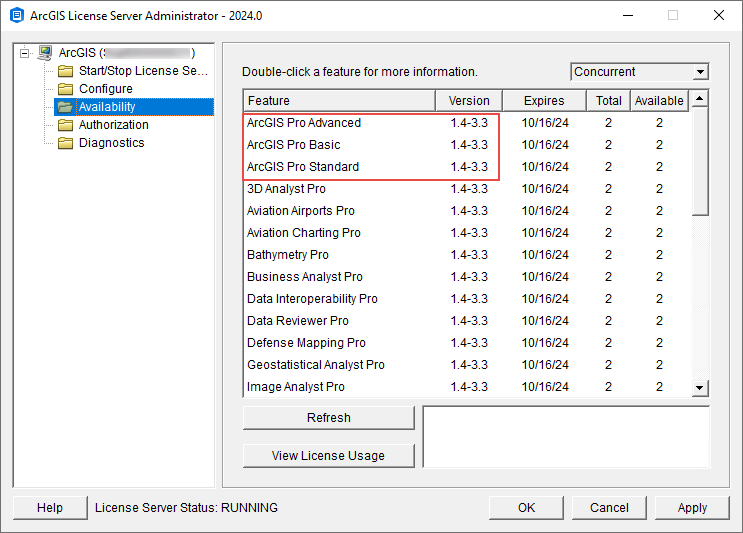
- Once completed, click Finish to close the wizard and return to ArcGIS License Server Administrator. Click the Availability folder on the table of contents to list all the authorized licenses.
- Start ArcGIS Pro. When the Sign In dialog box or prompt appears, click Configure Your Licensing Options at the bottom of the dialog box. If ArcGIS Pro is currently configured to use the Named User or the single-use licensing option, when opening ArcGIS Pro, click Settings, click the Licensing tab, and click Configure your licensing options at the bottom of the application to browse to the Licensing dialog box.

- In the Licensing dialog box, expand the License Type drop-down menu and choose Concurrent Use License.
- In the License Manager field, type the host name of the machine hosting the ArcGIS License Manager. Optionally, provide the backup server, if one exists. Click the Refresh button. If the License Manager host name is valid, ArcGIS Pro core product licenses and extension licenses are displayed, as well as available seats and expiration dates.
- Choose Advanced, Standard, or Basic for the license level. The selected license level displays in the Availability window. Here, you can view the number of available licenses. If there is an extension that you want to use, check the check box next to an extension to activate it.
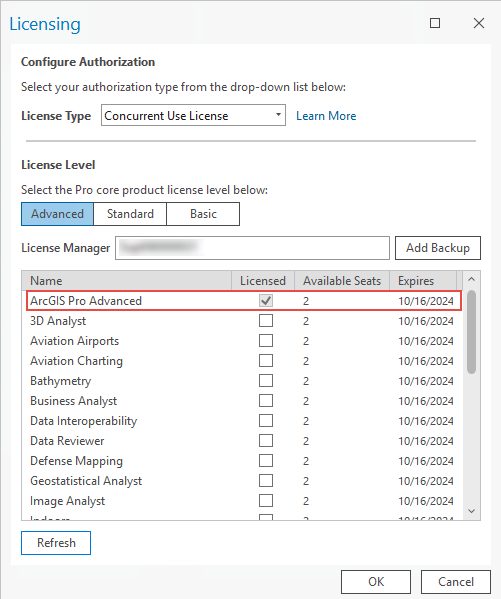
- Click OK to complete the authorization process for concurrent-use licenses.
Authorize single-use licenses
Follow these steps to install ArcGIS Pro, and use the Software Authorization Wizard to authorize single-use licenses.
- Start ArcGIS Pro. When the Sign In dialog box or prompt appears, click Configure Your Licensing Options at the bottom of the dialog box. If ArcGIS Pro is currently configured to use the Named User or the single-use licensing option, when opening ArcGIS Pro, click Settings, click the Licensing tab, and click Configure your licensing options at the bottom of the application to browse to the Licensing dialog box.
- In the Licensing dialog box, expand the License Type drop-down menu and choose Single Use License.
- Select the license level associated to the authorization number or provisioning file. If the single-use license is not authorized, click the Authorize button and follow the Authorization Wizard to authorize the license. Refer to ArcGIS Pro: Authorize and start ArcGIS Pro with a Single Use license for more information.
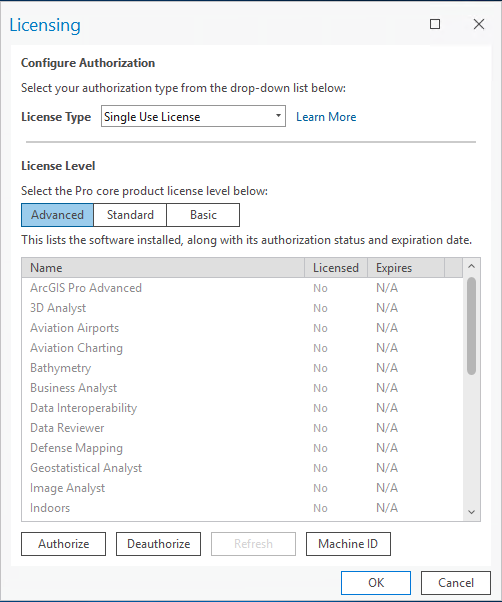
- Click OK.
Article ID: 000012721
- ArcGIS Pro 3 1
- ArcGIS Pro 3 3
- ArcGIS Pro 3 0
- ArcGIS Pro 3 2
- ArcGIS Pro 1 x
- ArcGIS Pro 2 x
Get support with AI
Resolve your issue quickly with the Esri Support AI Chatbot.


Discover more on this topic
Search for related information
Find training related to this topic
Explore ideas and give feedback
Get help from ArcGIS experts
Start chatting now