PROBLEMA
Não é possível editar tabelas de atributos no ArcGIS Pro
Descrição
When attempting to edit attribute tables in ArcGIS Pro, the attribute table is disabled or double-clicking a value in a field fails, preventing any edits to it.
Causa
- The editing capabilities of the layer is not enabled in ArcGIS Pro.
- The layer is corrupted or broken.
- The user is not logged in to an ArcGIS Online organizational account in ArcGIS Pro.
- The editing capabilities of the hosted feature layer is not enabled in ArcGIS Online.
- The editing capabilities of the field in the attribute table is not enabled in the web map pop-up configuration.
Solução ou Solução Provisória
Depending on the cause, the following workarounds are applicable.
Enable editing of the layer to edit the attribute table
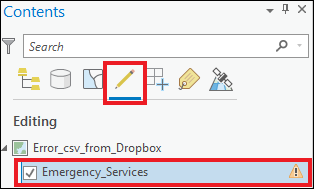
In ArcGIS Pro, in the Contents pane, on the List By Editing tab, check the layer to enable editing. Refer to ArcGIS Pro: Specify which layers can be edited for more information.
Remove and re-add the layer
In ArcGIS Pro, remove the corrupted or broken layer, and re-add it to the map. Refer to ArcGIS Pro: Add data to a project for more information.
Log in to an ArcGIS Online organizational account in ArcGIS Pro
In ArcGIS Pro, log in to an ArcGIS Online organizational account to access or edit layers hosted in ArcGIS Online. Refer to ArcGIS Pro: Sign in to your organization for more information.
Enable the editing capabilities of the hosted feature layer
In ArcGIS Online, on the item details page, enable editing of the hosted feature layer. Refer to ArcGIS Online: Allow others to edit for more information.
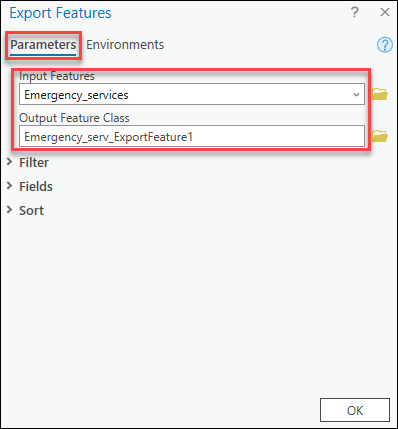
Convert the feature layer to a geodatabase feature class to enable editing of the attribute table
In ArcGIS Pro, convert the feature layer to a geodatabase feature class to enable editing of the attribute table.
Note:
This workflow does not require enabling editing of the hosted feature layer in ArcGIS Online.
- In the Contents pane, browse to and right-click the layer.
- Click Data > Export Features. The Export Features pane opens.
- In the Export Features pane, on the Parameters tab, click the drop-down arrow, and select the non-editable layer for Input Features.
- Specify a name for Output Feature Class, and click OK.
Configure the pop-up settings to enable editing of the locked field
In Map Viewer Classic, configure the pop-up settings to enable editing of the locked field in the attribute table.
Note:
This workflow is only applicable to feature layers with editing enabled at the layer level.
- Log in to ArcGIS Online, navigate to Content > My Content.
- Browse to the hosted feature layer, click More Options
 , and select Open in Map Viewer Classic.
 - In the Contents pane, browse to the layer, and configure the pop-up settings to enable editing of the locked field in the attribute table. Refer to How To: Enable editing of a locked field in ArcGIS Online Map Viewer for more information.
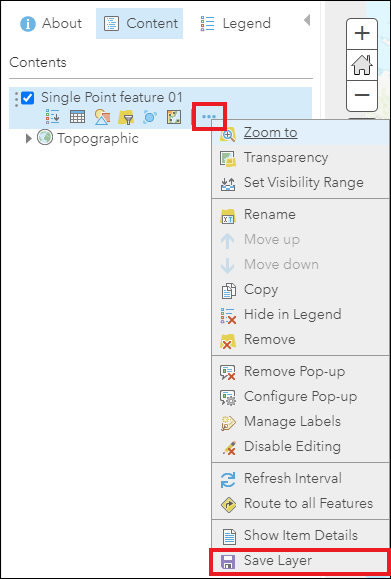
- In the Contents pane, browse to the layer, click More Options, and select Save Layer.
- In ArcGIS Pro, remove and re-add the layer to the map.
- In the Contents pane, browse to and right-click the layer, and select Remove.
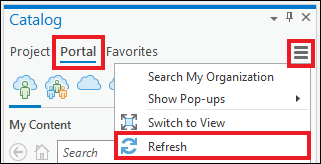
- In the Catalog pane, on the Portal tab, click Menu, and select Refresh.
- Browse to and right-click the layer, and select Add To Current Map.
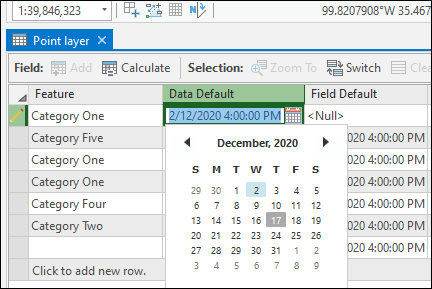
The image below shows the field in the attribute table is editable in ArcGIS Pro.
ID do Artigo:000024877
Obtenha ajuda de especialistas do ArcGIS
Baixe o Esri Support App
Informações Relacionadas
Descubra mais sobre este tema
Search for related information
Find training related to this topic
Explore ideas and give feedback