Instrução
Voar um drone usando Terrain Follow com Site Scan Flight for ArcGIS
Resumo
Rather than flying a drone at a constant height, Site Scan Flight for ArcGIS drone operators have the option to plan autonomous flights at varying altitudes, following the site topography by using the Terrain Follow feature. For survey areas around hills and other variable terrain elevations, terrain-following enhances the consistency and quality of imagery products from a drone flight by capturing images with constant resolution and proper overlap. Terrain Follow can be enabled in all flight modes except for Inspection.
Caution:
Terrain Follow is intended to be used by experienced pilots only. Terrain Follow flights introduce additional risk, which may require the pilot to assume manual control to avoid collision.
Important Notes about Terrain Follow
- Terrain Follow requires either an offline basemap or a strong internet connection in the field. It is highly recommended to download an offline basemap if strong internet at the site is uncertain.
- Terrain is calculated from Esri’s World Terrain database.
- The terrain database contains multiple data sources and has varying resolution and currency across the world. Therefore, terrain may be outdated or not have the resolution required to represent features like peaks, cliffs, and other terrain obstructions.
- Obstacles such as trees, tall buildings, water towers, and power lines are not represented in the terrain database and therefore are not taken into consideration during the flight height calculations.
- Profile View only shows the ground elevation beneath the flight path. Higher elevations may exist in the flight area, and between the flight area and the drone’s takeoff location. This should be accounted for while setting the Return Height.
Procedimento
- Update Site Scan Flight for ArcGIS to the newest version.
- Open the app on the iPad.
- Choose the desired flight mode. This tutorial uses Area Survey.
- Enter a mission name, choose a location (optional), and tap Next.
- Adjust the mission area by dragging the polygon vertices.
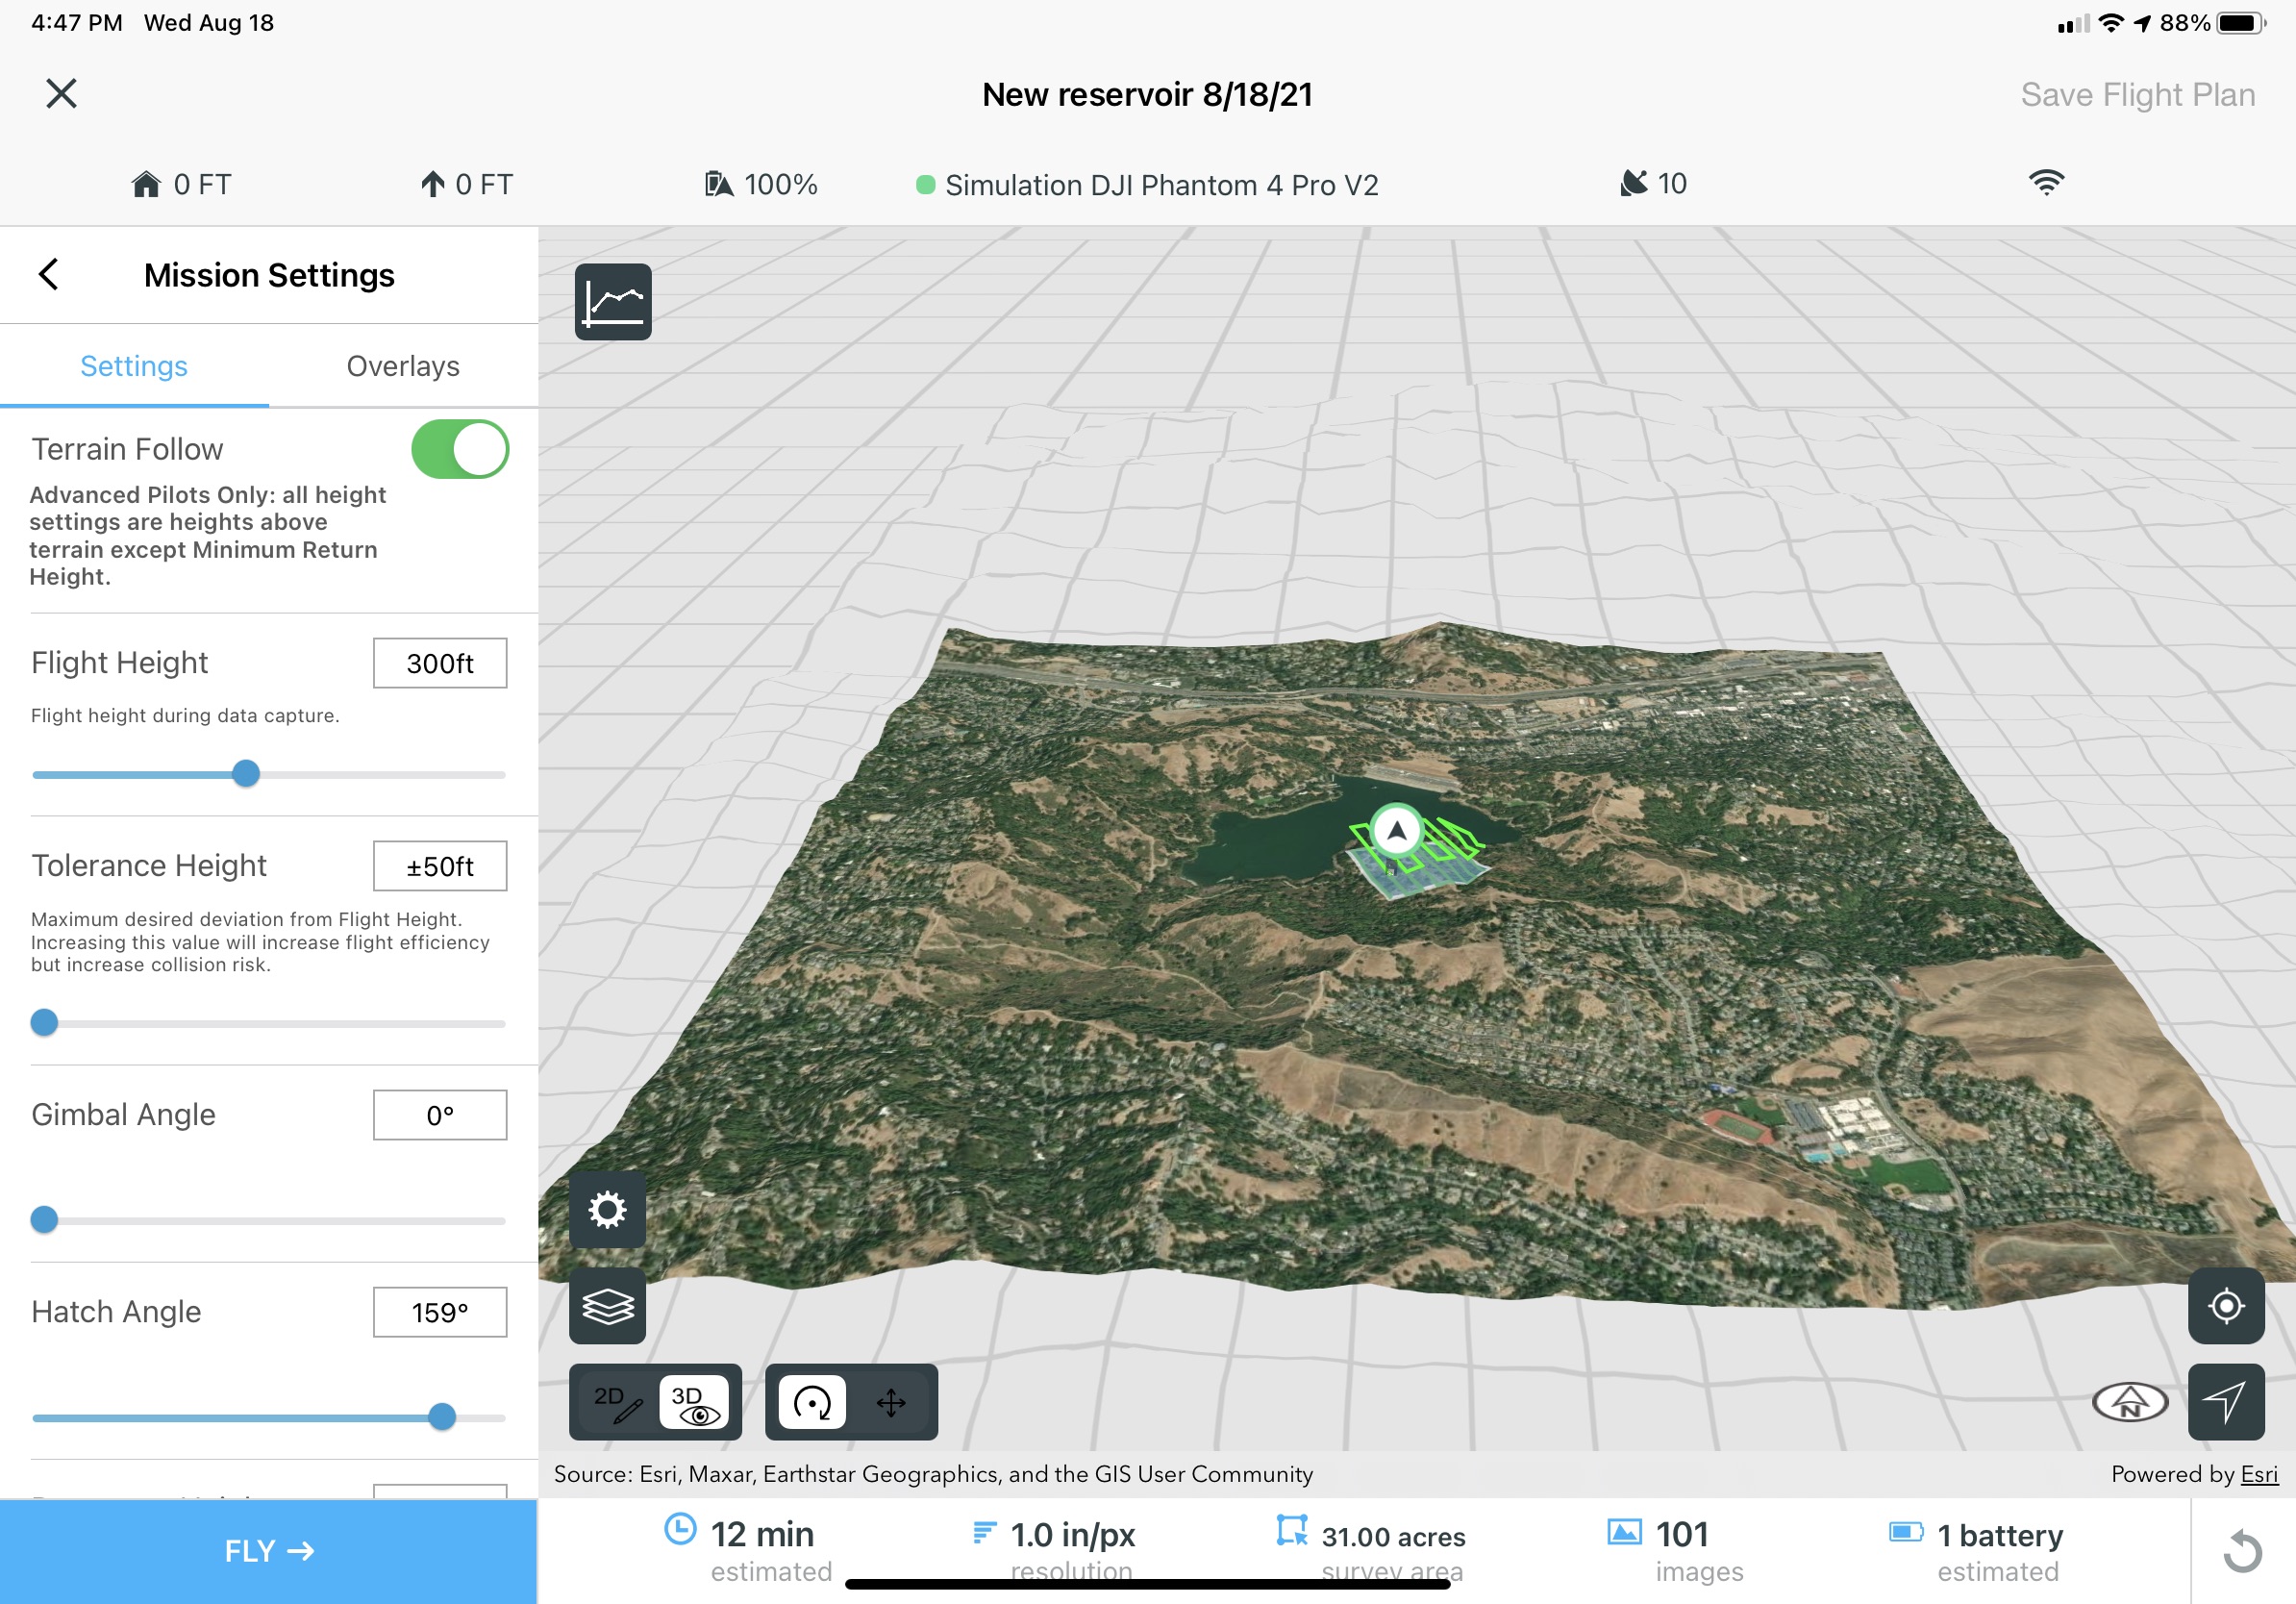
- Enable Terrain Follow. The Mission Settings screen switches to a 3D view.
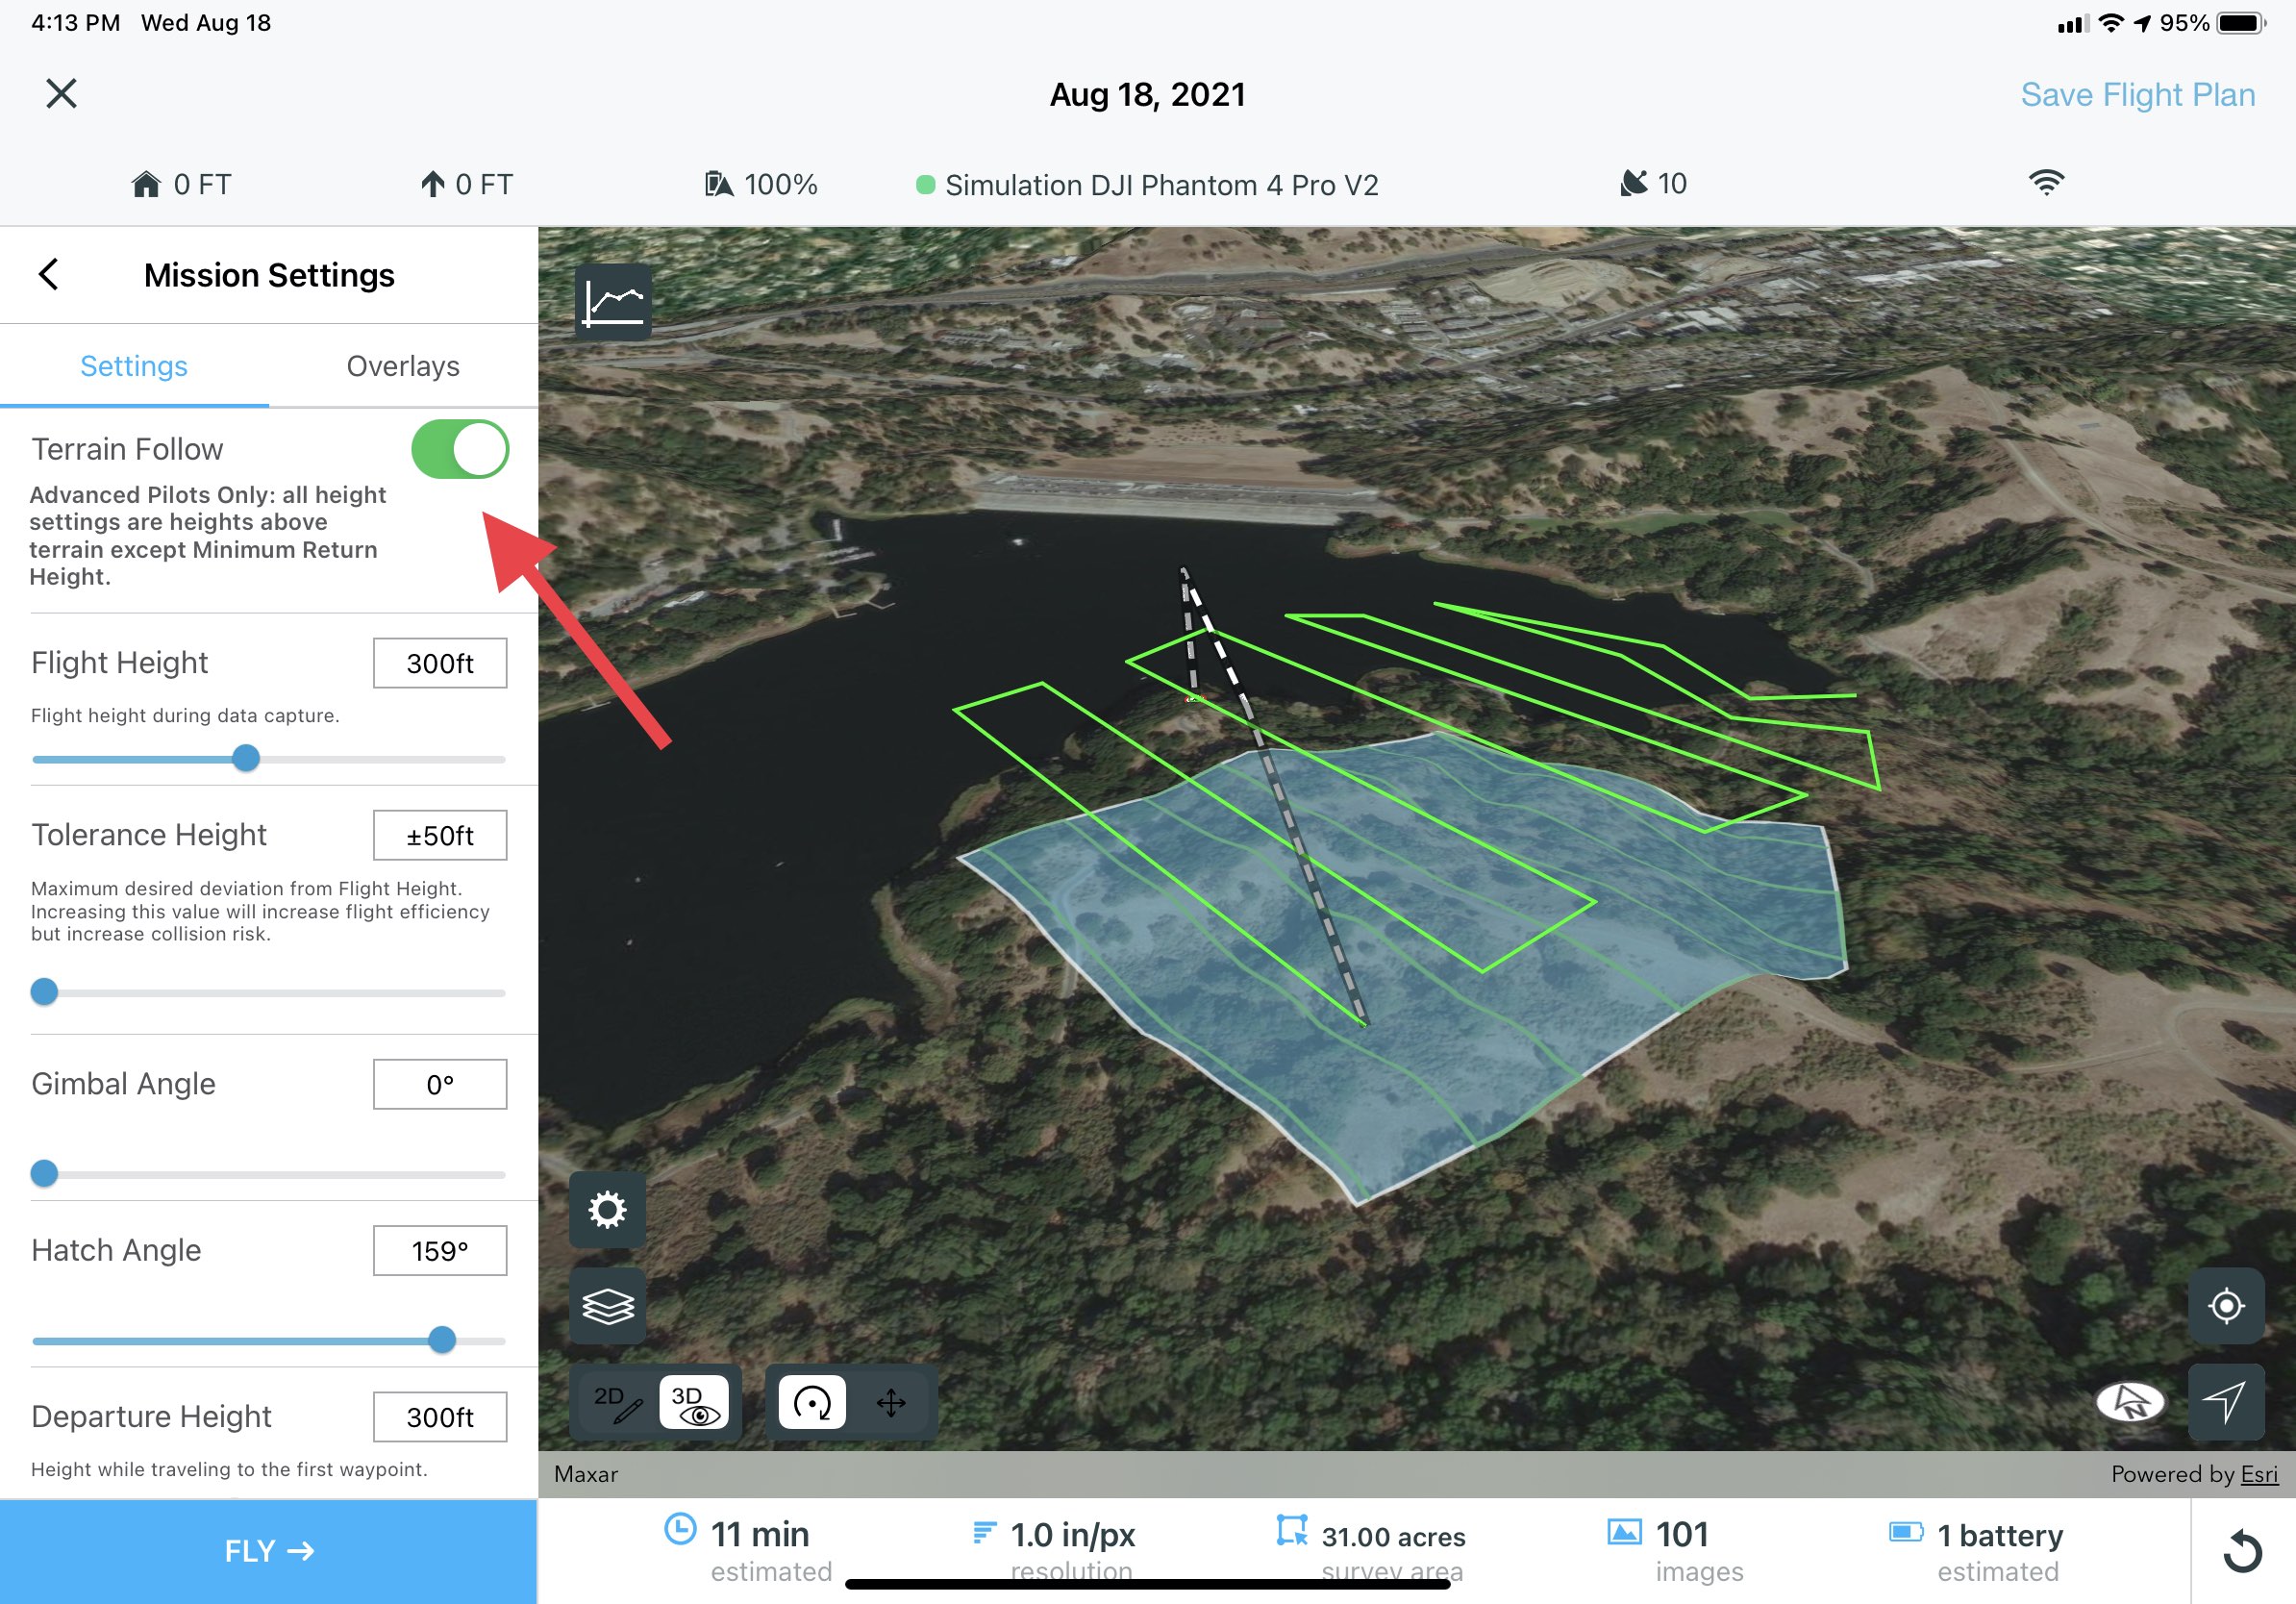
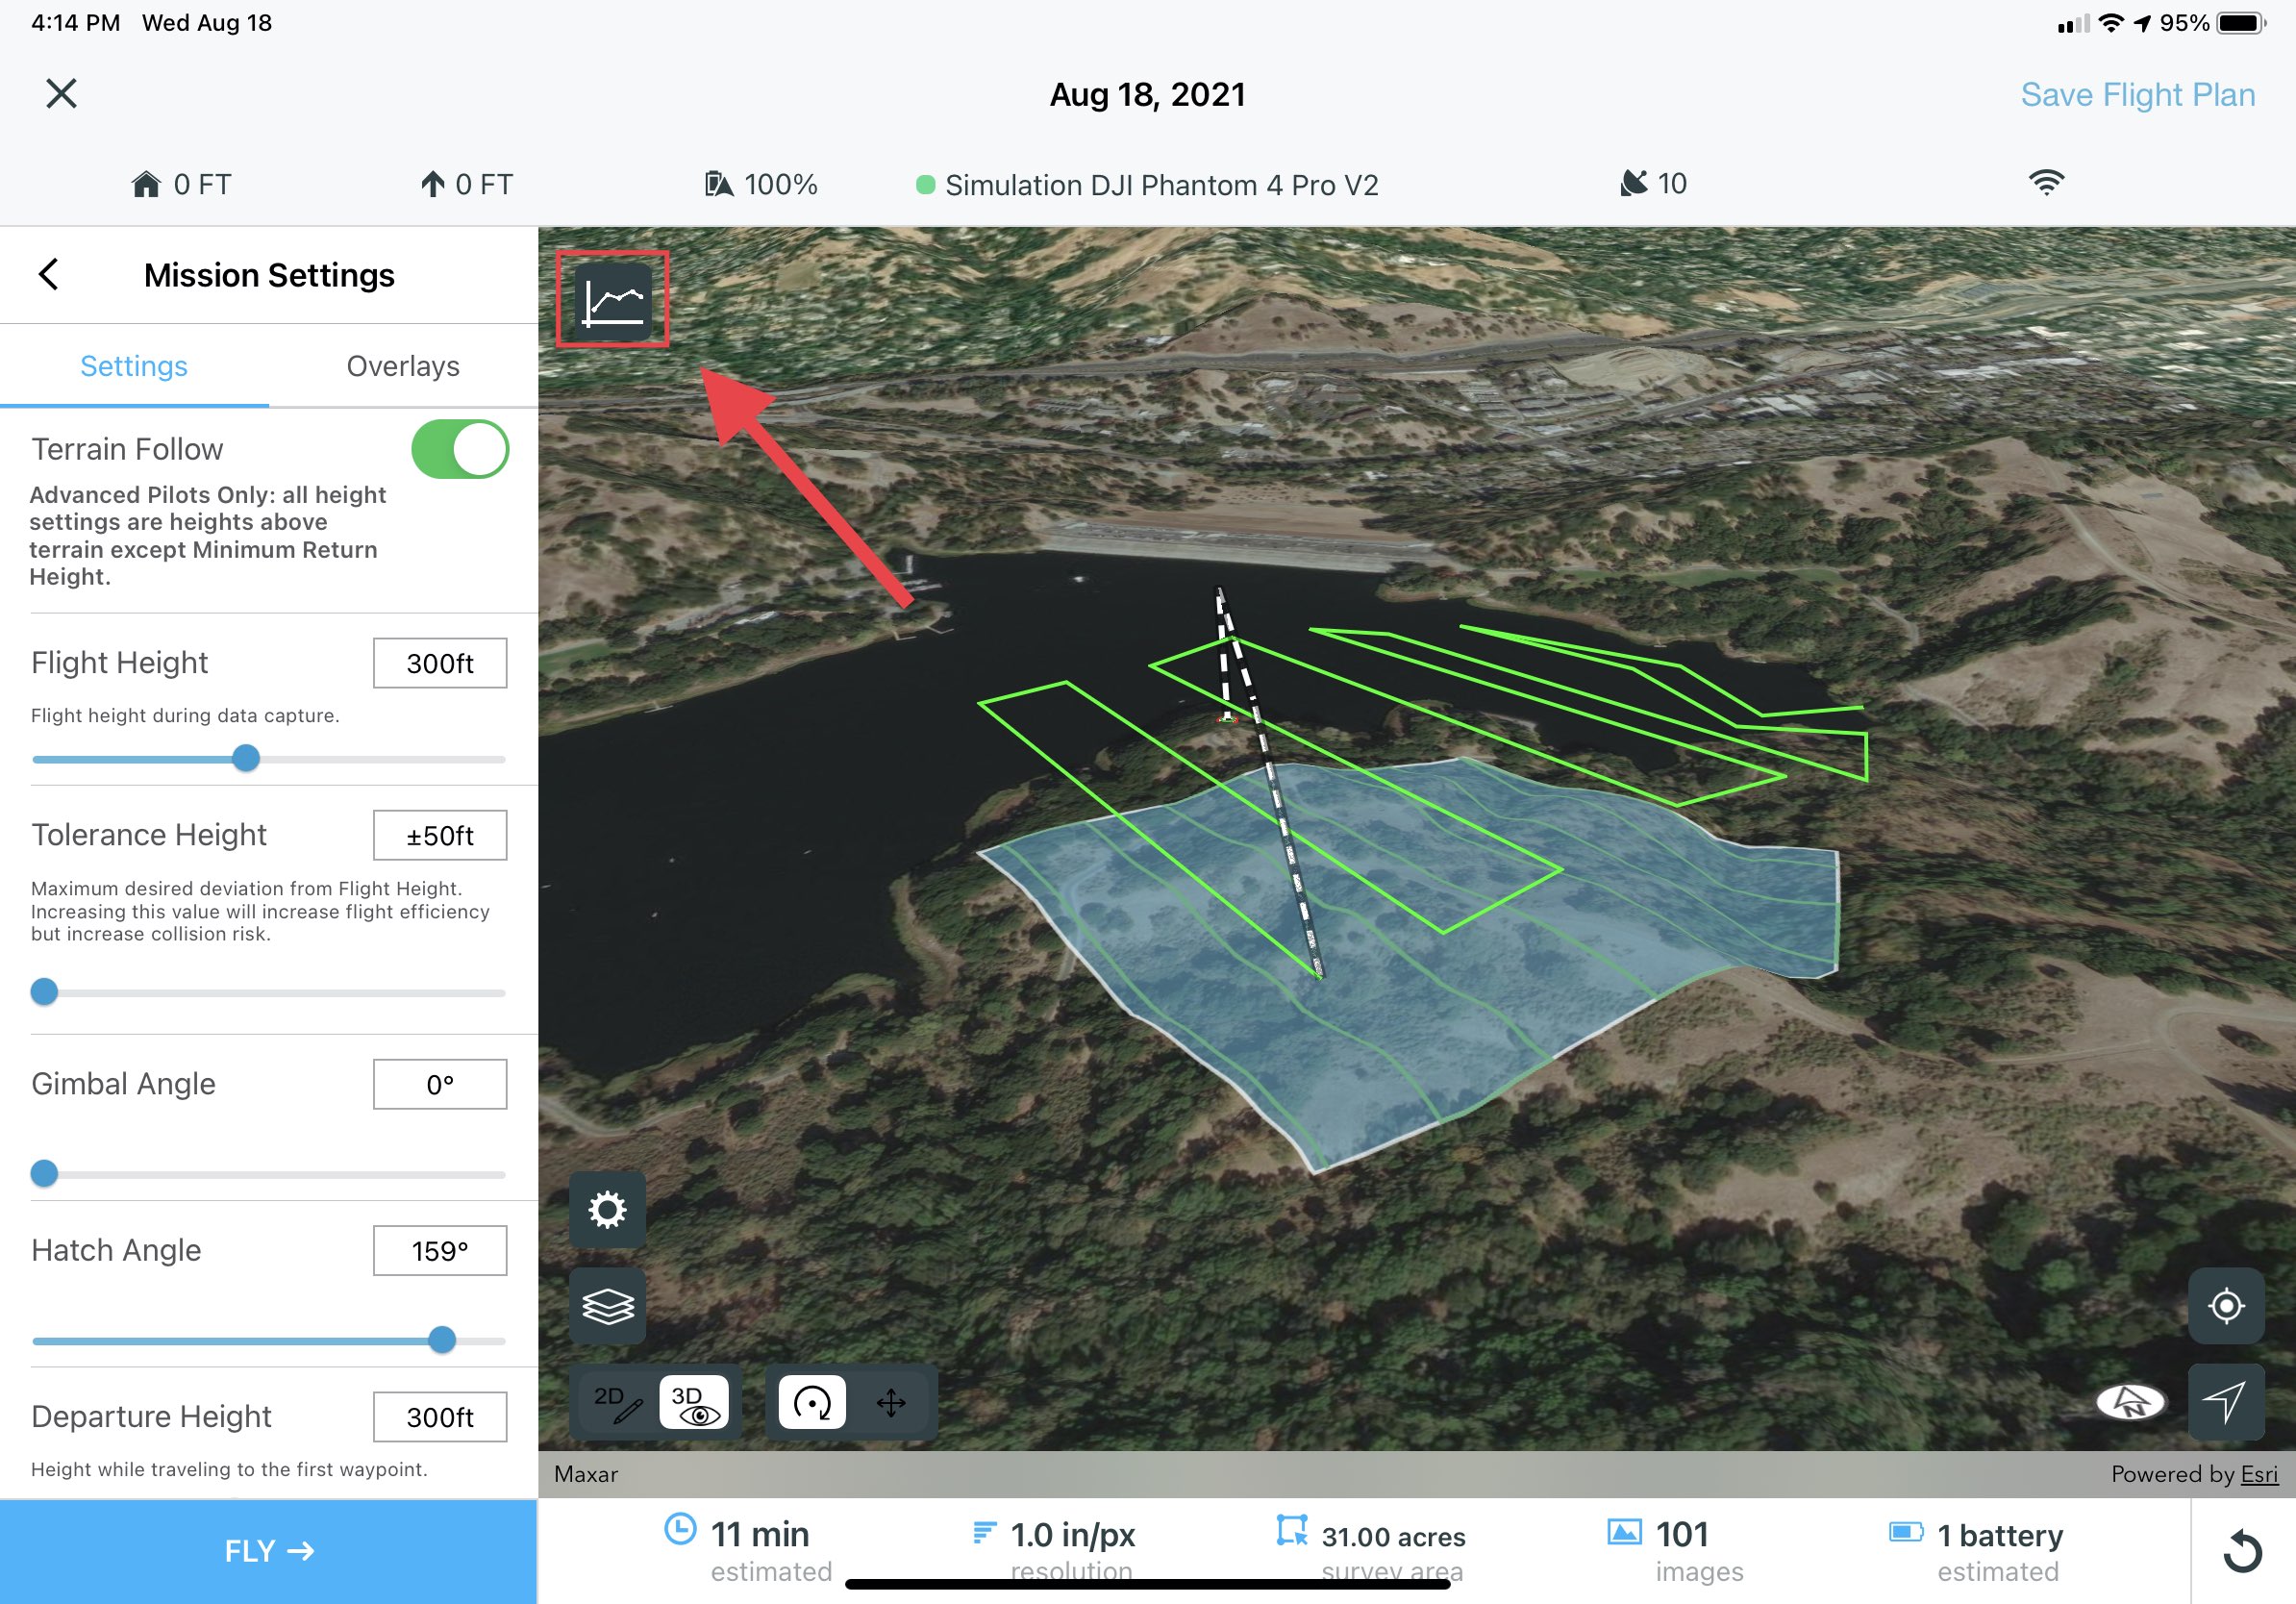
- In the map’s upper left corner, tap the graph icon to bring up the Profile View.
- Using the map and Profile View as guides, adjust the flight settings to suit the flight needs.
- If the Profile View shows the flight path getting close to the terrain, consider increasing the Flight Height or decreasing the Tolerance Height.
- To optimize efficiency, it is recommended to set the hatch angle perpendicular to the slope, such as the example below.
- The Profile View changes after each setting is adjusted and as vertices are moved. Vertices can be adjusted by switching back to 2D view.

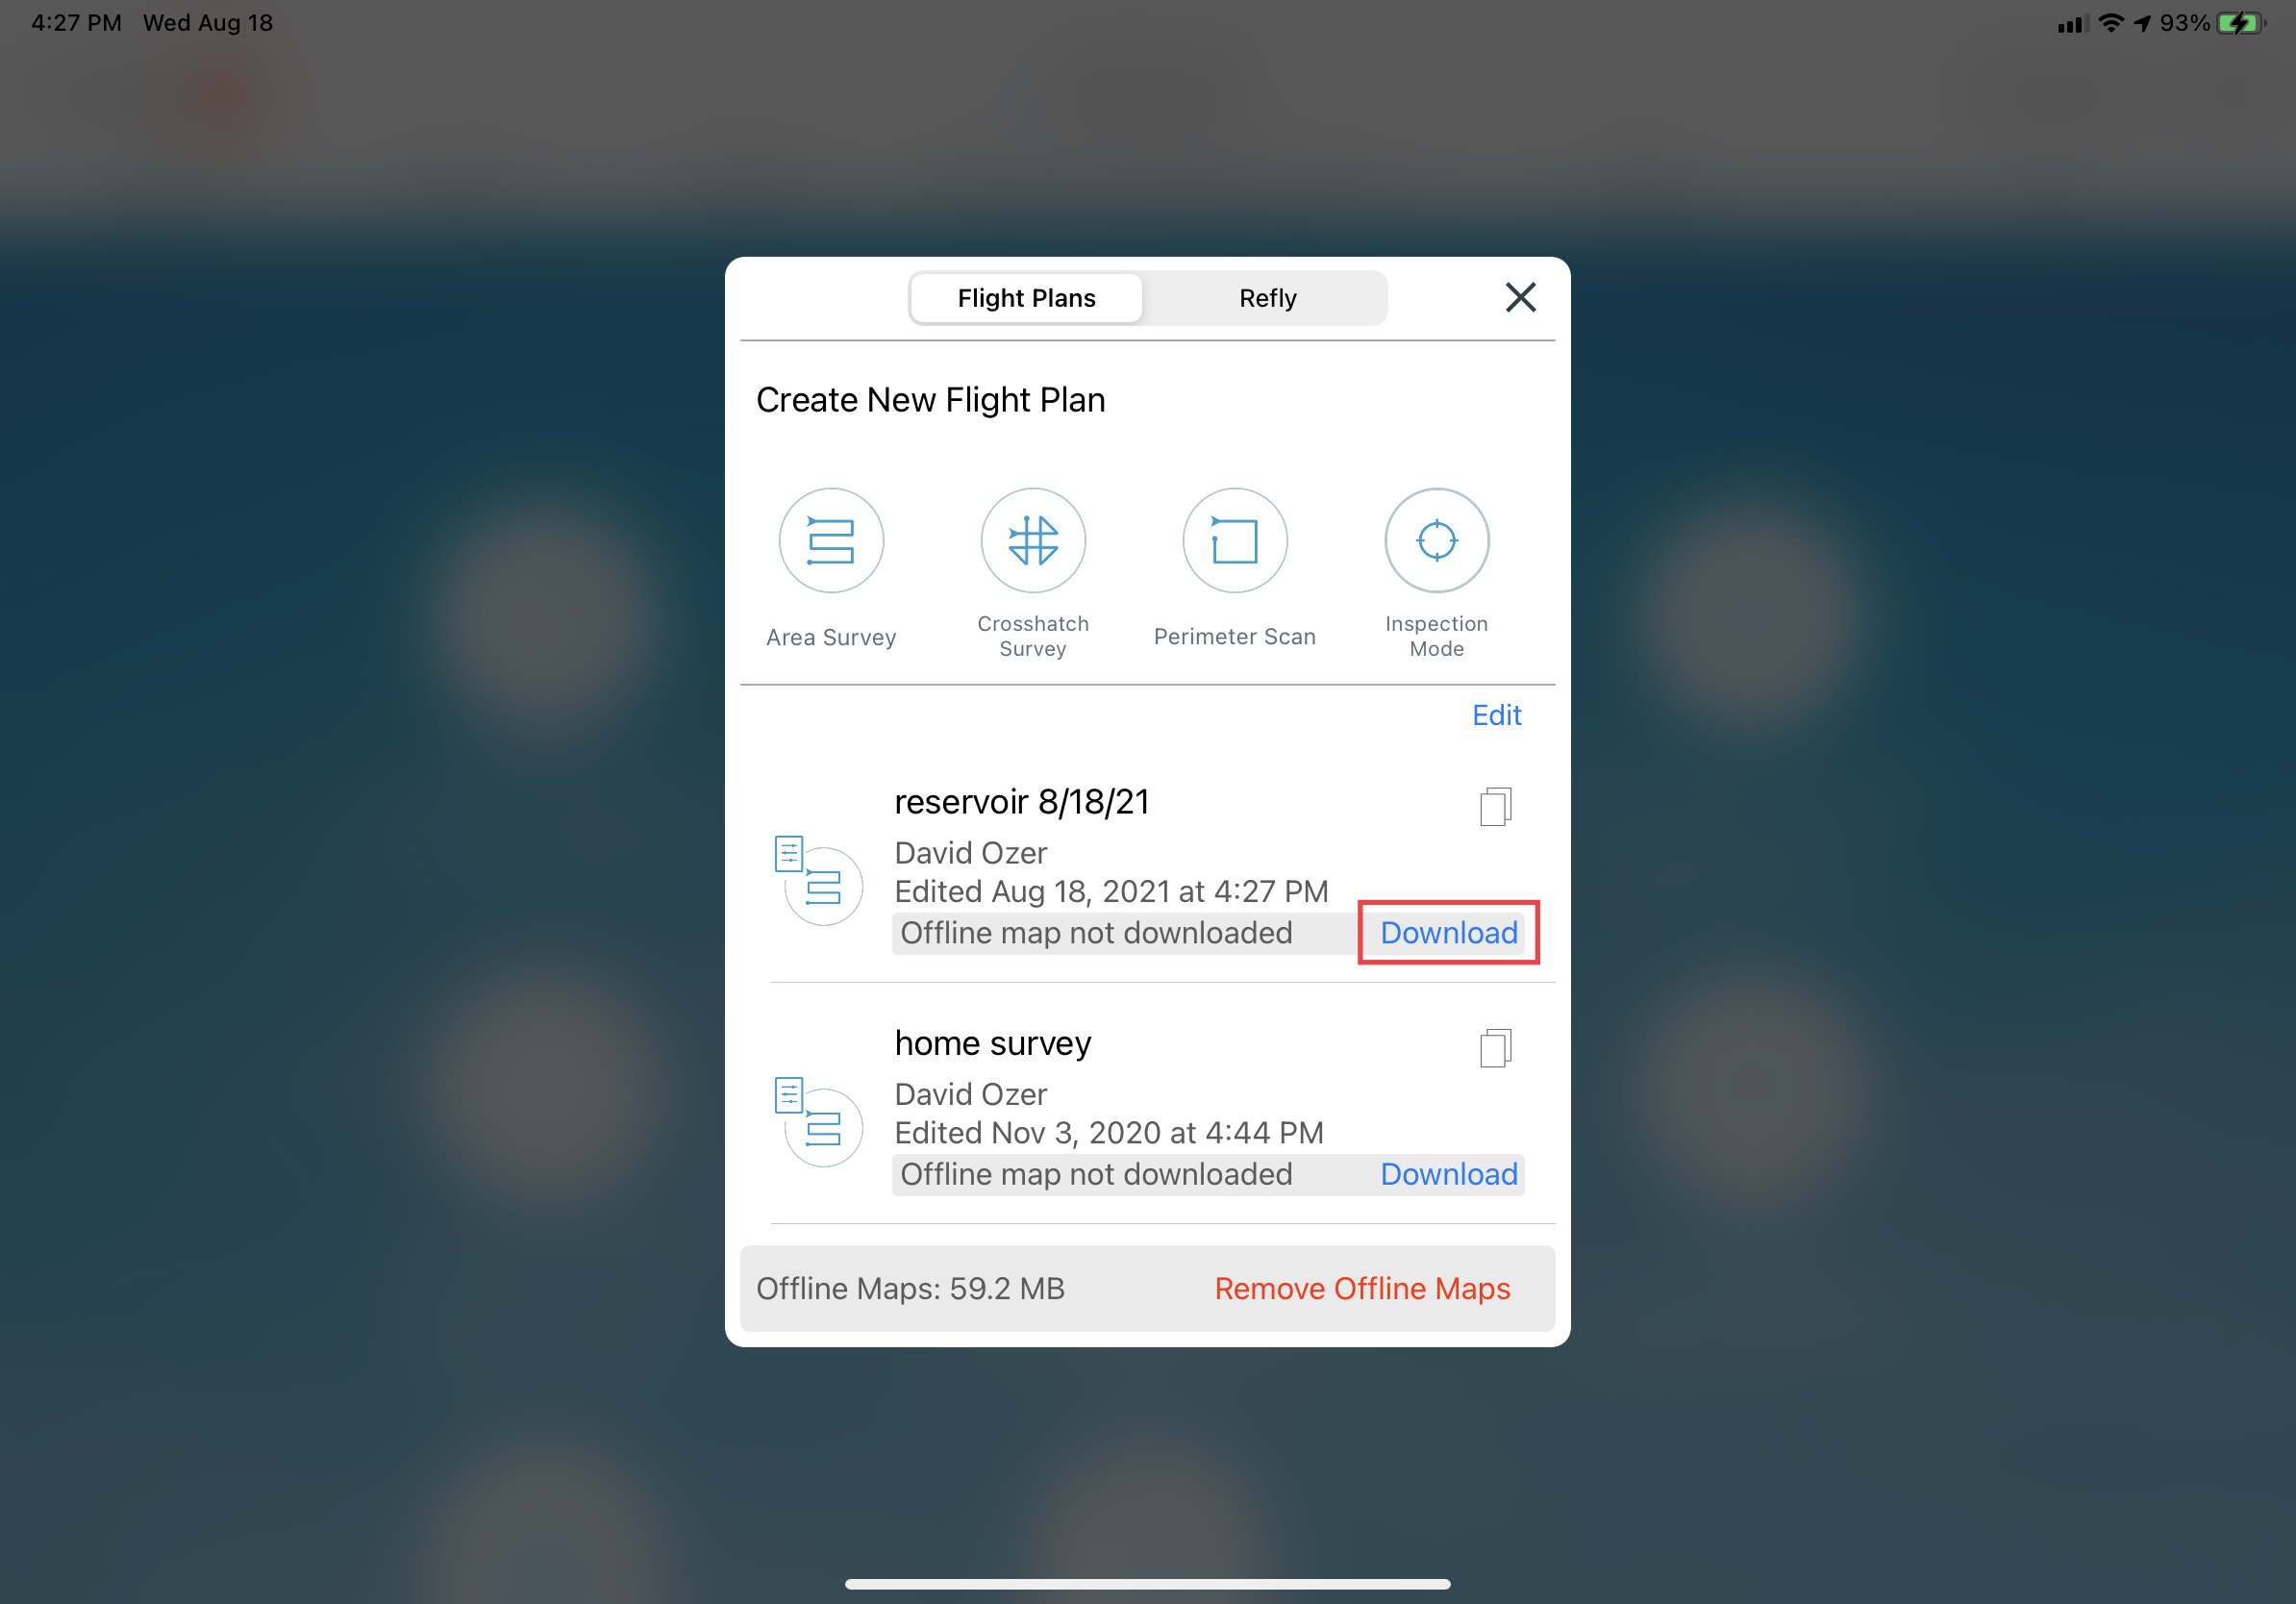
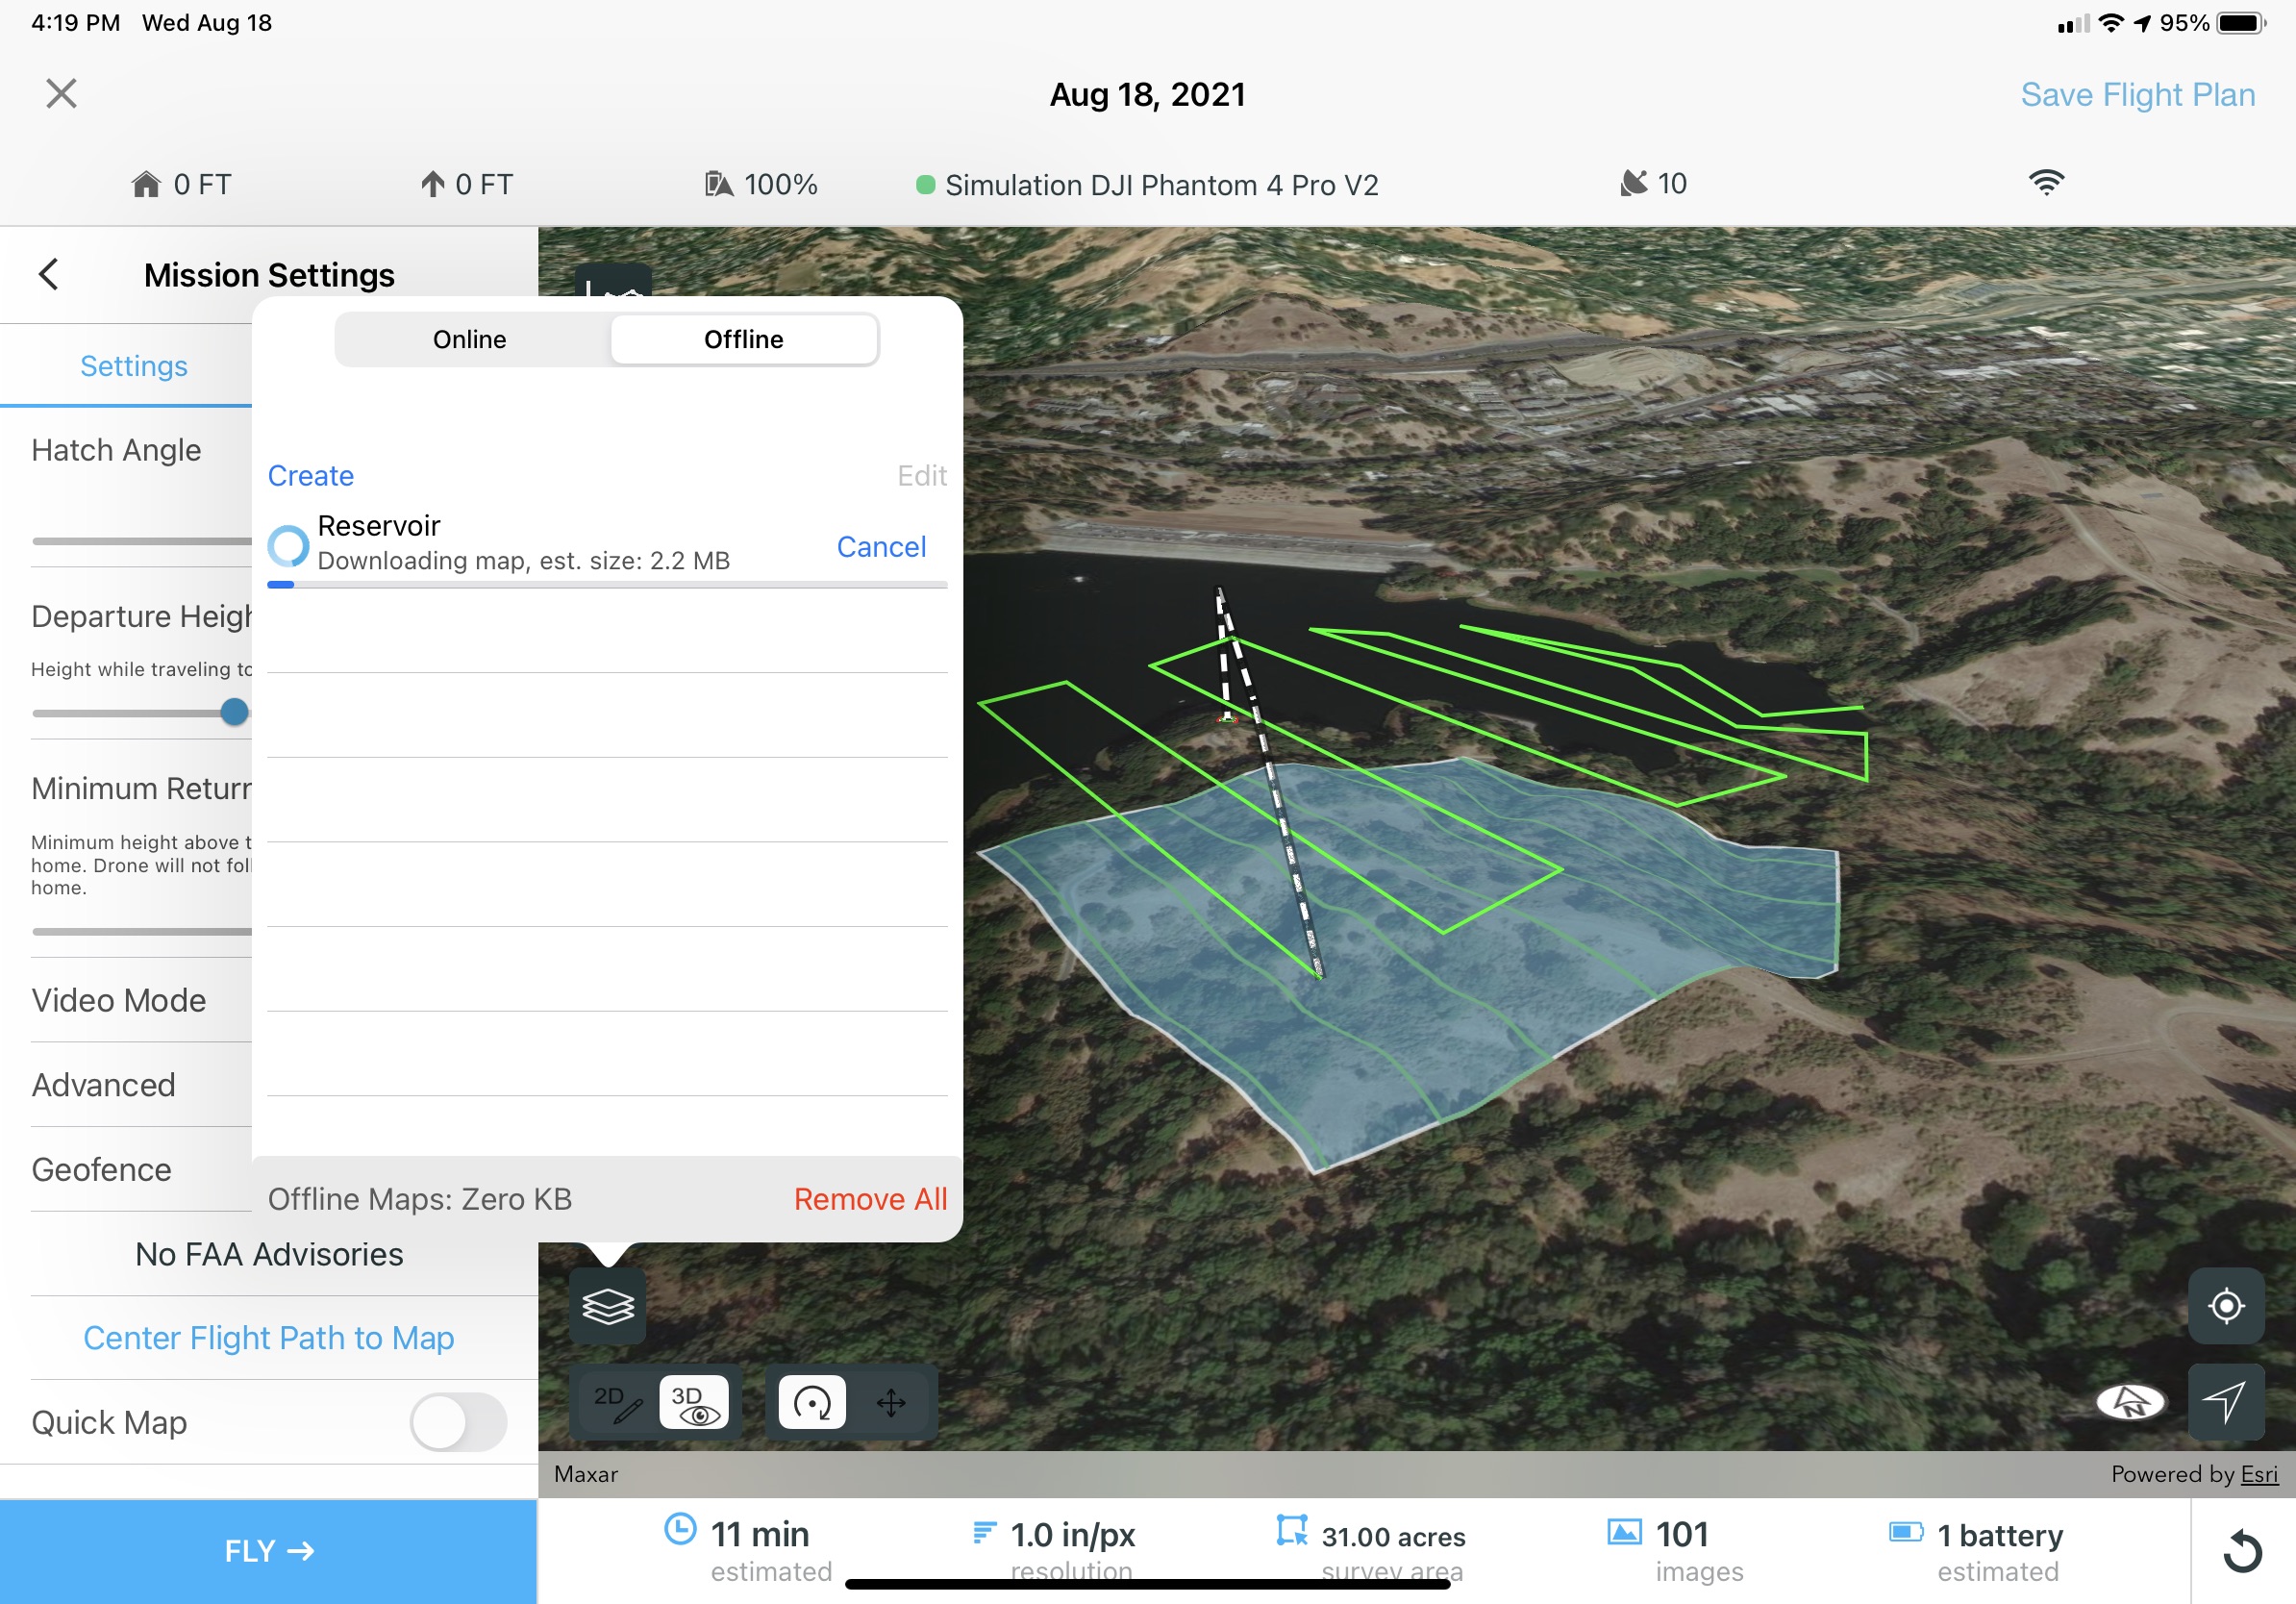
- Once satisfied with the mission, it is recommended to download an offline basemap.
- To save the flight plan, tap Save Flight Plan in the upper right corner.
- Return to the homepage and tap Flight Plans.
- Ensure that there is a strong internet connection.
- Find your Flight Plan and tap Download.
- The map and terrain data start downloading. Download may take a few minutes depending on the size of the flight plan.
- After download is complete, open the flight plan and confirm that you are using the offline basemap. To do this, tap the basemap picker, then toggle Offline, and find the newly downloaded offline basemap.
- Validate that the offline basemap covers both the mission area, as well as the planned to take off location. You must take off within the offline basemap coverage so the drone can follow terrain on its way to the mission area.
- As an alternative to the procedure above, you may create a custom offline basemap directly within the offline basemap menu. While planning your mission, tap the basemap icon, tap Offline, tap Create. Name the offline basemap and initiate download. As with the other procedure, validate that the newly created offline basemap covers the full area including the takeoff location.
- Depending on the flight configuration settings, Preflight Cautions or Warnings (see Preflight Warnings Screen below) may be presented. If this is the case, it is highly encouraged to tap Cancel and adjust flight settings to avoid risk of collision or exceeding regulation heights.
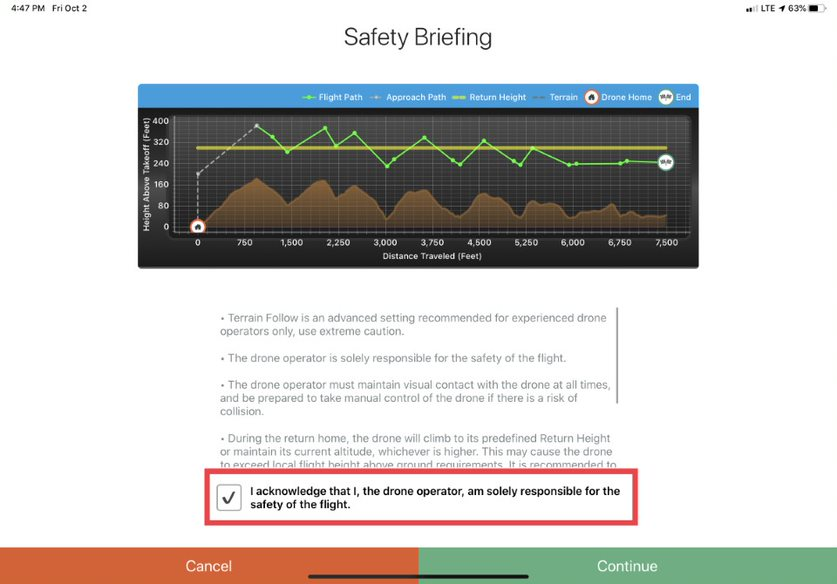
- Read the Safety Briefing screen, shown below. The pilot acknowledgement box must be selected to proceed.
- After passing the Preflight Checklist, swipe to fly.
Note:
Monitor the drone throughout the flight. Remain aware of abrupt terrain changes such as trees, water towers, and power lines. Since these features are not represented in the terrain database, you may need to assume manual control.
- During the return to the takeoff location, the drone does not follow the terrain, it returns in a horizontal line, at the height where the return was triggered, or the predefined Return Height, whichever is higher.
- After completing the mission, proceed with the preferred image upload method.
Geofence Option
- When the Geofence option is enabled, a return leg following the terrain is planned and uploaded to the drone before takeoff. Enabling the Geofence option reduces the area coverage per flight because Return Home is triggered sooner to ensure the drone has sufficient battery to safely return.
Warning:
If the pilot manually triggers a Return Home (from the App or the controller), or the drone automatically triggers a Return Home (due to signal loss for example), the drone does not follow terrain during the return. It instead returns in a straight line, at its current height or the predefined Return Height, whichever is higher.
Settings Definitions
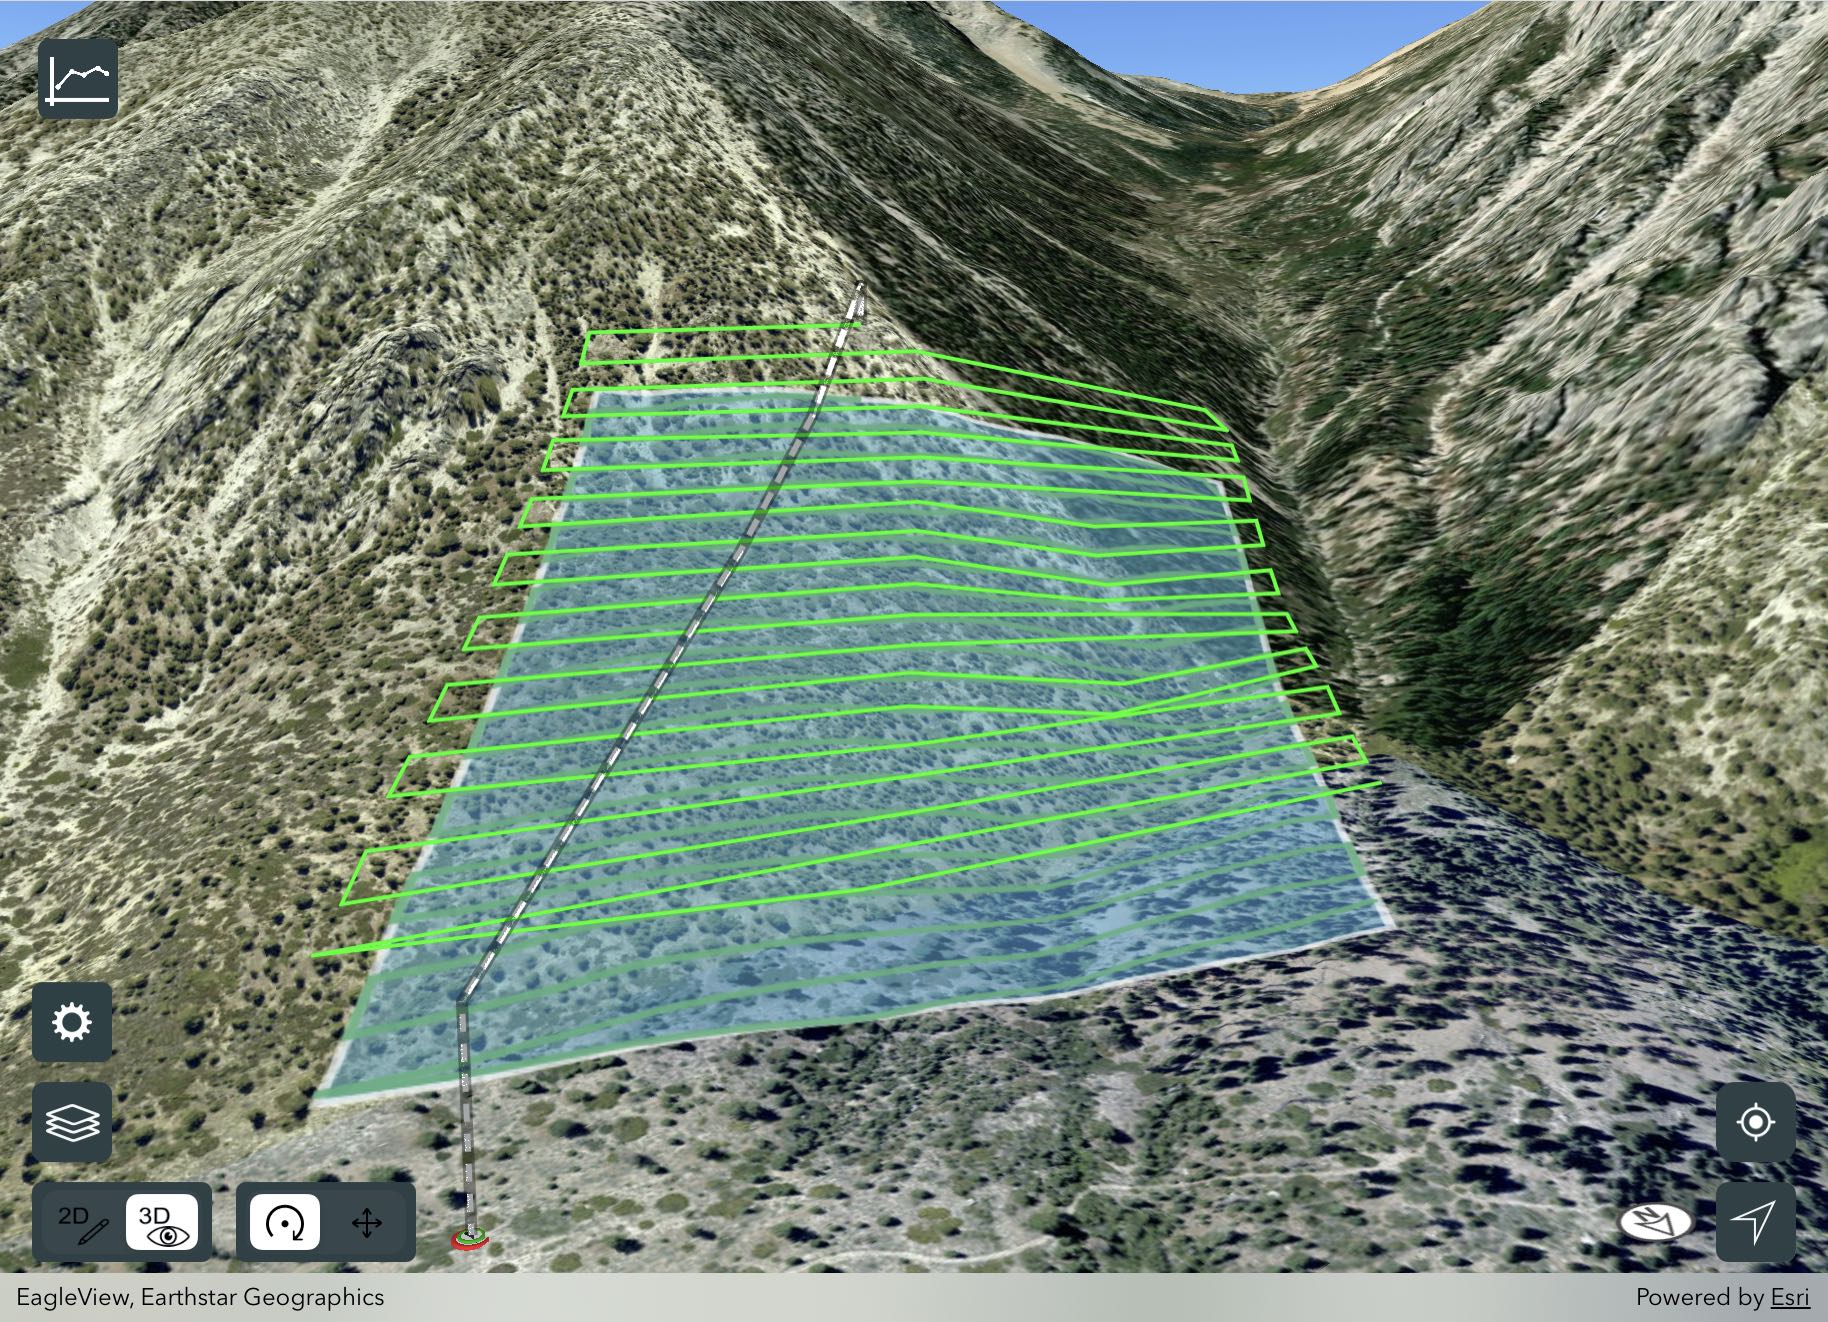
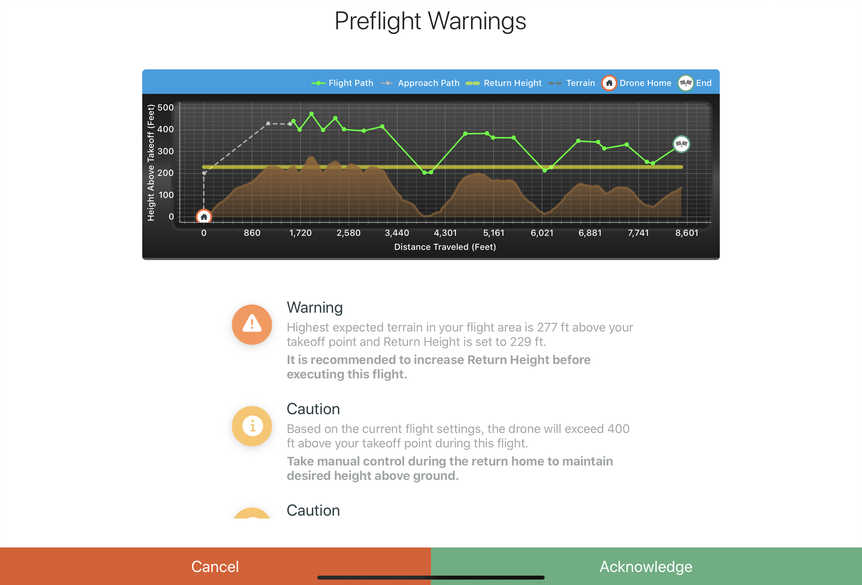
Profile View
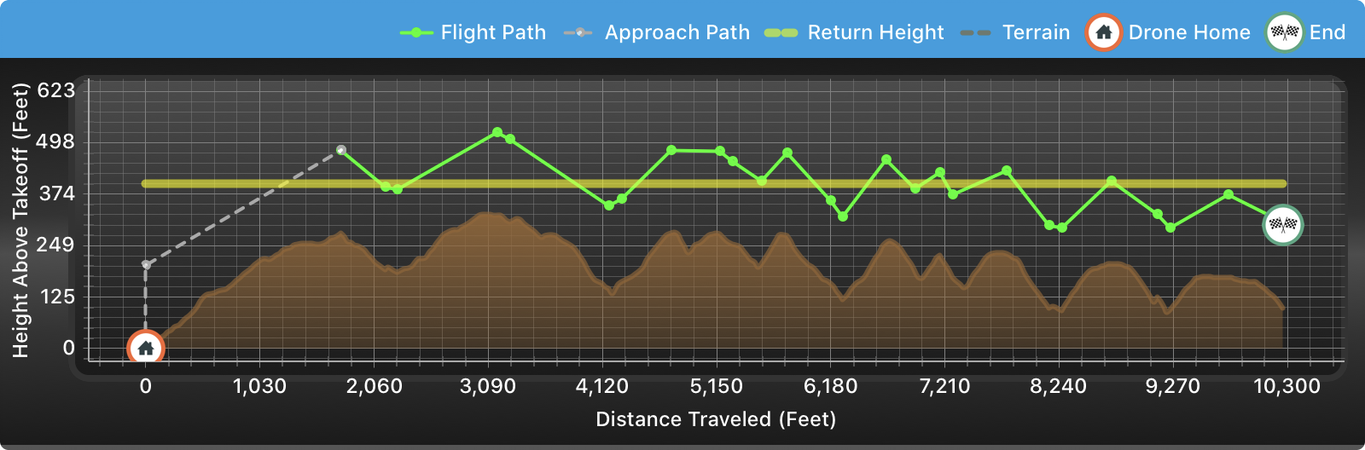
The visual representations in the image of Profile View shown above represent the following items:
- The red Drone Home icon is the drone’s takeoff location.
- The green End icon is the drone’s height at its final waypoint.
- The brown polygon represents the terrain underneath the drone’s path throughout the flight.
- The green line is the drone’s height above takeoff during data capture.
- The gray dotted line is the drone’s height above takeoff during departure.
- The yellow line is the drone’s height above takeoff during return.
Settings
- Flight Height: (Area Survey, Crosshatch, Corridor flying over the region of interest, Panorama): Height of the drone above the terrain during data capture. This means the drone adjusts its elevation to maintain this height above the ground for the duration of the data capture.
- Corresponds with green line in Profile View, above
- Minimum Flight Height: (Corridor not flying over the region of interest, Perimeter, Vertical): Height of the drone above terrain during the lowest flight leg.
- Maximum Flight Height: (Corridor not flying over the region of interest, Perimeter, Vertical): Height of the drone above terrain during the highest flight leg.
- Tolerance Height: Maximum desired deviation from Flight Height. Decreasing the Tolerance Height results in a safer flight, as the drone more accurately maintains the Flight Height. However, increasing the Tolerance Height increases the flight efficiency because the drone makes fewer height adjustments.
- Departure Height: Height of the drone above terrain while traveling to the first waypoint. Once the drone reaches the first waypoint, it adjusts its elevation, if necessary, to match the Flight Height.
- Corresponds with gray dotted line in Profile View
- Minimum Return Height: Minimum height above takeoff point during return home. The drone does not follow terrain during its return, so this value should account for variable terrain between the flight area and home. The drone returns home (either at the end of data capture, battery swap, or user-triggered) at the highest of the two values, either the Minimum Return Height or height of the drone at the most recent waypoint.
- Corresponds with yellow line in Profile View
Safety
- Preflight Warnings Screen
- Cautions inform pilots when the drone exceeds regulation heights above the ground or above the takeoff point. The pilot may modify the height at which a Caution is presented in Global Settings > Flight Settings > Caution Height. The flight can still be performed. The default setting is 400 feet.
- Warnings inform pilots when there may be a risk of collision. For example, if the Return Height is set to a value that is lower than the highest terrain in the entire flight area, a Warning is presented. The flight can still be executed.
- Safety Briefing Screen
- It is important the pilot reads all statements listed in the Safety Briefing. These are meant to inform the pilot of common risks of Terrain Follow. The pilot must acknowledge the Safety Briefing prior to performing every Terrain Follow flight.
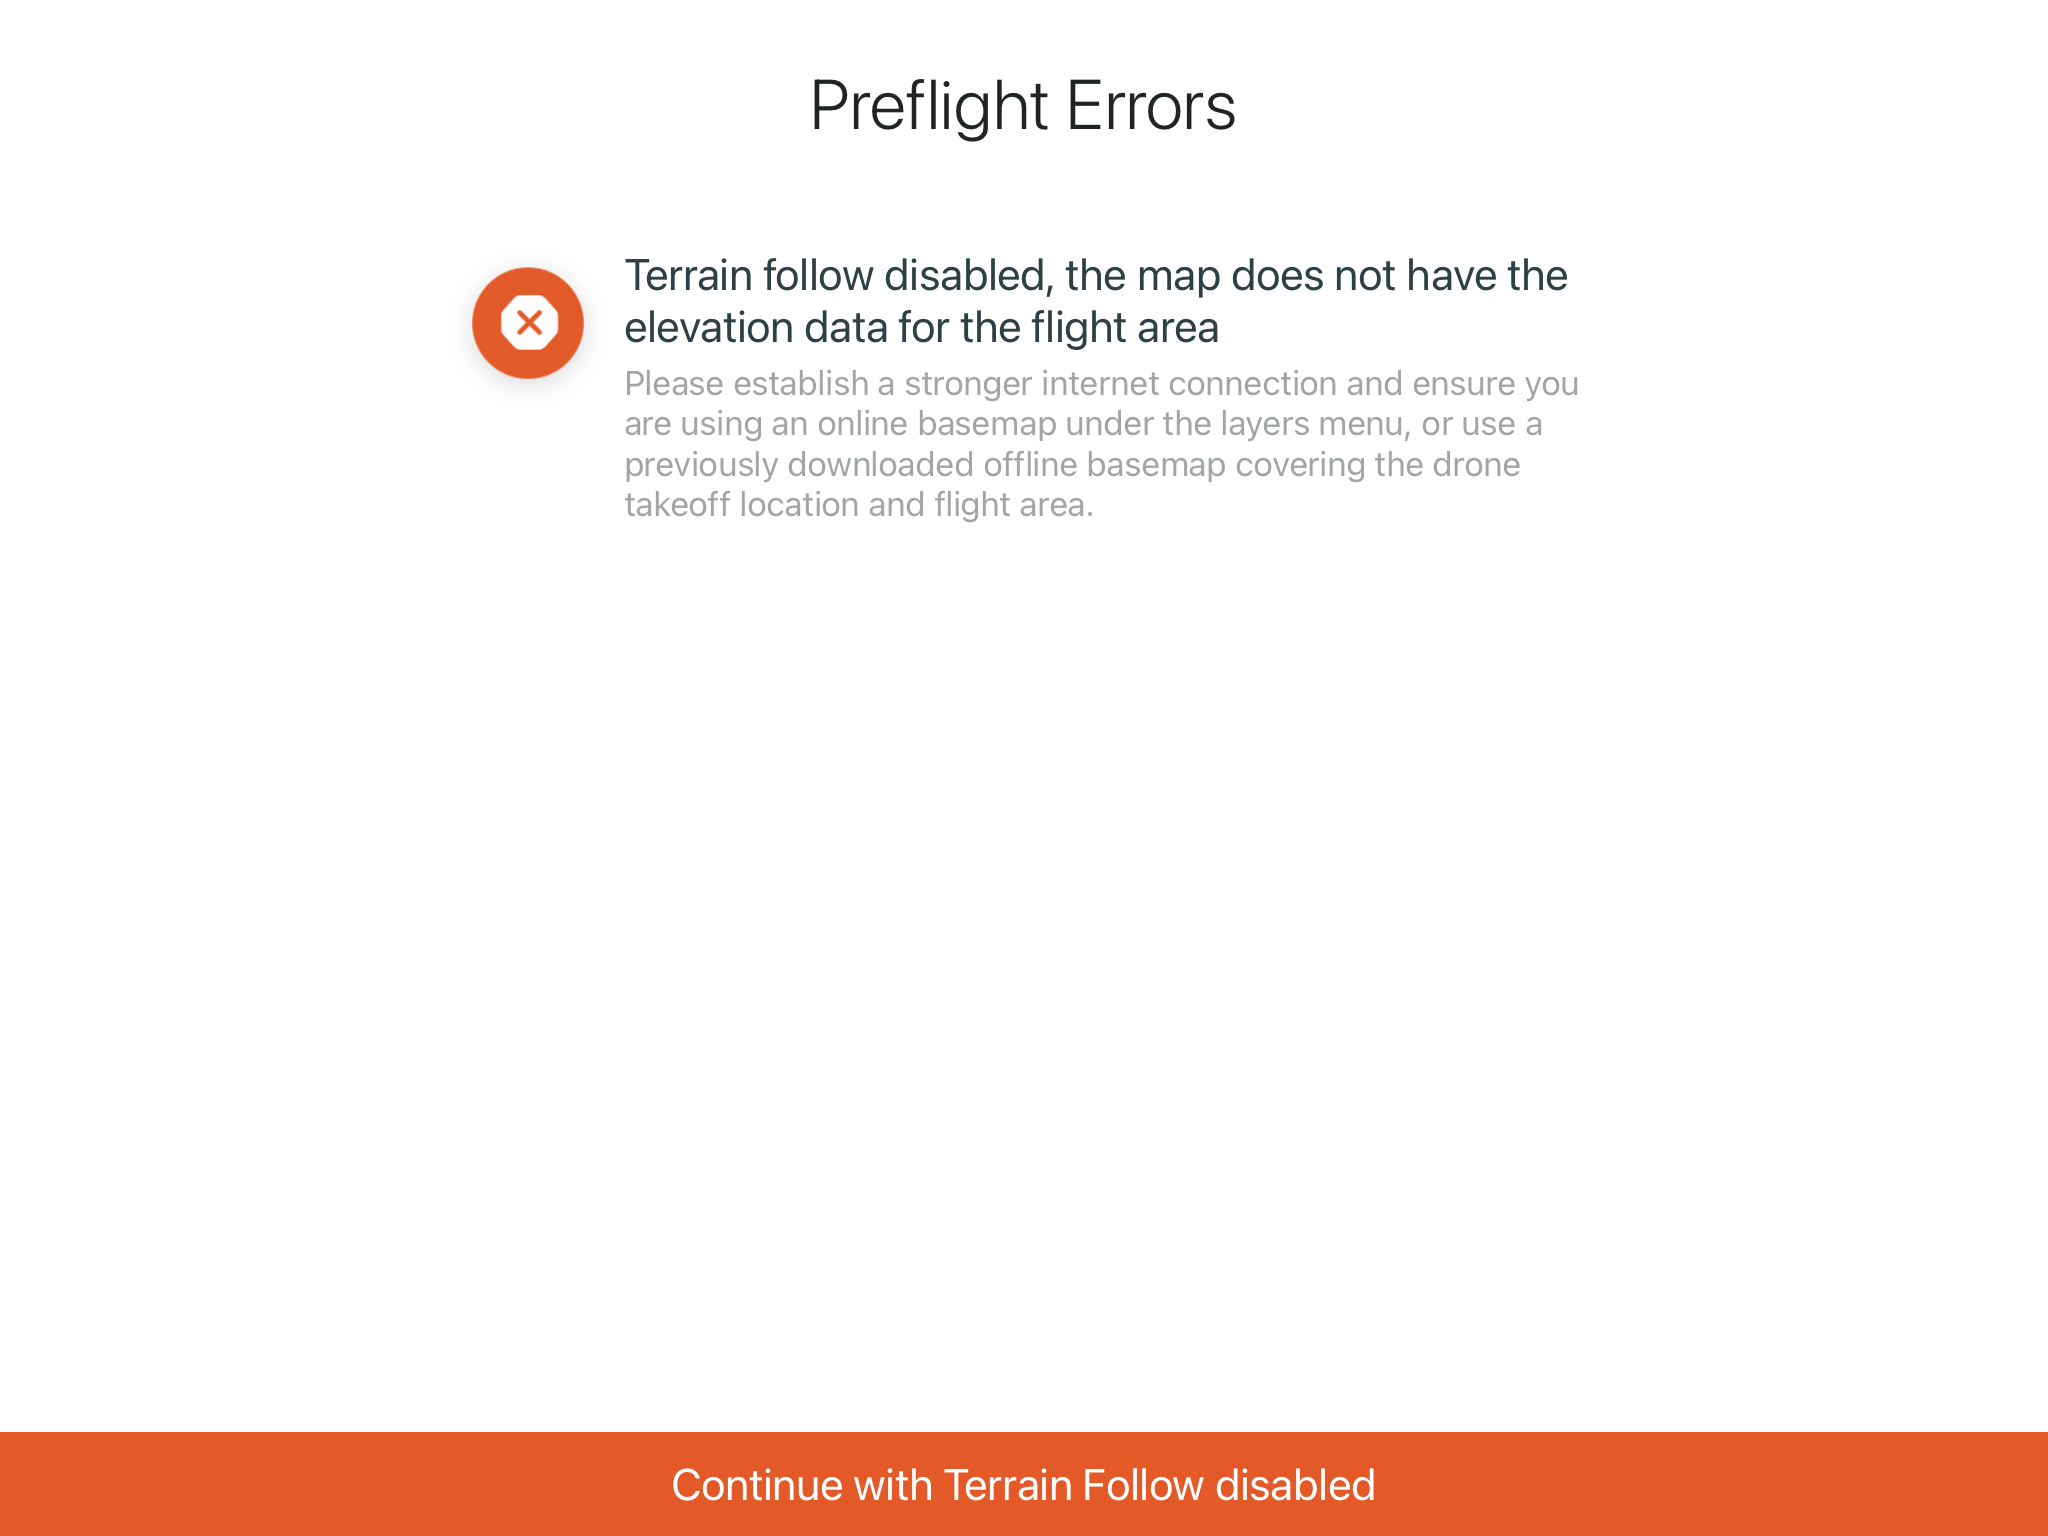
- Terrain data error
- If Site Scan does not have the terrain data necessary to calculate the drone's proper height at all points during the mission, the following error will appear [image]. There are several reasons why this could happen.
- If using an online basemap:
- Internet connection may not be strong enough for Site Scan to retrieve the terrain data. The solution is to download an offline basemap when there is a strong internet connection, such as in the office.
- If using an offline basemap:
- The offline basemap does not cover the takeoff location. The solution is to move the drone inside the offline basemap coverage area.
- There was an unexpected error while downloading the offline basemap. Try downloading a new offline map.
- If using an online basemap:
- If Site Scan does not have the terrain data necessary to calculate the drone's proper height at all points during the mission, the following error will appear [image]. There are several reasons why this could happen.
ID do Artigo: 000024335
Obtenha suporte com IA
Resolva seu problema rapidamente com o chatbot de IA de suporte da Esri.


Descubra mais sobre este tema
Search for related information
Find training related to this topic
Explore ideas and give feedback
Obtenha ajuda de especialistas do ArcGIS
Comece a conversar agora