方法
パブリックからフィードバックを受けつけるホスト フィーチャ レイヤーを作成する
サマリー
It is sometimes necessary to enable comments on the web map to collect user feedback. This article provides a workaround to create a hosted feature layer with a field added to enable comments and keep track of user comments on the web map.
手順
Note:
The following steps require an ArcGIS organizational account with sufficient privileges to publish hosted feature layers.
- Create a hosted feature layer.
- In ArcGIS Online, navigate to Content > My Content, and click the Create button.

- In the drop-down menu, click Feature Layer.
- In the Create a feature layer window, on the From Template tab, click Build a layer.
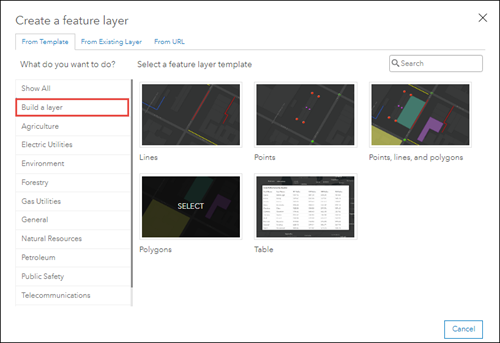
- Click Points, and click Create.
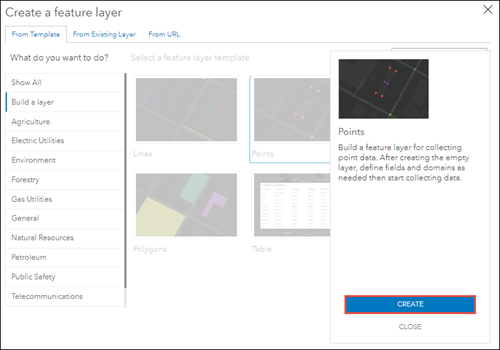
- In the next window, make the necessary changes or edits, and click Next.
- Use the mouse to pan and zoom the map to the desired map extent, or manually type the coordinates in the coordinate boxes, and click Next.

- Specify a name for Title and Tags.
- Click Done.
- Add a field to the hosted feature layer to enable comments.
- On the item details page, click the Data tab, and click Field.
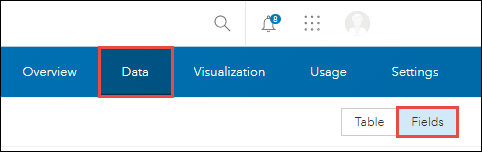
- Click the Add
 button.
 - In the Add Field window, specify a name for Field Name and Display Name.
- For Type, click the drop-down menu, and select String.
- Click Add New Field.
- Enable the settings of the hosted feature layer to track user comments.
- On the item details page, click the Settings tab.
Note:
To share the feature layer with the public, under General settings, check the Public Data Collection check box, and click Save.
- Under the Feature Layer (hosted) settings, check the Enable editing, Keep track of created and updated features, and Keep track of who created and last updated features check boxes.
- Click Save.
- Ensure the web map and hosted feature layer are shared with the same audience.
- In ArcGIS Online, navigate to Content > My Content.
- On the left side of the page, navigate to the folder the items are saved in, and click the folder to open it.
- On the list, check the check boxes to select the items.
- Click Share.
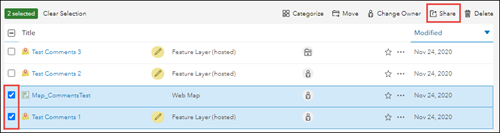
- In the Share window, select either Organization or Everyone (Public).
- Click Save.
記事 ID: 000024505
AI によるサポートを受ける
Esri サポート AI チャットボットを使用して問題を迅速に解決します。


関連情報
このトピックについてさらに調べる
Search for related information
Find training related to this topic
Explore ideas and give feedback
ArcGIS エキスパートのサポートを受ける
今すぐチャットを開始