HOW TO
Remove overlapping features from a polygon in ArcGIS Pro
Summary
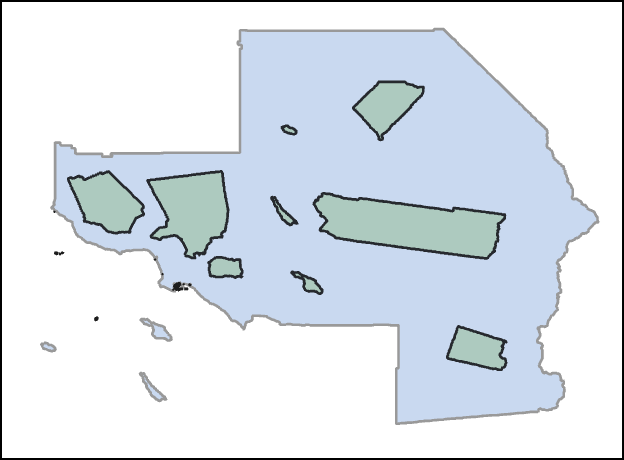
In ArcGIS Pro, features overlap one another to demonstrate the spatial relationship between feature layers on a map, as shown by the overlapping polygon features in the image below.
In some instances, it is necessary to remove the overlapping features from the polygon to ensure the data is correctly represented on the map in ArcGIS Pro.
Procedure
Use one of the options below to remove the overlapping features from the polygon in ArcGIS Pro. In this example, the feature layer to be removed is named Remove_Polygon, and the input layer is named Input_Polygon.
Use the Erase tool in ArcGIS Pro
Note:
The Erase tool requires ArcGIS Pro Advanced license.
In ArcGIS Pro, use the Erase tool to remove the overlapping features from the polygon on the map. Follow the steps below to do so.
- In ArcGIS Pro, click Tools from the Geoprocessing pane of the Analysis tab.
- In the Geoprocessing pane, type Erase in the Find Tools search bar, and click the Erase tool from the drop-down list.
- In the Erase geoprocessing pane, configure the parameters.
- For Input Features, select Input_Polygon from the drop-down list.
- For Erase Features, select Remove_Polygon from the drop-down list.
- For Output Feature Class, click the Browse
 button, and specify the location and name of the new feature class.
 - Click Run.
Use the Intersect tool, Union tool, and Select By Location tool in ArcGIS Pro
In ArcGIS Pro, use the Intersect tool, Union tool, and Select By Location tool to remove the overlapping features from the polygon on the map. Use the following steps to do so:
Note:
This solution is only applicable if the overlapping features are of polygon geometry.
- In ArcGIS Pro, use the Intersect tool to identify the overlapping features on the polygon.
- For Input Features, add the Remove_Polygon and Input_Polygon layers by selecting the layers from the drop-down list.
- For Output Feature Class, click the Browse
 button, and specify the location and name of the new feature class. In this example, the feature class is named Input_Polygon_Intersect.
 - Click Run.
- Use the Union tool to generate a geometry union between the polygon and the overlapping features.
- For Input Features, add the Remove_Polygon and Input_Polygon layers by selecting the layers from the drop-down list.
- For Output Feature Class, click the Browse
 button, and specify the location and name of the new feature class. In this example, the feature class is named Input_Polygon_Union.
 - Click Run.
- In ArcGIS Pro, click Select By Location in the Selection group of the Map tab.
- In the Select By Location dialog box, configure the parameters.
- For Input Features, select Input_Polygon_Union from the drop-down list.
- For Relationship, select Are identical to from the drop-down list.
- For Selecting Features, select Input_Polygon_Intersect from the drop-down list.
- Click OK.
- In ArcGIS Pro, click Delete in the Features group of the Edit tab.
- In the Delete dialog box, click Yes.
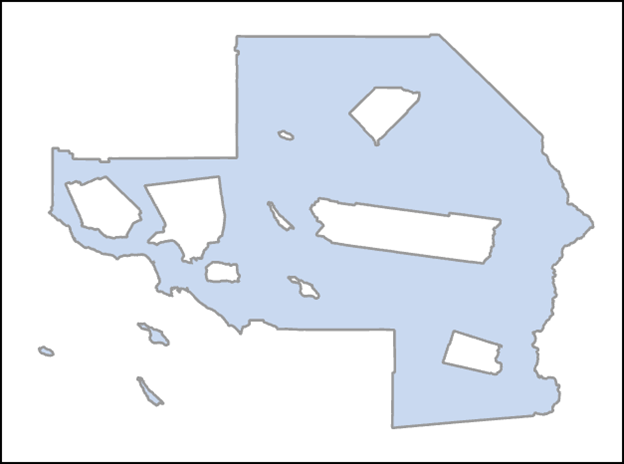
The image below demonstrates the polygon after removing the overlapping features using the Intersect tool, Union tool, and Select By Location tool in ArcGIS Pro.
Article ID: 000027482
- ArcGIS Pro 2 8 x
- ArcGIS Pro 2 7 x
- ArcGIS Pro 2 x
Get support with AI
Resolve your issue quickly with the Esri Support AI Chatbot.


Related Information
Discover more on this topic
Search for related information
Find training related to this topic
Explore ideas and give feedback
Get help from ArcGIS experts
Start chatting now