HOW TO
Publish a custom print service with embedded credentials from ArcGIS Pro to a standalone ArcGIS Server site
Summary
The instructions below describe how modify the Export Web Map task with embedded credentials, and publish it as a custom print geoprocessing service from ArcGIS Pro to a standalone ArcGIS Server site.
Procedure
- Modify the Export Web Map task.
- Locate the Export Web Map Python tool in ArcGIS Pro. Navigate to Geoprocessing > Toolboxes > Server Tools > Printing.
- Right-click Export Web Map and select Edit to open the script file.
- Copy and paste the script into a new text editor, for example, Notepad. Edit the script to include the ImportCredentials and ClearCredentials functions to match the following script. The following example is a script that takes the state of a web map in a web application (for example, included services, layer visibility settings, and client-side graphics) and returns a printable page layout or basic map of the specified area of interest in the vector (such as pdf, svg, etc.) or image (such as png, jpeg, etc.).
# Import required modules
#
import sys
import os
import arcpy
import uuid

# constants
#
SERVER_PROD_NAME = 'Server'
PRO_PROD_NAME = 'ArcGIS Pro'
PAGEX_FILE_EXT = 'pagx'
MAP_ONLY = 'map_only'

# Specify credentials for secured services in the WebMap JSON
secure_server_connections = [r'C:\Users\<username>\server on <connection file name>.ags']

# Import credentials
importedConnections = arcpy.ImportCredentials(secure_server_connections)

# default location and current product name
#
_defTmpltFolder = os.path.join (arcpy.GetInstallInfo()['InstallDir'], r"Resources\ArcToolBox\Templates\ExportWebMapTemplates")
_prodName = arcpy.GetInstallInfo()['ProductName']
_isMapOnly = False

# export only map without any layout elements
#
def exportMap(result, outfile, outFormat):
	# Set output parameter
	#
	arcpy.SetParameterAsText(1, outfilename)

	# Clear credentials
	arcpy.ClearCredentials(importedConnections)

if __name__ == "__main__":
	main()
- Save the file as a .py file and name the file as ExportWebMapSecured.py.
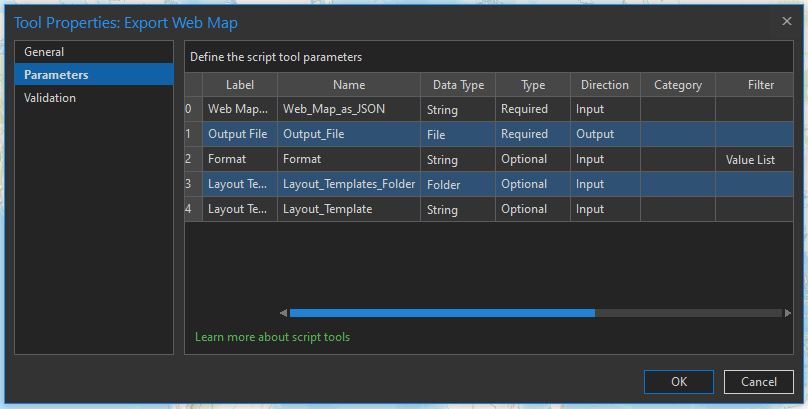
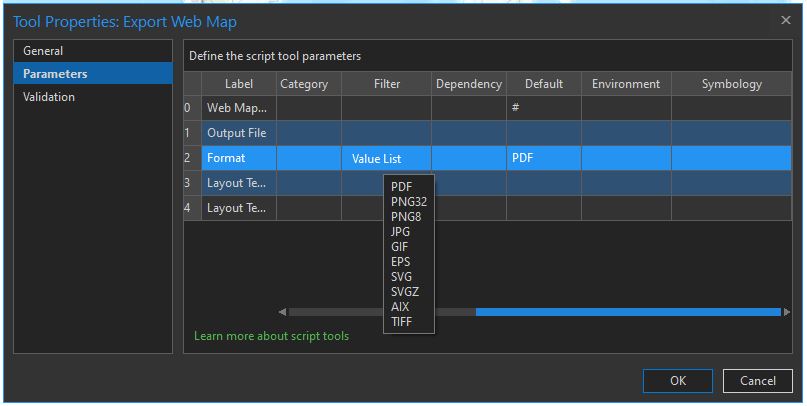
- In ArcGIS Pro, add the script to a toolbox. Refer to ArcGIS Pro: Add a script tool for more information. In the Parameters tab, match the parameters from the Export Web Map Python tool as shown in the following images.
- Run the script tool in ArcGIS Pro.
Note:
Ensure to fill-out the Layout Template field.
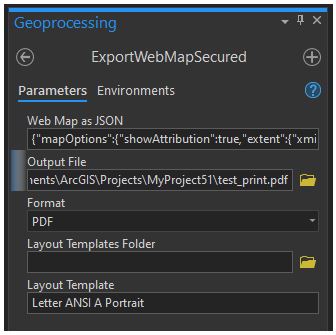
The following is a WebMap as JSON example:
{"mapOptions":{"showAttribution":true,"extent":{"xmin":-37570328.14272009,"ymin":-15552387.679177042,"xmax":37570328.14272009,"ymax":19552387.679177042,"spatialReference":{"wkt":"PROJCS[\"WGS_1984_Web_Mercator_Auxiliary_Sphere\",GEOGCS[\"GCS_WGS_1984\",DATUM[\"D_WGS_1984\",SPHEROID[\"WGS_1984\",6378137.0,298.257223563]],PRIMEM[\"Greenwich\",0.0],UNIT[\"Degree\",0.0174532925199433]],PROJECTION[\"Mercator_Auxiliary_Sphere\"],PARAMETER[\"False_Easting\",0.0],PARAMETER[\"False_Northing\",0.0],PARAMETER[\"Central_Meridian\",0],PARAMETER[\"Standard_Parallel_1\",0.0],PARAMETER[\"Auxiliary_Sphere_Type\",0.0],UNIT[\"Meter\",1.0]]"}},"spatialReference":{"wkt":"PROJCS[\"WGS_1984_Web_Mercator_Auxiliary_Sphere\",GEOGCS[\"GCS_WGS_1984\",DATUM[\"D_WGS_1984\",SPHEROID[\"WGS_1984\",6378137.0,298.257223563]],PRIMEM[\"Greenwich\",0.0],UNIT[\"Degree\",0.0174532925199433]],PROJECTION[\"Mercator_Auxiliary_Sphere\"],PARAMETER[\"False_Easting\",0.0],PARAMETER[\"False_Northing\",0.0],PARAMETER[\"Central_Meridian\",0],PARAMETER[\"Standard_Parallel_1\",0.0],PARAMETER[\"Auxiliary_Sphere_Type\",0.0],UNIT[\"Meter\",1.0]]"},"scale":147914381.897889},"operationalLayers":[{"id":"defaultBasemap","title":"World Topographic Map","opacity":1,"minScale":0,"maxScale":0,"url":"https://services.arcgisonline.com/ArcGIS/rest/services/World_Topo_Map/MapServer"}],"exportOptions":{"outputSize":[670,500],"dpi":96},"layoutOptions":{"titleText":"","authorText":"","copyrightText":"","customTextElements":[{"Date":"12/9/2019, 9:17:04 AM"}],"scaleBarOptions":{"metricUnit":"esriKilometers","metricLabel":"km","nonMetricUnit":"esriMiles","nonMetricLabel":"mi"},"legendOptions":{"operationalLayers":[]}}}
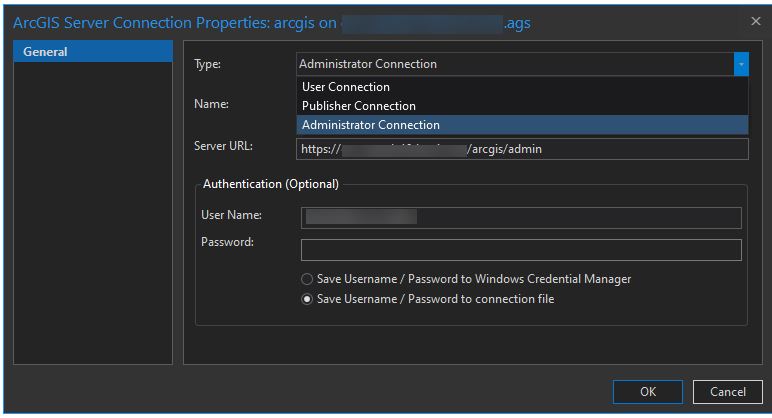
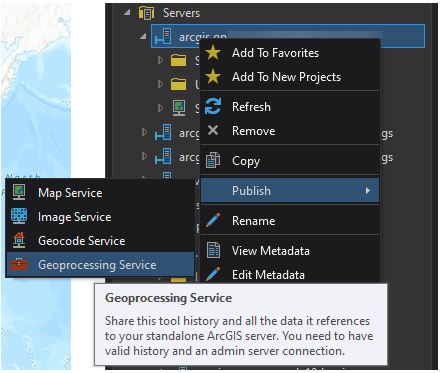
- Connect to the ArcGIS Server site and change the connection type to Administrator Connection to publish the geoprocessing service.
- Publish the successful result as a geoprocessing service.
- Test the published geoprocessing service by replacing the URL with the IWA-secured URL from the in-house server site in the Web Map as JSON example.
Article ID: 000026010
Software:
- ArcGIS Server
- ArcGIS Pro 2 8 x
- ArcGIS Pro 2 7 x
- ArcGIS Pro 2 x
Get support with AI
Resolve your issue quickly with the Esri Support AI Chatbot.


Related Information
Discover more on this topic
Search for related information
Find training related to this topic
Explore ideas and give feedback
Get help from ArcGIS experts
Start chatting now