HOW TO
Unlock DJI No-Fly Zones in Site Scan Flight for ArcGIS
Summary
The Site Scan Flight for ArcGIS app allows pilots to unlock DJI No-Fly Zones from within the Site Scan app. There are two types of No-Fly Zones that pilots can unlock in Site Scan: Authorization Zones and Restricted Zones.
Warning Zones and Enhanced Warning Zones do not require any action to unlock.
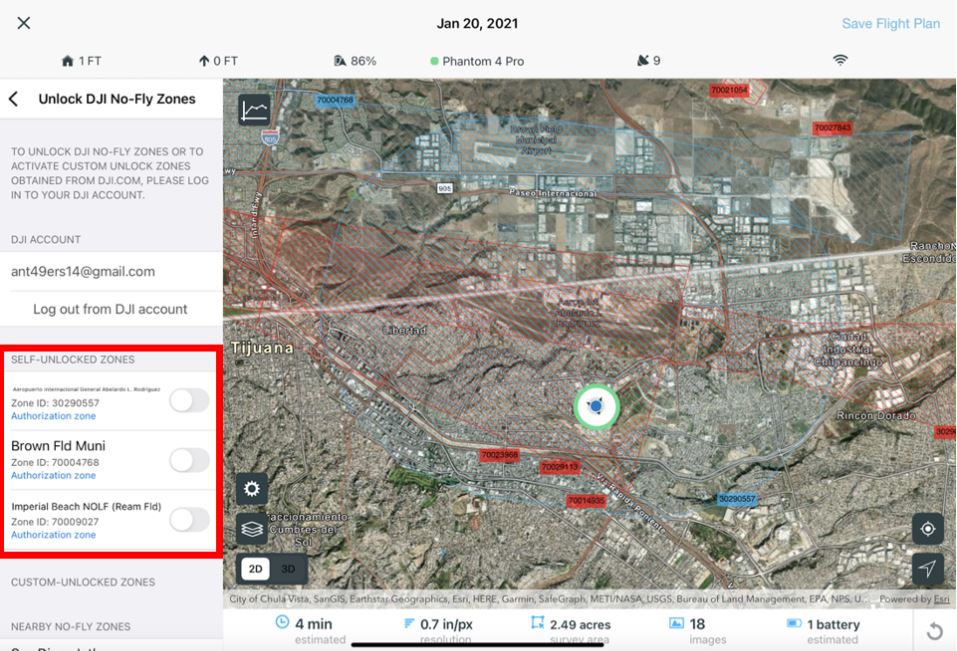
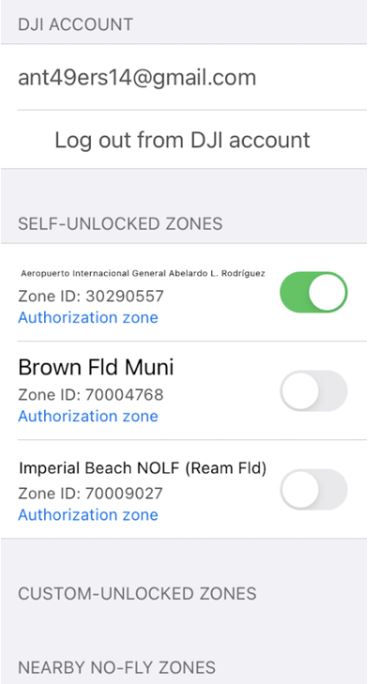
Authorization Zones (Self Unlock)
Unlocking Authorization Zones require pilots to have a DJI verified account. Multiple Authorization Zones can be unlocked simultaneously, and the complete workflow can be conducted from within Site Scan.
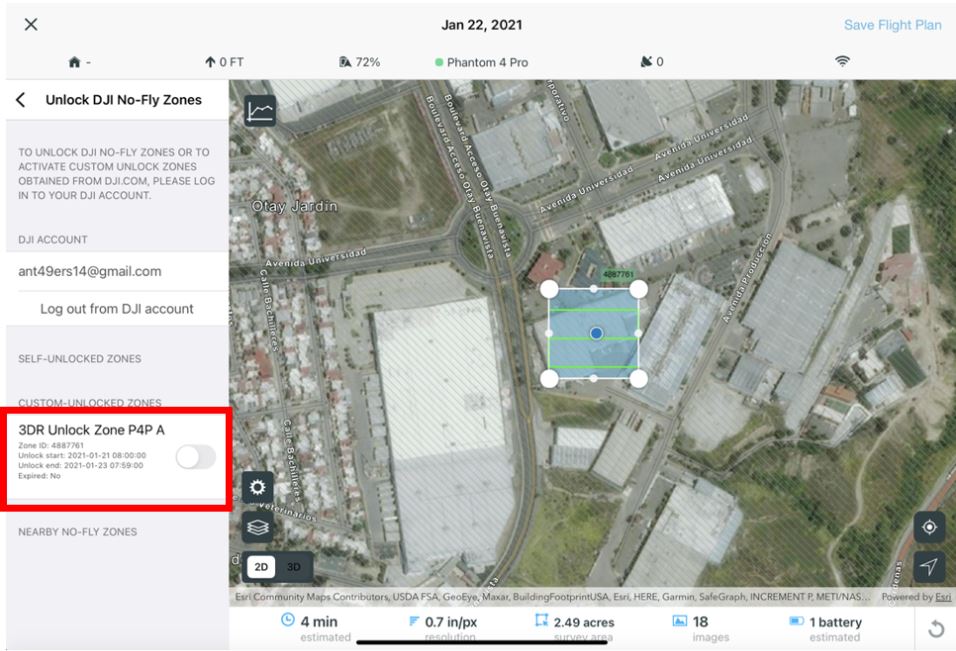
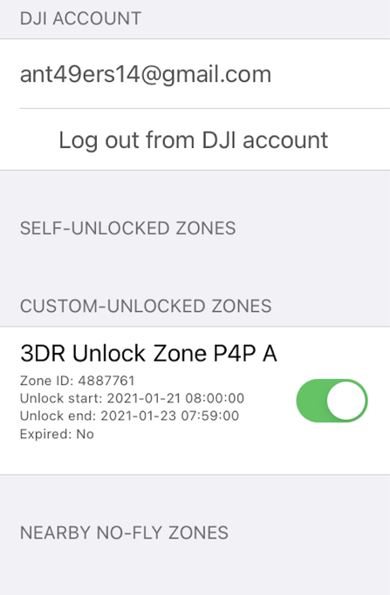
Restricted Zones (Custom Unlock)
Restricted Zones require the pilot to obtain special permission from DJI via Online Custom Unlocking. Pilots must log in to a DJI account and submit an authorization request to DJI. The custom-unlocked zone can be enabled from Site Scan only after the request to unlock has been granted.
There are two primary steps required to fly in a DJI No-Fly Zone:
- Unlock the required zone(s)
- Enable the required zone(s)
Pilots must have a DJI account to proceed. This resource describes how to unlock each type of zone, as they have different requirements.
Other notes:
- At the time of publication, the phone number verification step in unlocking No-Fly Zones is only available on iPad mini models. Users of other iPad models must complete this step (Step B2 below) in either DJI GO or DJI Pilot app.
- Warning Zones and Enhanced Warning Zones do not require unlocking and thus are not displayed in Site Scan for ArcGIS.
Procedure
Note:
If you know a specific Custom-Unlock zone needed for the flight, start by requesting authorization for that zone at: www.dji.com/flysafe/custom-unlock , and follow the procedure there. If you are not sure, the procedure provides guidance on whether this step may be necessary.
- Setup
- Update the Site Scan Flight for ArcGIS iPad app to the newest version.
- Open the app on the iPad.
- Enable Beta mode: Settings > User Account > Beta Mode.
- Connect to a DJI drone.
- If desired, browse the DJI Fly Safe Geo Zone Map to see No-Fly Zones in the area by opening Global Settings and tapping Check No-Fly Zones.
- Choose the desired flight mode or select an existing flight plan.
- For new flight plans, enter a flight name, choose a location (optional), and tap Next.
- Adjust the flight area by dragging the polygon vertices.
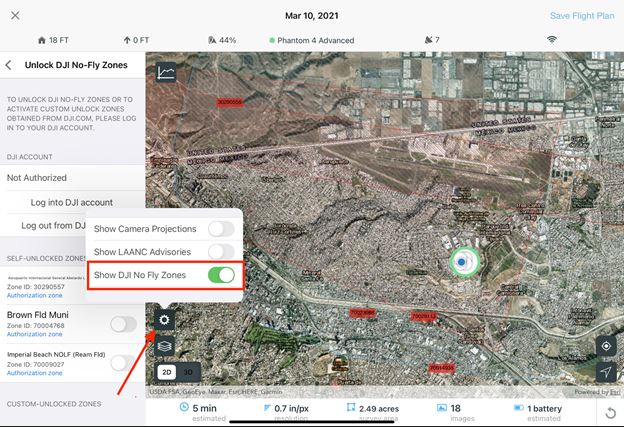
- Toggle on DJI No-Fly Zones by tapping the gear icon on the map, as shown in the following image. This map layer is only available while connected to a DJI drone.
- Browse around the map to explore No-Fly Zones that may interfere with any part of the flight.
- Unlock DJI No-Fly Zones
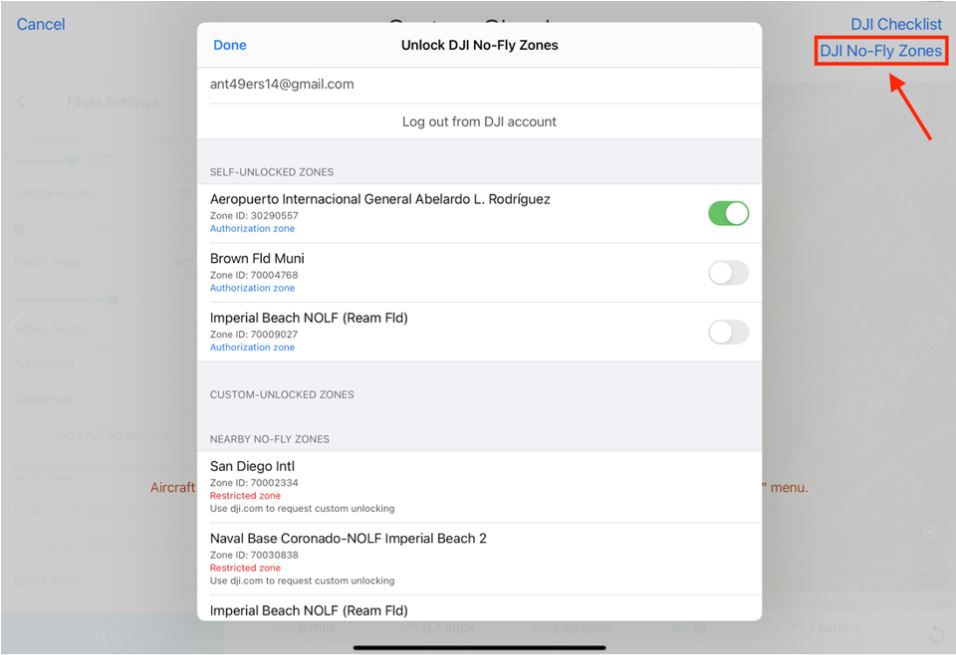
- In the Flight Settings, tap Unlock DJI No-Fly Zones.
- If not yet already logged in, tap Log into DJI account and follow the log-in instructions. Note that at the time of publication, this step only works for iPad minis.
- If you have previously requested authorization from DJI to unlock a specific Custom-Unlock zone, it appears underneath the header Custom-Unlocked Zones. If this is the only zone required to fly, skip to Step 6.
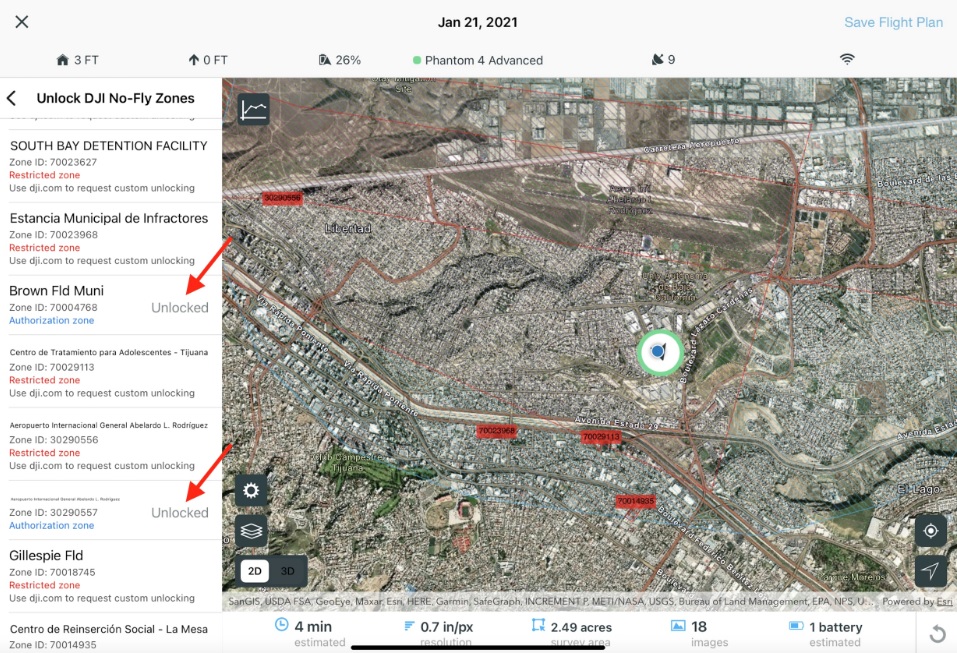
- Browse the Nearby No-Fly Zones list. Tapping on a zone automatically zooms to the zone in the map. Zones can also be cross-referenced between the map and the list by referencing the Zone ID.
- Tap Unlock to unlock zone(s) from the Nearby No-Fly Zones list.
- Authorization Zones (Self-Unlock Zones): These can be unlocked immediately and appear in the Self-Unlocked Zone list above.
- Restricted Zones (Custom-Unlock Zones): These require special permission from DJI. Request permission at www.dji.com/flysafe/custom-unlock. Once DJI has granted permission, they appear automatically in the Custom-Unlocked Zones list above (see Step 3).
- Zones that you have previously unlocked still appear in the Nearby No-Fly Zone list and show Unlocked. Proceed to Step 6 once all necessary zones have been unlocked.
- After unlocking the desired zones, toggle on (enable) the desired zone(s) from the Self-Unlocked Zones and/or Custom-Unlocked Zones lists. Multiple Authorization Zones can be enabled at a given time, but only one Restricted Zone can be enabled at a given time.
Note:
When enabling an Authorization Zone, others from the list of Self-Unlocked Zones may also toggle on at this step. This happens automatically by DJI due to zone grouping and does not affect your flight.
- Return to the Flight Settings menu and execute the flight.
- Custom-Unlock Zones with Multi-Battery Missions
Custom-Unlock Zones must be enabled before every flight, including multi-battery missions. For this reason, the No-Fly Zones menu is made available during the preflight System Check.- After the first flight of a multi-battery mission, during the System Check, tap DJI No-Fly Zones.
- Identify the custom-unlocked zone in the flight area and enable it, if it is not already.
- Close the menu and proceed with the next flight.
- Repeat for additional flights that may be part of the multi-battery mission.
Article ID: 000025287
- Site Scan Flight for ArcGIS iPadOS
Receive notifications and find solutions for new or common issues
Get summarized answers and video solutions from our new AI chatbot.


Related Information
Discover more on this topic
Search for related information
Find training related to this topic
Explore ideas and give feedback
Get help from ArcGIS experts
Download the Esri Support App