HOW TO
Convert UTC time to the local time zone in ArcGIS Survey123 Connect
Summary
In ArcGIS Survey123, when publishing surveys as feature layers to ArcGIS Online, the date fields are stored in Coordinated Universal Time (UTC) time instead of the local time zone in which the survey is taken. When viewing submitted data, the UTC time is converted to the local time zone in which the data is viewed. This is the expected behavior in ArcGIS Survey123 to standardize date values when analyzing data received from submitters with different time zones. Refer to ArcGIS Online: Published date fields store time in UTC for more information.
When exporting survey data as an Excel file from ArcGIS Survey123, the date field displays the date and time in UTC time instead of the local time zone which can cause confusion due to discrepancies.
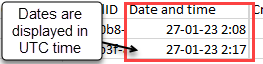
This image shows the 'Date and time' field displays the dates and times in UTC time.
This article describes the workflow to display the local time zone when exporting survey data from ArcGIS Survey123.
Procedure
- In ArcGIS Survey123 Connect, open the survey's XLSForm.
- Create a survey question to input date and time information.
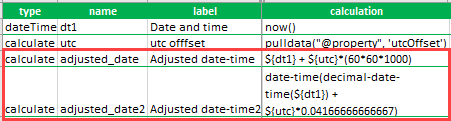
- In the survey worksheet, in the type column, select dateTime from the drop-down list.
- Specify the values in the name and label columns. In this example, the question is named 'dt1' and labeled 'Date and time'.

- Create a survey question to calculate the UTC offset value.
- In the type column, select calculate from the drop-down list.
- Specify the values in the name and label columns. In this example, the question is named 'utc' and labeled 'utc offset'.
- In the calculation column, enter the following expression:
pulldata("@property", 'utcOffset')

- Create another survey question to calculate the local time in which the survey is taken.
- In the type column, select calculate from the drop-down list.
- Specify the values in the name and label columns. In this example, the question is named 'adjusted_date' and labeled 'Adjusted date-time'.
- In the calculation column, enter the following expression:
- For the field app, use the epoch calculation as follows:
${dt1} + ${utc}*(60*60*1000)
- For the web app, use the epoch calculation as follows:
date-time(decimal-date-time(${dt1}) + ${utc}*0.04166666666667)
Note:
The ArcGIS Survey123 field app supports both epoch time and decimal time, while the web app only supports decimal time. Refer to ArcGIS Survey123: Decimal date time for more information.
In this example, both expressions are entered in separate rows to demonstrate the differences.
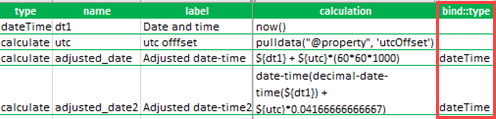
- In the bind::type column, select dateTime from the drop-down list.
- Save the XLSForm.
- In ArcGIS Survey123 Connect, click Publish to publish the survey.
The recorded data can be viewed and exported from the survey's Data tab on the ArcGIS Survey123 website. To export the data, refer to ArcGIS Survey123: Download results. In this example, the 'adjusted_date' and 'adjusted_date2' fields in the exported file display the local time zone.

Article ID: 000024613
- ArcGIS Survey123 Connect
Get support with AI
Resolve your issue quickly with the Esri Support AI Chatbot.


Related Information
Discover more on this topic
Search for related information
Find training related to this topic
Explore ideas and give feedback
Get help from ArcGIS experts
Start chatting now