HOW TO
Deauthorize single use licenses in ArcGIS Pro
Summary
The following workflows document how to deauthorize a single use license in ArcGIS Pro using online or offline methods.
Procedure
Online Deauthorization:
- Launch ArcGIS Pro.
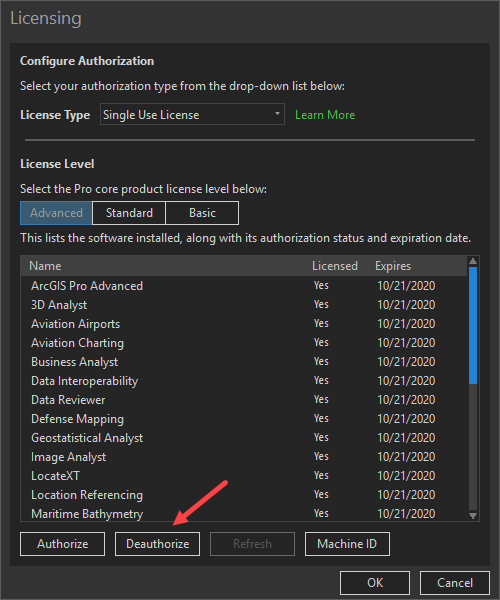
- Click Settings in the lower left corner of the ArcGIS Pro start page. On the Settings page, click Licensing and Configure your licensing options.
- In the Licensing dialog box, click Deauthorize.
- A pop-up displays, reading the successful deauthorization of single use feature will require ArcGIS Pro to shut down. Click OK.
- Under Deauthorization Method, select Deauthorize with Esri now using the Internet.
- Under Deauthorization Options, select the features to deauthorize. The licenses are now deauthorized.
- Launch ArcGIS Pro.
- Click Settings in the lower left corner of the ArcGIS Pro start page. On the Settings page, click Licensing then Configure your licensing options.
- In the Licensing dialog, click Deauthorize.
- A pop-up displays, reading the successful deauthorization of single use feature will require ArcGIS Pro to shut down. Click OK.
- Under Deauthorization Method, select Deauthorize at Esri's website or by email to receive your deauthorization file.
- Under Deauthorization Options, select the features to deauthorize.
- Under Email Deauthorization, click Save to save the deauthorize.txt file used to complete the process. Click Finish after the file has been saved.
- Obtain the deauthorization RESPS file using one of two methods.
- To send the deauthorization file via email, send an email to authorize@esri.com, with the file as an attachment, and save the RESPS file that is emailed back and move it to the original machine.
- To upload the deauthorization file to my.esri.com:
- Log into my.esri.com and under My Organizations select Licensing, and Additional Licensing Forms.
- Click Secure Site Operations and click Browse to select the deauthorization file.
- Click Upload.
- Save the resulting RESPS file and move it to the original machine.
- Repeat Steps 2 and 3 to open the Software Authorization Wizard. Select I have received a deauthorization file from Esri and am now ready to finish the deauthorization process.
- Click Browse and select the RESPS file created in the last step.
- Click Next to complete the deauthorization process. The licenses are now deauthorized.
Article ID:000024065
Software:
- ArcGIS Pro
Get help from ArcGIS experts
Download the Esri Support App
Related Information
Discover more on this topic
Search for related information
Find training related to this topic
Explore ideas and give feedback