HOW TO
Append data from an existing ArcGIS Survey123 survey to a new survey in ArcGIS Pro
Summary
In ArcGIS Survey123, data collected from an existing survey may contain feature classes with the related tables and attachments, and can be appended to a new survey with a similar or different schema in ArcGIS Pro. Appending data from an existing survey to a new survey ensures information from the existing survey is not lost when new data are added.
Procedure
Follow the instructions below to append data from an existing ArcGIS Survey123 survey with related tables and attachments to a new survey in ArcGIS Pro.
Import data into the enterprise geodatabase and use the Append geoprocessing tool directly in ArcGIS Pro
Note:
Access to an enterprise geodatabase is required. Refer to ArcGIS Server: Enterprise geodatabases for more information.
- Import the survey data into the enterprise geodatabase. Refer to ArcGIS Survey123: Use Survey123 with ArcGIS Enterprise for more information.
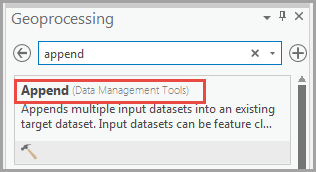
- In ArcGIS Pro, on the Analysis tab, click Tools in the Geoprocessing group.
- In the Geoprocessing pane, search for and select Append (Data Management Tools).
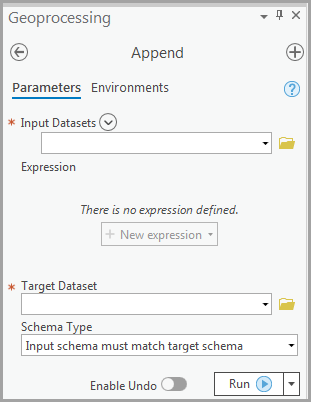
- Populate the required fields for Parameters.
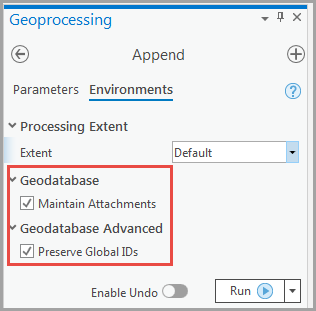
- Click the Environment tab. Check the Maintain Attachments check box for Geodatabase and the Preserve Global IDs check box for Geodatabase Advanced.
- Click Run.
Add new GUID fields and use the Append geoprocessing tool in ArcGIS Pro
Note:
This workflow overwrites the attachment keywords associated with the attachments.
Download the old (A) and new (B) surveys as file geodatabases, and extract the feature classes and associated tables into ArcGIS Pro.
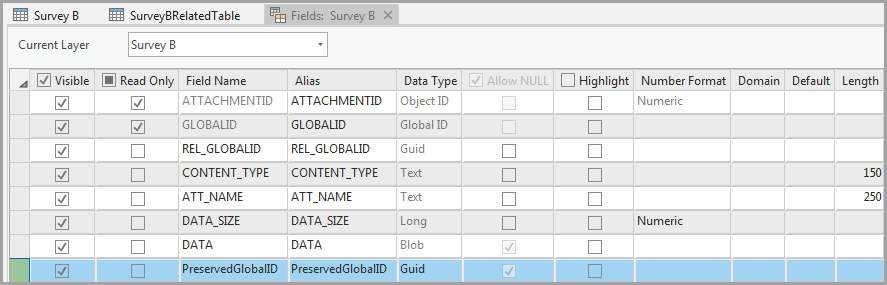
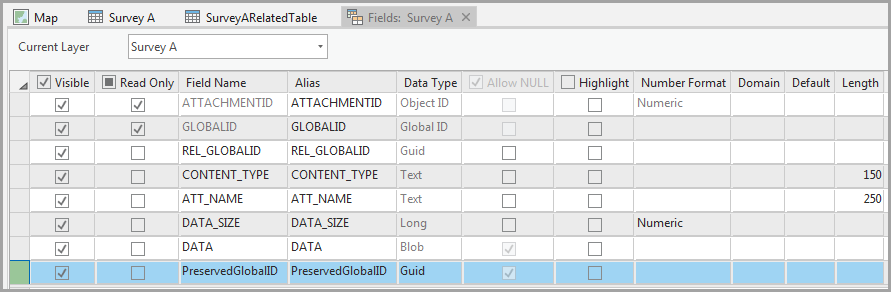
- In Survey B, open the attribute table, and click the Add Field icon to add a new GUID field. In this example, the new GUID field is named PreservedGlobalID.
- In Survey A, open the attribute table, and click the Add Field icon to add a new GUID field. In this example, the new GUID field is named PreservedGlobalID.
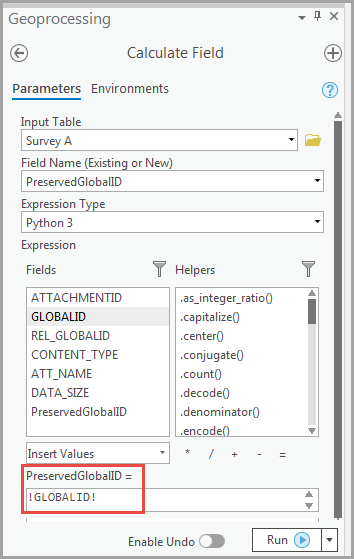
- Right-click the new GUID field, and click Calculate Field.
- In the Calculate Field pane, select the old GLOBALID. Click Run.
- On the Analysis tab, click Tools in the Geoprocessing group.
- In the Geoprocessing pane, search for and select Append (Data Management Tools).
- Populate the required fields for Parameters. In this example, Survey A is selected for Input Datasets and Survey B is selected for Target Dataset.
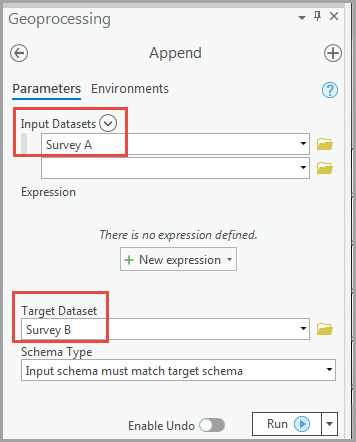
- Click Run. The old global IDs from Survey A are appended to the new GUID field in Survey B.
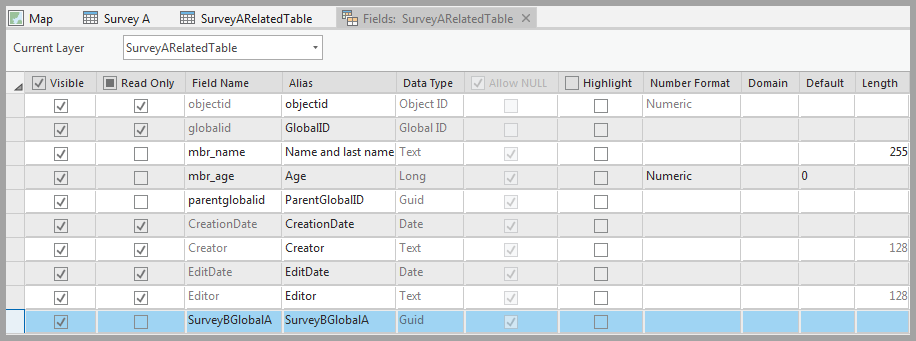
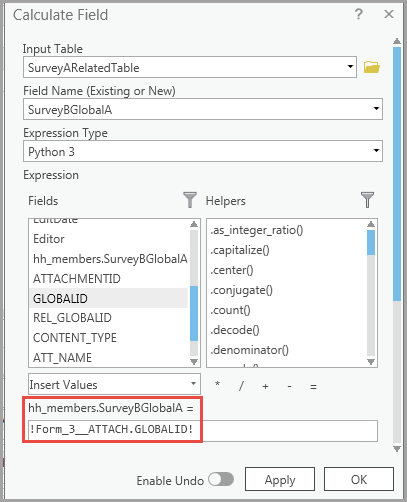
- In the related table of Survey A, add a new GUID field to store the newly generated global IDs for the appended features from Survey A in Survey B. In this example, the new field is named SurveyBGlobalA.
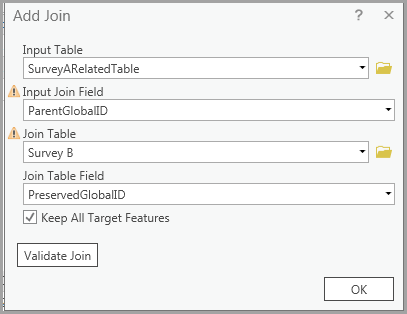
- In the Contents pane, right-click the related table of Survey A, click Join and Relates, and click Add Join to join the Survey B feature class to the related table of Survey A based on the ParentGlobalID of the related table.
Note:
The Add Join is required to have the global IDs of the related table in Survey A to match the GLOBALID field in Survey B.
- Populate the required fields in the Add Join pane. In this example, select SurveyARelatedTable for Input Table, ParentGlobalID for Input Join Field, and Survey B for Join Table. Click OK.
- In the related table of Survey A, right-click the new GUID field (SurveyBGlobalA), and click Calculate Field.
- In the Calculate Field pane, select the new GLOBALID. Click OK. The global IDs in SurveyBGlobalA match the global IDs in the newly appended Survey B.
Note:
Remove the join created in Step 10 to avoid confusion in the upcoming steps. As the global IDs of the related table for Survey A now match the global IDs of Survey B, the join is no longer required.
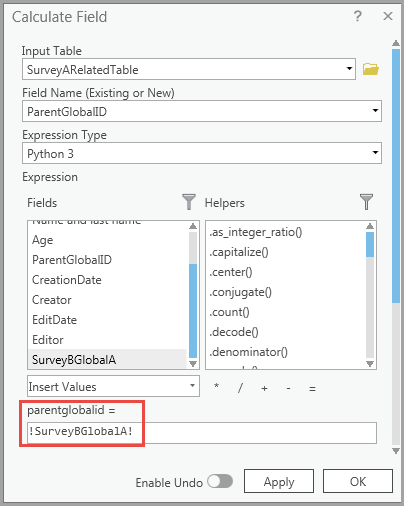
- In the related table of Survey A, recalculate the ParentGlobalID field with the new global IDs (SurveyBGlobalA) to match the GlobalIDs of Survey B.
Note:
Remove the new GUID field (SurveyBGlobalA) to ensure the schema matches the appended data.
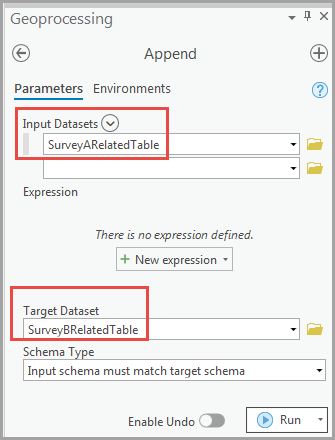
- In the Geoprocessing pane, search for and select Append (Data Management Tools).
- Populate the required fields for Parameters. In this example, the related table of Survey A is selected for Input Datasets, and the related table of Survey B is selected for Target Dataset. Click Run.
- Overwrite the hosted feature layer with the updated data.
Article ID: 000024002
- ArcGIS Survey123 Website
- ArcGIS Pro 2 8 x
- ArcGIS Pro 2 7 x
- ArcGIS Pro 2 x
Get support with AI
Resolve your issue quickly with the Esri Support AI Chatbot.


Related Information
Discover more on this topic
Search for related information
Find training related to this topic
Explore ideas and give feedback
Get help from ArcGIS experts
Start chatting now