HOW TO
Symbolize hosted feature layers using related table values in ArcGIS Online Map Viewer
Summary
ArcGIS Online Map Viewer allows symbolizing hosted feature layers based on attribute values using Change Style to display data in the desired presentation style. In some instances, it is necessary to change the style based on the values from a related table. While there is no direct function to perform this in ArcGIS Online, it is possible to join the related table with the feature layer attribute table, and symbolize the layer based on the joined values.
This article provides the workflow to create a relationship class between the feature class and related table in ArcCatalog before publishing to ArcGIS Online, and to symbolize the published hosted feature layer based on the related table values.
Procedure
- In ArcCatalog, create a relationship class between the feature class and the table based on the Global ID and GUID fields. Refer to How To: Set up related tables for use in ArcGIS Collector for steps to do this.
- Publish the feature class and the related table to ArcGIS Online as a hosted feature layer. Refer to ArcMap: Publish a map service from ArcMap for steps to do this.
- Open the hosted feature layer in ArcGIS Online Map Viewer, and join the related table with the feature layer.
- In ArcGIS Online Map Viewer, click the Analysis tab, and navigate to Summarize Data > Join Features.
- In the Join Features pane, select the feature layer for Choose target layer.
- For Choose layer to join to target layer, select the related table.
- For Select the type(s) of joins, click Choose the fields to match, and select the Global ID and GUID fields.
- Select the join operation type, and specify a name for Result layer name.
- Click RUN ANALYSIS to perform the join. A new, joined feature layer containing the related table values is added to the Contents pane.
- Symbolize the joined feature layer with values from the related table.
- On the Details tab, click Content to view the layers in the Contents pane.
- Hover over the joined feature layer, and click Change Style.
- In the Change Style pane, for Choose an attribute to show, select the desired fields from the related table to symbolize the layer.
- For Select a drawing style, select Types (Unique Symbols), and click OPTIONS to configure the symbol.
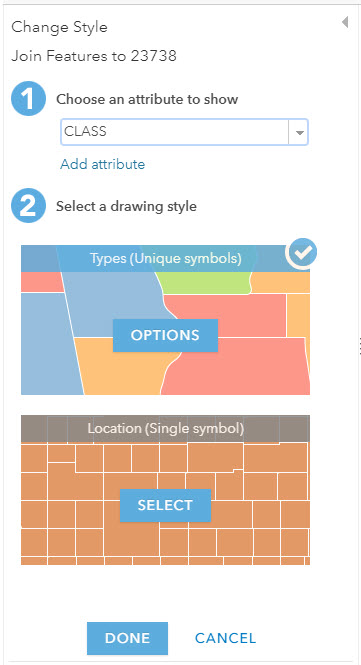
- Click OK, and click DONE to apply the symbol. The layer is symbolized with values from the related table.
Article ID: 000023844
- ArcMap
- ArcGIS Online
Get support with AI
Resolve your issue quickly with the Esri Support AI Chatbot.


Related Information
Discover more on this topic
Search for related information
Find training related to this topic
Explore ideas and give feedback
Get help from ArcGIS experts
Start chatting now