HOW TO
Convert a raster dataset to an XYZ table with ArcGIS Pro
Summary
Several software packages can import data from an XYZ format. This article provides instructions to convert a raster dataset into an XYZ table with ArcGIS Pro.
Note:
This process requires the Spatial Analyst license.
Procedure
- Open ArcGIS Pro and add the raster dataset.
- Find the Sample tool. Refer to ArcGIS Pro: Find a geoprocessing tool for more information.
- In the Geoprocessing pane, select the desired raster dataset for Input rasters.
- Select the raster dataset again in the Input location raster or point features field. Ensure Resampling technique is set to Nearest.
- Specify Output table.
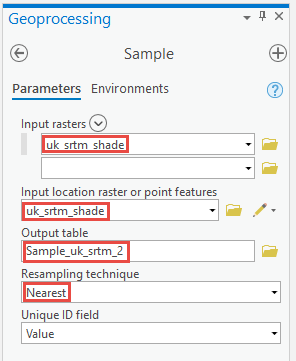
- Click Run.
- Once the geoprocessing is complete, right-click the new table. Click Open.
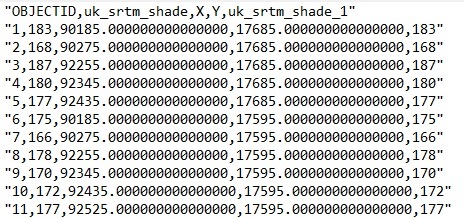
- Export the table and save it with the .txt extension. Refer to ArcGIS Pro: Export tables for more information.
The output text file is in the OID, Z, X, Y format. The image below shows the output file.
Article ID: 000023278
Software:
- ArcGIS Pro 2 x
Get support with AI
Resolve your issue quickly with the Esri Support AI Chatbot.


Related Information
Discover more on this topic
Search for related information
Find training related to this topic
Explore ideas and give feedback
Get help from ArcGIS experts
Start chatting now