PROBLEM
Unable to edit the attribute information of a feature class after a join in ArcGIS Pro
Description
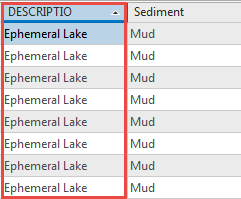
The attribute information of a feature class is not editable in the attribute table after a join is performed using the Add Join tool.
The description (DESCRIPTIO) field is not editable in the attribute table when it is double-clicked, as highlighted in the image below.
Cause
The Add Join tool adds a temporary field to a feature class attribute table, and temporary field values are not editable.
Solution or Workaround
Make the join permanent to edit the feature class attribute information. Use one of the following methods.
Export the join feature class as a new feature class after using the Add Join tool
- In the Contents pane, right-click the join feature layer, and navigate to Data > Export Features.
- Configure the Feature Class to Feature Class geoprocessing pane as follows:
- For Input Features, select the feature layer to convert. In this example, it is Lakes and marshes:2.
- For Output Location, select the location the feature class is saved.
- For Output Feature Class, specify the name of the exported feature class.
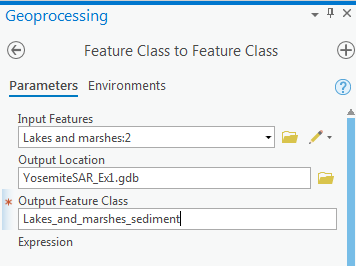
- Click Run.
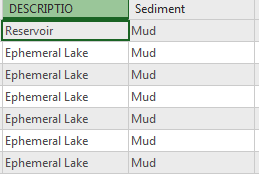
The feature class is exported as a new feature class with the join field added permanently, and the attribute information is editable as shown in the image below.
Use the Join Field tool
- In the Geoprocessing pane, select the Toolboxes tab. Navigate to Data Management Tools > Joins and Relates > Join Field.
- Configure the Join Field pane as follows:
- For Input Table, select the desired table or feature class. In this example, it is Lakes and marshes:1.
- For Input Join Field, select the input field the join is based on form the drop-down list. In this example, it is DESCRIPTIO.
- For Join Table, select or browse for the layer or table to join to the input table. In this example, it is WaterSediment.csv.
- For Output Join Field, select the field the join is based on from the drop-down list. In this example, it is DESCRIPTIO.
- For Join Fields, select the fields from the join table that must be included in the feature class attribute table. In this example, it is Sediment.

- Click Run.
The field is added permanently to the feature class attribute table, and the attribute information is editable, as shown in the image below.

Article ID: 000022407
- ArcGIS Pro 2 x
Get support with AI
Resolve your issue quickly with the Esri Support AI Chatbot.


Related Information
Discover more on this topic
Search for related information
Find training related to this topic
Explore ideas and give feedback
Get help from ArcGIS experts
Start chatting now