HOW TO
Configure ArcGIS Enterprise versions 10.7 and earlier to support Drone2Map for ArcGIS 2.0
Summary
The steps provided describe how to configure Drone2Map for ArcGIS 2.0 with ArcGIS Enterprise version 10.7 and earlier.
Note:
This workflow is not necessary if using earlier versions of Drone2Map for ArcGIS, or when configuring Drone2Map for ArcGIS 2.0 with ArcGIS Enterprise 10.7.1 or higher. This content only applies to those configuring Drone2Map for ArcGIS 2.0 with ArcGIS Enterprise 10.7 and earlier.

If upgrading to a version prior to 10.7.1, these steps must be re-applied.  If upgrading to 10.7.1, there is no need to do anything further.
Procedure
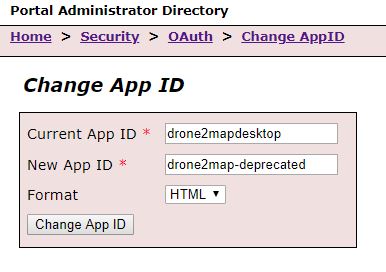
Rename the "drone2mapdesktop" application ID to "drone2map-deprecated", as follows.
- Log into the Portal Administrator Directory using administrative credentials. This can found by using a web browser to navigate to:
https://<insert your portal name>/<your portal context>/portaladmin
- In the Portal Administrator Directory, navigate to Security > OAuth > ChangeAppID.
- In the Current App ID text box, type drone2mapdesktop
- In the New App ID text box, type drone2map-deprecated
- Click Change App ID.
Create a new Application ID. This can be done in the portal website:
- Log into the portal website using administrative credentials. This can be found by using a web browser to navigate to:
https://<insert your portal name>/<your portal context>/home
- Navigate to the Content tab
- On the Content tab, click Add Item, and select the An Application option.
- A panel is displayed that asks for further information:
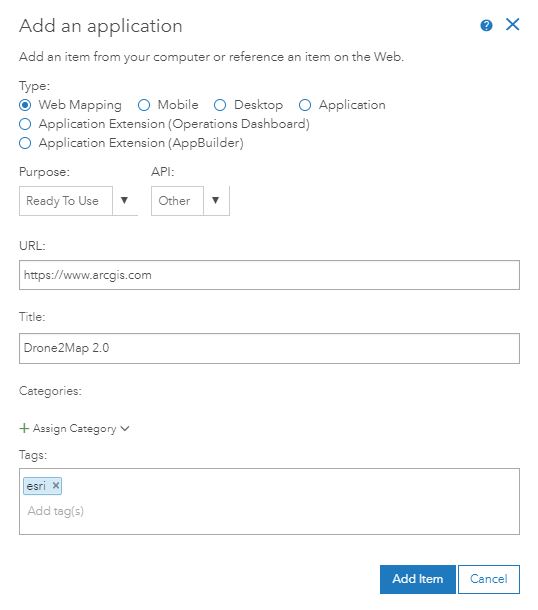
- Under Type, select Web Mapping.
- Under Purpose, select Ready To Use, (this is usually the default option).
- Under API, select Other.
- Under URL, enter "https://www.arcgis.com".
- The Title can have any name you choose. Esri recommends using an easily identifiable name such as "Drone2Map 2.0".
- Under Tags, type Esri.
- After entering the necessary information, click Add Item and proceed to the Item Details page for the newly-created application.
- In the Item Details page, click the Settings tab.
- Scroll to the bottom of the page, and click the Register button
- A panel is displayed that asks for more information:
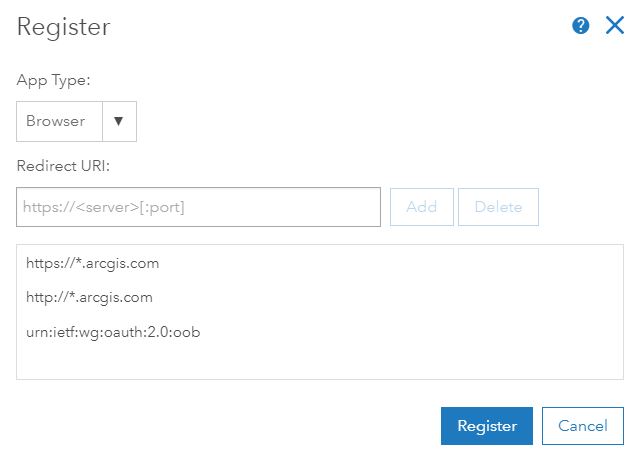
- For App Type, select Browser.
- Under Redirect URI, enter the following URLs:
- https://*.arcgis.com
- https://*.arcgis.com
- urn:ietf:wg:oauth:2.0:oob
- After entering this information, click the Register button. The App Registration information should now be populated with new information, including an App ID.
- Copy the App ID listed, as it will be needed for the next steps.
Register the newly-generated AppID in the Portal Administrator Directory
- Return to the Portal Administrator Directory, and log in using administrative credentials
- In the Portal Administrator Directory, navigate to Security > OAuth > ChangeAppID.
- In the Current App ID text box, paste the AppID, copied in step 10, above.
- In the New App ID text box, type: drone2mapdesktop
- Click Change App ID.
Article ID: 000021180
Software:
- Portal for ArcGIS
- ArcGIS Drone2Map 2 x
Get support with AI
Resolve your issue quickly with the Esri Support AI Chatbot.


Discover more on this topic
Search for related information
Find training related to this topic
Explore ideas and give feedback
Get help from ArcGIS experts
Start chatting now